This article was written by Jack Lloyd. Jack Lloyd is a Technology Writer and Editor for wikiHow. He has over two years of experience writing and editing technology-related articles. He is technology enthusiast and an English teacher.
The wikiHow Tech Team also followed the article's instructions and verified that they work.
This article has been viewed 6,295,614 times.
This wikiHow teaches you how to replace your computer's current operating system with Arch Linux, which is an advanced version of Linux. You can install Arch Linux on both Windows and Mac computers.
Steps
Part 1
Part 1 of 3:Booting into the Installer
-
1Back up your computer to an external hard drive. You'll be erasing your current operating system, so make sure that you have a backup of anything that you want to keep before continuing.
-
2Download the Arch installation image. Arch Linux can be downloaded in ISO format, from which point you can burn it onto a blank DVD in order to run the image on your computer. To download this image:
- Make sure that you have either BitTorrent or uTorrent installed.
- Go to https://www.archlinux.org/download/ in your browser.
- Click the Torrent link below the "BitTorrent" heading.
- Open the downloaded torrent in BitTorrent or uTorrent.
- Wait for the Arch Linux torrent file to finish downloading.
-
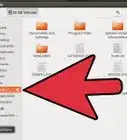
3Burn the image onto a blank DVD. Once your Arch Linux ISO file finishes downloading via your torrent client, you'll burn it onto a blank DVD using your computer's DVD drive. Once the burning is complete, leave the DVD in your computer.
- If your computer doesn't have a DVD drive, you'll need to buy an external DVD drive and attach it to your computer via USB cable.
-
4
-
5Press the key that allows you to change the boot order. On most newer computers, this is F12, though the exact key should be displayed on the screen during boot up. If there is no key to change boot order, press the BIOS Setup key (usually F1, F2, F10, or Del).
- Skip this step on a Mac.
-
6Select your installation drive as the primary boot drive. Set the drive (e.g., "DVD Drive" or "Disk Drive") that contains your Arch Linux DVD as the primary drive by selecting it and pressing the + key until it's at the top of the menu.
- Skip this step on a Mac.
- On some PCs, you may first have to open an "Advanced" tab or select a "Boot Options" section.
-
7Save and exit the "Boot Options" screen. You should see a key at the bottom or in the bottom-right corner of the screen that you can press to save and exit. After doing so, your computer will resume restarting.
- Skip this step on a Mac.
-
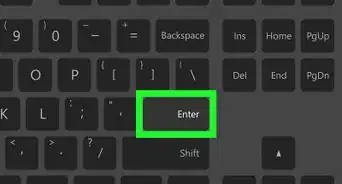
8Select Boot Arch Linux and press ↵ Enter. This will launch the Arch Linux installer, at which point you can proceed with partitioning your hard drive.


Part 2
Part 2 of 3:Creating Partitions
-
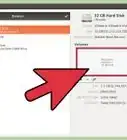
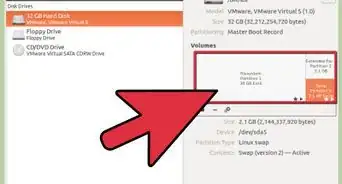
1Check your existing drives. You'll have at least two drives available: your computer's hard drive, and the Arch Linux installation media. To check your current drives:
- Type in fdisk -l and press ↵ Enter.
- Find the name of the largest hard drive on the results screen. The name will be something like "/dev/sda" and can be found to the right of the "Disk" heading.
-
2Bring up the partition page. Type in cfdisk [drive name], making sure to replace [drive name] with your hard drive's name, and press ↵ Enter, then select DOS and press ↵ Enter again.
- For example: if the drive is named "/dev/sda", you would type cfdisk /dev/sda into the terminal.
-
3Delete the hard drive's contents. Select a partition in the middle of the screen, select Delete at the bottom of the screen, press ↵ Enter, and repeat for any other partitions in the middle of the screen. You should ultimately be left with a line entitled Pri/Log Free Space.
-
4Create a "swap" partition. This partition will function as your system's backup memory if and when you are consuming all of your RAM. To do so:
- Select New and press ↵ Enter.
- Select Primary and press ↵ Enter.
- Type in a number of megabytes (e.g., 1024 for one gigabyte) and press ↵ Enter. As a rule of thumb, you should make the swap partition 2 or 3 times your RAM (e.g., if you have 4 gigabytes of RAM, you should make the swap partition 8192 or 12288 megabytes).
- Select End and press ↵ Enter.
-
5Create your main hard drive partition. This is the partition on which your Arch Linux operating system, files, and other information will be stored. To do this:
- Make sure that the Pri/Log Free Space partition is selected.
- Select New and press ↵ Enter.
- Select Primary and press ↵ Enter.
- Make sure that the number next to the "Size (in MB)" heading is correct.
- Press ↵ Enter.
- Select the primary partition again.
- Select Bootable and press ↵ Enter.
-
6Label the "swap" partition. This will set it as your system's RAM:
- Select the "swap" partition.
- Select Type and press ↵ Enter.
- Type in 82 and press ↵ Enter.
- With the "swap" partition still selected, select Write and press ↵ Enter.
- Type in yes and press ↵ Enter.
-
7Note the names of your partitions. In the "Name" column on the far-left side of the screen, you should see a name (e.g., "sda1") next to your "swap" partition, and a similar name (e.g., "sda2") next to the primary partition. You'll need both of these names in order to format your partitions.
-
8Exit the "cfdisk" utility. Select Quit and press ↵ Enter to do so.
-
9Format your primary partition. This will make it usable with your operating system. To do this, type in mkfs.ext4 /dev/[primary partition name] and press ↵ Enter.
- For a partition named "sda2", you'd enter mkfs.ext4 /dev/sda2 here.
-
10Mount the formatted partition. Type in mount /dev/[partition name] /mnt and press ↵ Enter. This will make the partition into a usable drive.
-
11Add a swap file to the "swap" partition. Type in mkswap /dev/[partition name] and press ↵ Enter, then type in swapon /dev/sda1 and press ↵ Enter again. After completing this step, you can proceed with installing Arch Linux.
- For a "swap" partition named "sda1", for example, you'd enter mkswap /dev/sda1 and then swapon /dev/sda1 here.


Part 3
Part 3 of 3:Installing
-
1Set up a Wi-Fi connection. If your computer is plugged into your router via ethernet, you can skip this step. Using ethernet is preferable to using Wi-Fi.[1]
- Type ip link and press ↵ Enter to determine the interface name of your network adapter.
- Type pacman -S iw wpa_supplicant and press ↵ Enter to install the necessary software.
- Type pacman -S dialog and press ↵ Enter to install the Wi-Fi menu.
- Type pacman -S wpa_actiond and press ↵ Enter to install the software that allows you to automatically connect to known networks.
- Type systemctl enable netctl-auto@interfacename.service to turn on the auto-connection service for your wireless adapter.
- Next time you reboot, type wifi-menu interfacename to access the wireless menu for your adapter. After you connect to the network for the first time, you will be automatically connected for subsequent boots. Do not enter this now, or you will lose access to your network.
-
2Install the base system. Type in pacstrap /mnt base base-devel and press ↵ Enter. The system will begin installing onto your computer.
- This process will usually take around 15-30 minutes depending on your Internet connection speed.
-
3Open "chroot" access. Type in arch-chroot /mnt and press ↵ Enter. This will allow you to change aspects of the root directory, including the password.
-
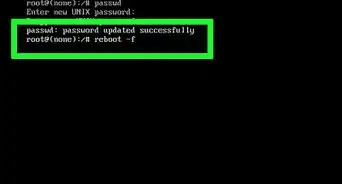
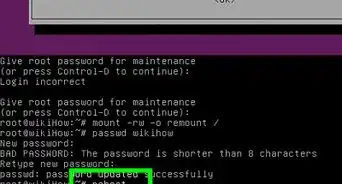
4Set a password. This is the password that you'll use to log into the root account. To do so:
- Type in passwd and press ↵ Enter.
- Type in a password and press ↵ Enter.
- Retype your password and press ↵ Enter.
-
5Set a language. To do so:
- Type in nano /etc/locale.gen and press ↵ Enter.
- Scroll down to select your preferred language.
- Select the letter directly in front of the "#" symbol behind your language and press Del.
- Delete the "#" symbol from any other versions of your language (e.g., all versions of "en_US").
- Press Ctrl+O (or ⌘ Command+O on a Mac), then press ↵ Enter.
- Exit by pressing Ctrl+X or ⌘ Command+X.
- Type in locale-gen and press ↵ Enter to finish setting up your language.
-
6Select a time zone. To do so:
- Type in cd usr/share/zoneinfo and press ↵ Enter.
- Type in ls and press ↵ Enter.
- Find your country or region, then type in cd usr/share/zoneinfo/country (e.g., America) and press ↵ Enter.
- Type in ls again and press ↵ Enter.
- Find your preferred time zone, then type in ln -s /usr/share/zoneinfo/country/timezone /etc/localtime and press ↵ Enter.
-
7Set a host name for your computer. To do so, type in echo name > /etc/hostname and press ↵ Enter.
- To name your computer "Panda", for example, you'd enter echo Panda > /etc/hostname here.
-
8Download the GRUB bootloader. This is the program that will install your Arch Linux for you. To do so:
- Type in pacman -S grub-bios and press ↵ Enter.
- Type in y and press ↵ Enter.
- Wait for GRUB to finish downloading.
-
9Install GRUB. Make sure that when you do this, you install it on your actual hard drive (e.g., "sda"), not the partition (e.g., "sda1"). To install GRUB:
- Type in grub-install /dev/drive name (e.g., grub-install /dev/sda and press ↵ Enter.
-
10Create an "init" file. This file stores information about your computer's hardware, making it available for utilization by Linux. To do so, type in mkinitcpio -p linux and press ↵ Enter.
-
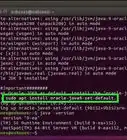
11Create a configuration file for GRUB. To do so, type in grub-mkconfig -o /boot/grub/grub.cfg and press ↵ Enter.
-
12Create an "fstab" file. Type in genfstab /mnt >> /mnt/etc/fstab and press ↵ Enter. Doing so allows Arch Linux to identify your partition's file systems.
-
13Reboot your computer. To do so, type in umount /mnt and press ↵ Enter, type in reboot, press ↵ Enter, remove your installation media, and wait for your system to finish rebooting.
-
14Log into your account. Type root into the "login" field and press ↵ Enter, then type your password in and press ↵ Enter. You have successfully installed and opened Arch Linux on your computer.
- If you want to install a graphical user interface (GUI) that allows you to use the mouse, try installing GNOME on your computer.


Community Q&A
-
QuestionWhen booting from USB, Arch does a kernel panic when I try to boot as a UEFI, but I can boot as legacy. The system boots Windows as a UEFI. I want to dual boot the system. How should I partition the disk?
 Community AnswerThe Legacy/UEFI problem has nothing to do with how you partitioned the disk. If it works in legacy mode, then double check your bios settings. Set Boot Mode to EFI. Disable Secure Boot. Check if your stick actually has an EFI folder. If not, try a greater update of Arch and/or of the software you use to put Arch on the stick.
 -
QuestionI had to exit out of chroot in order to follow step 12. Is there a reason for this?
 Community AnswerThe answer is twofold. While you're chrooted into the Arch partition, you're effectively using the system. The system as you currently have it does not have the command genfstab in it, and therefore cannot use it. The path that the tutorial uses, /mnt/etc/fstab, is only valid when you are not chrooted into the system. Remember that when you chroot, you chroot into /mnt, and therefore effectively make that the root (/) directory. Thus, if you tried to use the same command, you'd pretty much be saying "put the fstab file in /mnt/mnt/etc/fstab" when there is no such directory.
 -
QuestionWhat do I do if I have an error when installing?Community AnswerDownload the ISO again, and maybe try a different USB or DVD drive.
Warnings
- Ensure that you pick a root password that is both memorable and secure. If you forget it, you will not be able to properly administer your system.Thanks!
References
About This Article
1. Back up your PC to an external drive.
2. Download the installation image from archlinux.com/download.
3. Burn the image to a DVD.
4. Restart the computer.
5. Boot from the DVD.
6. Select Boot Arch Linux and press Enter.
7. Create main and swap partitions.
8. Use ″pacstrap /mnt base base-devel″ to install.