This article was written by Nicole Levine, MFA. Nicole Levine is a Technology Writer and Editor for wikiHow. She has more than 20 years of experience creating technical documentation and leading support teams at major web hosting and software companies. Nicole also holds an MFA in Creative Writing from Portland State University and teaches composition, fiction-writing, and zine-making at various institutions.
This article has been viewed 134,893 times.
This wikiHow teaches you how to enable USB booting on a Chromebook. This setting is only available after enabling Developer Mode--a step that will erase all of the data on your Chromebook.
Steps
Part 1
Part 1 of 2:Enabling Developer Mode
-
1Back up the data on your Chromebook. Enabling Developer Mode will erase all of the data on your Chromebook, as well as any customization changes you’ve made.[1]
-
2Turn off your Chromebook. To do this, click your account photo in the menu, select Power.Advertisement
-
3Press Esc+F3, and the Power button simultaneously. The Chromebook will turn on and ask you to insert recovery media.[2]
- Some models may require you to insert a paperclip or other slim object into a tiny hole on the side of the unit while pressing the Power button. If you see a small hole on the side marked "Recovery," try that instead.
-
4Press Ctrl+D on the ″Insert recovery media″ screen. A confirmation message will appear.
-
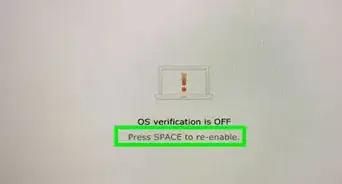
5Press ↵ Enter to confirm. The Chromebook will reboot. Once the conversion is complete, you’ll see a message that says ″OS verification is OFF.″ You’ll now see this screen every time you boot up the Chromebook.
-
6Press Ctrl+D on the ″OS verification″ screen. Your Chromebook is now in Developer Mode.Advertisement


Part 2
Part 2 of 2:Enabling USB Booting
-
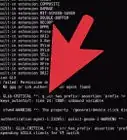
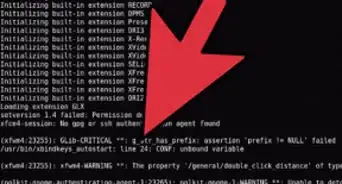
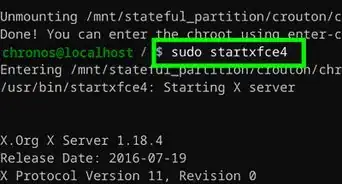
1Press Ctrl+Alt+F2 on the home screen. This opens a console window, which is a black screen with white text.[3]
-
2Type sudo crossystem dev_boot_usb=1 at the prompt.
-
3Press ↵ Enter. This runs the command.
-
4Insert the USB drive you want to boot from. Now that you’ve enabled USB booting, you can reboot from the drive from the console window.
-
5Press Ctrl+U on the ″OS verification″ screen. The Chromebook will now reboot from the connected drive.Advertisement


Community Q&A
-
QuestionDoesn't that wipe the Chromebook?
 Community AnswerIt is possible to do a clean install of the Chrome operating system using Chromebook Recovery Utility, available in the Chrome Web Store.


References
About This Article

1. Back up your Chromebook.
2. Power it off.
3. Boot into recovery mode.
4. Press Ctrl + D and press Enter.
5. Press Ctrl + D to log in.
6. Open the console.
7. Type "sudo crossystem dev_boot_usb=1" and press Enter.
8. Insert the drive and press Ctrl + U.