X
wikiHow is a “wiki,” similar to Wikipedia, which means that many of our articles are co-written by multiple authors. To create this article, 20 people, some anonymous, worked to edit and improve it over time.
This article has been viewed 142,729 times.
Learn more...
You can adjust virtual memory to help increase your performance if your computer is running too many programs at once. You can adjust virtual memory in either a PC, Mac or a Linux-based computer. This guide will give you quick steps for adjusting virtual memory and increasing your computer's performance.
Steps
Method 1
Method 1 of 3:Adjusting Microsoft Windows OS (XP, Vista and 7)
Method 1
-
1Click on the Start Menu in Windows XP. Select Control Panel. Select System from the Control Panel. Click the Performance button in the System menu.
-
2Choose the Advanced settings tab. Click the Change button in the Virtual Memory section.
-
3Decide the amount of disk space you would like to allocate to the paging file. Windows XP recommends that you allocate 1.5 times your physical RAM. So, if you have 2 GB of RAM, your maximum paging file should be 3,000 MBs.
-
4Click the Start Menu in Windows Vista. Go to the Control Panel and select System Maintenance. From there, select System.
-
5Select Advanced System Settings in the left navigation panel. Choose the Advanced Tab. Click the Change button in the Virtual Memory section.
- Select whether you want the system to control the paging file size, or you can choose to customize your settings. Windows' recommended settings for your system will appear at the bottom of the dialog window.
-
6Click the Start Menu button in Windows 7. Right-click on Computer and choose Properties. Click on Advanced System Settings in the left menu.
-
7Click the Settings button in the Performance section of the System Properties dialog window. Click the Advanced tab in the Performance Options dialog window. Click on the Change button in the Virtual Memory section.
- Choose whether you want the system to automatically manage the paging file size or if you want to customize the settings yourself. The Windows recommended settings will appear at the bottom of this dialog window.


Method 2
Method 2 of 3:Adjusting Mac OS X
Method 2
-
1Open the Terminal program. You'll find it in the Utilities folder under the Applications folder.
-
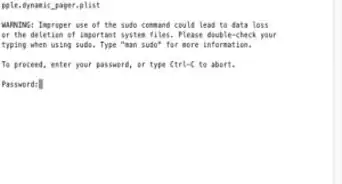
2To turn off the swap file, type this command into the Terminal window: sudo launchctl unload -w /System/Library/LaunchDaemons/com.apple.dynamic_pager.plist
-
3To re-activate the swap, Type this command in the terminal window: sudo launchctl load -w /System/Library/LaunchDaemons/com.apple.dynamic_pager.plistChoose the hard drive that will serve your virtual memory file. Up and down arrows will appear that will allow you to adjust the amount of virtual memory as either more or less.


Method 3
Method 3 of 3:Adjusting Linux OS
Method 3
-
1Backup any data that you want to keep-resizing partitions can cause data losss/corruption. Boot from live cd-it needs to have gparted on it. It should detect that you have linux installed and will use the swap space.
-
2Open gparted and click on your swap partition (right click) press swap off. This dismounts swap so you can increase the size of it.
-
3Shrink a partition next to it by the same size that you want to increase your swap partition by. So let's assume you have 4gb ram and 4gb swap. You need an 8gb swap. So you should reduce the partition next to swap by 4gb. The unallocated (greyed out) space should be next to the partition. (This may be done by booting through CD ROM and un-mounting the partitions). Now click on the partition (the bar at the top of gparted) and select resize. Include your unallocated space. click swapon-restart.
-
4Enjoy having more swap.


Warnings
- Always have backups-not just when you are changing the system.Thanks!
- Do not delete the swap partition — it is harder to create a new one so that everything works.Thanks!