X
This article was co-authored by wikiHow Staff. Our trained team of editors and researchers validate articles for accuracy and comprehensiveness. wikiHow's Content Management Team carefully monitors the work from our editorial staff to ensure that each article is backed by trusted research and meets our high quality standards.
This article has been viewed 24,628 times.
Learn more...
Is the text in your presentation too bland and boring? OpenOffice.org uses Fontwork to create graphical text objects (it makes a graphic out of your chosen text). This wikiHow article will teach you how to use Fontwork to make your text projects more visually dynamic.
Steps
Method 1
Method 1 of 2:Creating a Fontwork Object
Method 1
-
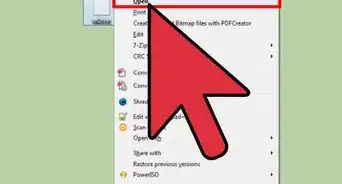
1Open your project in Open Office. With the program open, go to File > Open or right-click your project file in your file manager (File Explorer for Windows and Finder for Mac), then click Open with > Apache Open Office.
- If you don't have Open Office installed on your computer, you can download it from http://www.openoffice.org/download/ for free.
-
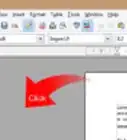
2Open the Fontwork Gallery. You can do this by clicking the hanging picture icon with "A" inside it. If the Drawing toolbar is not visible, make it visible by going to View > Toolbars > Fontwork.
-
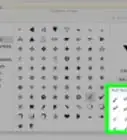
3Select a Fontwork style and click OK. The Fontwork object will appear in your document.
-
4Click outside the Fontwork or press Esc to apply your changes. If you want to edit the Fontwork, double-click it.[1]


Method 2
Method 2 of 2:Editing a Fontwork Object
Method 2
-
1Make sure that the Fontwork toolbar is visible. If you do not see it, go to View > Toolbars > Fontwork.
- Double-click a Fontwork in your project to edit it.
-
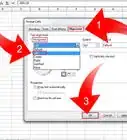
2Change the Fontwork Shape. This icon looks like an "A" on a slope and it edits the shape of the selected object. When you click the Fontwork Shape icon, a menu of more shapes that you can use will drop down.
-
3Edit the Fontwork Same Letter Heights. This icon looks like "Aa" with a line on top of the two letters and it changes the height of characters in the object. It toggles between normal height (where some characters are taller than others, for example, capital letters D, H, and L are taller than p, m, and c) and forcing all letters to the same height.
-
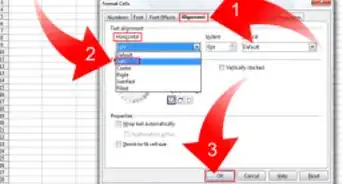
4Change the Fontwork Alignment. This icon looks like multiple lines in a list and it changes the alignment of characters. Your choices are left align, center, right-align, word justify, and stretch justify. The effects of the text alignment can only be seen if the text spans over two or more lines. In the stretch justify mode, all the lines are filled completely.
-
5Edit the Fontwork Character Spacing. This icon looks like an "A/V" with an arrow underneath the letters and it changes the character spacing (kerning) in the object. For custom spacing, input a percentage value: 100% is normal spacing; less than 100% is tight spacing; more than 100% is expanded spacing.
-
6Use the Formatting toolbar. With this tool, you can go further and customize the Fontwork object with several more attributes.
- The options and icons shown here will vary depending on the version of Open Office you're using.[2]
- You can change the lines in your Fontwork as well as the coloring, gradient, and fill color.
-
7Move or resize the Fontwork. When you select a Fontwork object, eight blue squares (known as handles) appear around the edge of the object. You can drag these handles to resize the object.
- A yellow dot also appears on the object. This dot may be along an edge of the object, or it may be somewhere else. If you hover the pointer over this yellow dot, the pointer turns into a hand symbol. You can drag the dot in different directions to distort the object.


References
About This Article

wikiHow Staff
wikiHow Staff Writer
This article was co-authored by wikiHow Staff. Our trained team of editors and researchers validate articles for accuracy and comprehensiveness. wikiHow's Content Management Team carefully monitors the work from our editorial staff to ensure that each article is backed by trusted research and meets our high quality standards. This article has been viewed 24,628 times.
How helpful is this?
Co-authors: 11
Updated: November 8, 2021
Views: 24,628
Categories: Office