This article was written by Nicole Levine, MFA. Nicole Levine is a Technology Writer and Editor for wikiHow. She has more than 20 years of experience creating technical documentation and leading support teams at major web hosting and software companies. Nicole also holds an MFA in Creative Writing from Portland State University and teaches composition, fiction-writing, and zine-making at various institutions.
Adobe Photoshop has many customization options, including the option to organize its panels, menus, and tools in your preferred manner. Once you find a layout that works for you, you can save it as a workspace and easily select it from the Window menu. This wikiHow teaches you how to save a custom workspace in Adobe Photoshop.
Steps
-
1Click the Window menu. Once you've arranged your workspace how you like it, click this menu at the top of the screen.
-
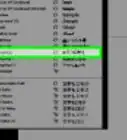
2Click Workspace on the menu. Another menu will expand.
- This is also where you'll find all of your workspaces, including those you save.
-
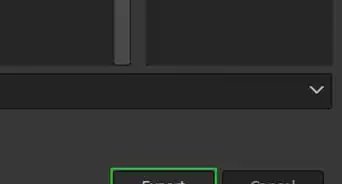
3Click New Workspace. A dialog box will appear.
-
4Enter a name for the workspace. This is how your saved workspace will appear in the list of workspaces.
-
5Select your capture preferences. The three options at the bottom are optional, but are helpful if you've made other customizations:
- Keyboard Shortcuts saves the keyboard shortcuts you've set for this session.[1]
- Menus saves any menu customizations you've made.
- Tools saves all of the tool settings in their current states.
-
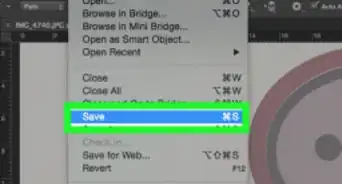
6Click Save. The next time you open Photoshop, you can select the saved workspace by clicking the Window menu, selecting Workspace, and then clicking the workspace name.
- You can also click the Workspace Switcher icon, which is in the upper-right corner of Photoshop—the icon looks like a square with a menu on its left side.
- The last workspace you use is the one that will automatically load the next time you open Photoshop. So if you close Photoshop with your new workspace selected, re-opening Photoshop will automatically load that workspace.
-
7Restore the original workspace. If you want to switch back to the regular Photoshop workspace at any point, here's how:
- Click the Window menu and select Workspace.
- Click Essentials. This restore the default workspace, although there's one more step you'll need to take to bring back the original panel layouts.
- Return to Window and select Workspace.
- Click Restore Essentials. Now you're back to the original workspace.


-Step-9.webp)


About This Article

1. Click the Window menu.
2. Click Workspace.
3. Click New Workspace.
4. Enter a name.
5. Select capture preferences.
6. Click Save.