This article was co-authored by wikiHow Staff. Our trained team of editors and researchers validate articles for accuracy and comprehensiveness. wikiHow's Content Management Team carefully monitors the work from our editorial staff to ensure that each article is backed by trusted research and meets our high quality standards.
The wikiHow Video Team also followed the article's instructions and verified that they work.
This article has been viewed 2,401 times.
Learn more...
Ktbl stands for "knit through the back loop" in knitting patterns. Knitting through the back loop is similar to the standard knit stitch, except you insert the needle into a different part of the stitch. The result will be a twisted stitch. You can use it to close eyelets, some decreases require the technique, and many fancy knitting stitch patterns as well. The stitch is easy to learn, so you can master it even if you are brand new to knitting!
Steps
Part 1
Part 1 of 2:Casting On
-
1Make a slip knot. Loop the yarn around your finger twice and then pull the first loop over the second loop. Tighten the knot at the base of the loop by pulling on the tail of the yarn. Slide the loop onto the left-hand needle and pull the tail end of the yarn to tighten it.
-
2Cast on. Loop the yarn over the left-hand needle and insert the right-hand needle through the loop. Loop the yarn over the needle again and pull this new loop through the first one. Let the new loop slide off onto the right-hand needle. Repeat this process until you have the desired number of stitches.[1]Advertisement
-
3Position your hands. Transfer the needle with all of the cast-on stitches on it to your left hand and hold the empty needle in your right hand. For knitting with straight needles, you will be working the stitches from one needle to the other as you knit.
- If you are knitting in the round, then you will be working your stitches in a circle, either on double-pointed needles or circular needles. This means that there will not be an empty needle in the beginning, but you will still be working the stitches from the left needle onto the right needle.
-
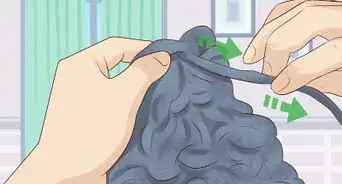
4Make sure the yarn is in the back of your work. The front of the work is the side that is facing you. The working yarn—the yarn extending from the ball of yarn—should be behind the stitches. This is important to ensure that your stitches turn out right.
- If you are working on double-pointed needles or circular needles, then the working yarn should be on the inner part of the circle.
Advertisement


Part 2
Part 2 of 2:Working the Stitch
-
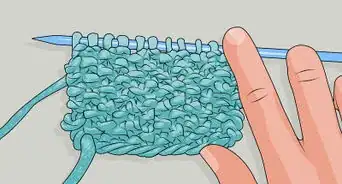
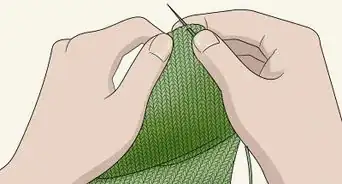
1Insert the right-hand needle through the back of the first loop. In standard knitting, you insert the needle through the front of the loop. To knit through the back loop, insert the tip of the right-hand needle through the back of the first loop on the left-hand needle. Go into the stitch from your right side until about 0.5 inches (1.3 cm) of the needle is coming through the other side of the stitch.[2]
- If your knitting instructions ever call for a K2 together tbl, then you would insert the needle through the first 2 stitches in the same fashion.
-
2Yarn over the needle. Take the working yarn that is extending from the back of your work and loop it over the right-hand needle tip that is going through the stitch. Bring the yarn up and over the needle going from the back to the front of your work, but do not bring the yarn over the front of the stitches.[3]
-
3Pull the yarn through the loop. The yarn over creates a loop on the right-hand needle, which will form the first new stitch. Pull the working yarn taut with your left hand and hold it. Then, bring the needle back through the stitch with the new loop still on it.[4]
-
4Slide the old stitch off the left needle. As you pull the new loop through the stitch, let the old stitch slide off of the left hand needle. The new loop on the right hand needle replaces it and this completes your first Ktbl stitch.[5]
- Make sure to keep the yarn taut as one stitch replaces the other.
-
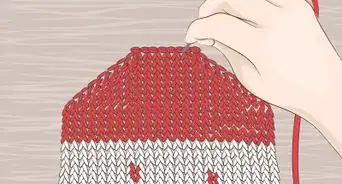
5Continue to the end of the row or round. Work the rest of the Ktbl stitches in the row or round in the same fashion. This will complete the first row.
-
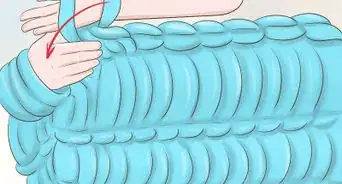
6Purl the next row. After you complete the first row, turn your work around and do a purl row. Purling is just the opposite of knitting with the working yarn in front of the stitches and the right-hand needle going into the stitches from the front. Purl all of the stitches in this next row, unless your pattern says to do otherwise.[6]
- If you are working in the round, then you will not need to do a purl row. This is because you will never have to knit on the backside of the stitches. You will always be working them from the front.
-
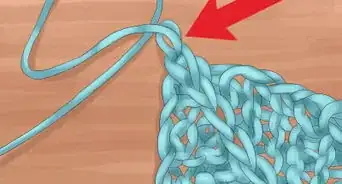
7Repeat the process until your project is complete. When you have achieved the desired length, cast off your stitches to complete the project. Then, tie off the final stitch by pulling the final loop through and tying it in a knot around the end stitch. Cut the excess yarn, and you are finished!Advertisement
Things You'll Need
- Yarn
- A pair of knitting needles (check the yarn label for a size recommendation)
- Scissors
References
- ↑ https://www.craftyarncouncil.com/instructions_kn.php3
- ↑ http://newstitchaday.com/k-tbl-knit-through-back-loop/
- ↑ http://newstitchaday.com/k-tbl-knit-through-back-loop/
- ↑ http://newstitchaday.com/k-tbl-knit-through-back-loop/
- ↑ http://newstitchaday.com/k-tbl-knit-through-back-loop/
- ↑ http://newstitchaday.com/k-tbl-knit-through-back-loop/
About This Article