X
This article was co-authored by wikiHow Staff. Our trained team of editors and researchers validate articles for accuracy and comprehensiveness. wikiHow's Content Management Team carefully monitors the work from our editorial staff to ensure that each article is backed by trusted research and meets our high quality standards.
This article has been viewed 238,237 times.
Learn more...
Installing the Java Development Kit (JDK) on your Mac will allow you to write and compile Java applications. Installation of the JDK is very straightforward, and includes a development environment called NetBeans. You'll be using NetBeans to write your code and compile it for testing.
Steps
Part 1
Part 1 of 2:Installing JDK
Part 1
-
1Visit the JDK download page. Open your web browser and visit oracle.com/downloads/index.html.
-
2Download the JDK installer. Once you're on the Downloads page, you'll need to navigate to the installer files:
- Click the "Java" option.
- Click "Java SE."
- Click the "Download" button next to "JDK 8 with NetBeans."
- Select "Accept License Agreement" and then click the download link for "Mac OS X" in the top section. This is the most recent release of the Java SDK with the NetBeans development environment.
-
3Double-click the downloaded installer. The installer is in .dmg format. Double-clicking it will open the installation interface.
-
4Follow the prompts to install the JDK. You'll be asked to enter your administrator password before installation can proceed.
-
5Delete the DMG file after installation (optional). This will help you save on disk space, since you don't need it after the JDK has been installed.[1]


Part 2
Part 2 of 2:Creating Your First Program
Part 2
-
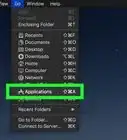
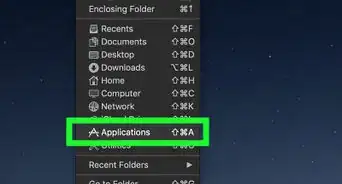
1Open NetBeans from the Applications folder. This is the development environment for Java, and will allow you to easily write and compile code.
-
2Click File and select "New Project." This will start a new project in NetBeans.
-
3Select the "Java" category and the "Java Application" project. This will set NetBeans to create Java files for this project.
-
4Give the project a name and click "Finish." For this example, call it "HelloWorld." This will open the code editor after the project is created.
-
5Find the "// TODO code application goes here" line. Your program code will go underneath this line.
-
6Enter your program code on a new line. Press ⏎ Return after the "// TODO code application goes here" line to create a new line with the same indentation. Type the following code:
System.out.println("Hello World!");
-
7Click the "Run Project" button. This looks like a green Play button, and can be found in the toolbar.
-
8Check the Output tab to see your project in action. This frame will appear at the bottom of your screen after running the project.
-
9Fix any errors. If the project doesn't have any errors, you'll see "Hello World!" and "BUILD SUCCESSFUL" in the Output tab. If there are errors, you'll see which lines they occur on so that you can go back and fix them.[2]
-
10Continue learning Java. Now that you have the JDK installed and working, you can continue learning to program in Java. See Write Your First Program in Java for more beginner guides.


Community Q&A
-
QuestionHow do I run a Java environment?
 Jacob FitzgeraldCommunity AnswerYou need to get an IDE if you plan to code on your computer (Mac). I recommend Eclipse. You should also download the JDK If you want to run a program; just get the JDK and you should be OK.
 -
QuestionI can't find the installer for mac OS X, and the only one I CAN find is 161, no 111. Why?
 Community AnswerGo to the JDK download page. Hit Cmd+F and type in 111. You will find the Mac download.


References
About This Article

wikiHow Staff
wikiHow Staff Writer
This article was co-authored by wikiHow Staff. Our trained team of editors and researchers validate articles for accuracy and comprehensiveness. wikiHow's Content Management Team carefully monitors the work from our editorial staff to ensure that each article is backed by trusted research and meets our high quality standards. This article has been viewed 238,237 times.
How helpful is this?
Co-authors: 7
Updated: August 9, 2019
Views: 238,237
Categories: Mac OS X | Install & Uninstall Software