wikiHow is a “wiki,” similar to Wikipedia, which means that many of our articles are co-written by multiple authors. To create this article, volunteer authors worked to edit and improve it over time.
The wikiHow Tech Team also followed the article's instructions and verified that they work.
This article has been viewed 22,151 times.
Learn more...
If you are running Mac OS X on your computer, and you want to manage your hard drive, external hard drive, or flash drive, you can OS X's native software, Disk Utility. However, Disk Utility can not only manage your hard drives and other forms of storage, it can also create disk images. A disk image can be used to store and encrypt files. In order to create disc images with Disk Utility, you should know the purpose of your disc image, choose the format for your disc image, and create it.
Steps
Part 1
Part 1 of 3:Knowing the Purpose of a Disc Image
-
1Secure your data. There are several purposes to making a disk image; securing your data is one reason. If you have sensitive information, then creating disk images with a level of encryption and then uploading that disk image to your flash drive is one way of protecting that information.
-
2Mount from your hard drive. Another advantage that you gain from creating disk images is that you can create a disk image for CDs or DVDs.
- In simple terms, you can mount the CD from an image stored on your hard drive. This way, you don't have to locate that disk again.
-Step-1.jpg)
-Step-2.jpg)
Part 2
Part 2 of 3:Choosing a Specific Format
-
1Open Disk Utility. Go to Applications and then click on the Utilities folder.
-
2Click on New Image.
-
3Manage the image. After you have clicked on New Image, a new option box will appear presenting you with the following:
- Volume Name—This is the name that will be given to your image when it is mounted.
- Volume Size—A new disk image will no doubt need to possess a specific size. You can either choose from a range of values, or you can enter a value of your own choice.
- Volume Format—If you need your disk image to be in a specific format, then you can change it; otherwise, it is highly recommended that you leave it at the default value.
- Encryption—You are given two options to choose from regarding encryption.
- Partitions—In this option, you can select whether you'd like to make a DVD/CD image, a regular image, or an image that can be booted by OS X.
- Image Format—It is recommended that you stick to the default value, unless you know what you are doing.
-Step-3.jpg)
-Step-4.jpg)
-Step-5.jpg)
Part 3
Part 3 of 3:Creating the Disk Image
-
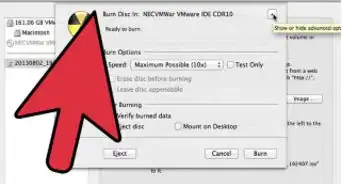
1Click on Create. After you have filled in the options and the values of your choice, then click on the Create button located at the bottom of the option box.
-
2Add files. After the process has been completed, the Disk Utility will automatically mount the new image on your OS X desktop, which will be ready to have files added to it.
-
3Eject the mounted image. When you have added whatever you want to add to the disk image, you can drag the mounted image to the trash, which will eject the mounted image.
- The disk image can now be moved between computers and transferred with ease.
-Step-6.jpg)
-Step-7.jpg)
-Step-8.jpg)
-Step-6.webp)