X
wikiHow is a “wiki,” similar to Wikipedia, which means that many of our articles are co-written by multiple authors. To create this article, volunteer authors worked to edit and improve it over time.
The wikiHow Tech Team also followed the article's instructions and verified that they work.
Learn more...
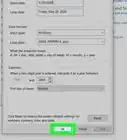
While it's normally best to allow your computer to automatically synchronize the date and time, there are some cases where you may want to manually change it. Changing the date and time is a simple process, but you will need to disable the automatic time synchronization. This wikiHow will teach you how to change the Date and Time on Windows 10.
Steps


Warnings
- Your browser may not work if the time is significantly different from the real time.Thanks!
- Setting your time to be more than a day or two off of the real time could cause security issues.Thanks!


-Step-17.webp)