This article was written by Nicole Levine, MFA. Nicole Levine is a Technology Writer and Editor for wikiHow. She has more than 20 years of experience creating technical documentation and leading support teams at major web hosting and software companies. Nicole also holds an MFA in Creative Writing from Portland State University and teaches composition, fiction-writing, and zine-making at various institutions.
The wikiHow Tech Team also followed the article's instructions and verified that they work.
This article has been viewed 1,796 times.
This wikiHow teaches you how to include a checklist in your Letgo ad on an Android phone or tablet.
Steps
-
1Open Letgo on your Android. It’s the red icon that says ″letgo″ in white cursive letters. You’ll usually find it on the home screen or in the app drawer.
-
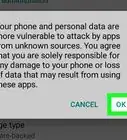
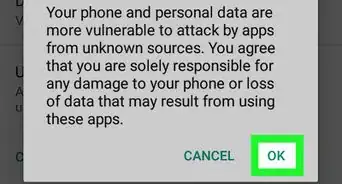
2Post your item for sale. If you’re new to Letgo, see this article to learn how to sell your first item.Advertisement
-
3Tap Add more details after creating the post. If you don’t see this option, tap the ≡ menu at the top-left corner of the screen, select My Profile, tap the item, then tap the pencil icon to open the editing screen.
-
4Tap the description box. This opens your Android’s keyboard.
-
5Tap the emoji key. The location varies by keyboard. Look for a key in the bottom row that has a smiley face.
- If you don’t see an emoji key, you may have to tap an arrow to view other keyboards.
-
6Tap the symbol emoji tab. Emoji are broken into categories, and the check mark is located in the section that contains emoji symbols.
- The emoji that represents the symbols tab varies by keyboard, but it’ll usually have a symbol (often a star/asterisk) or group of symbols on it.
-
7Scroll through the emoji and tap the check mark. There are several check mark options from which to choose. Tapping the check mark inserts it into the typing area.
-
8Return to the ABC keyboard and type your text. You can usually get back to the standard keyboard by tapping a key that says ABC.
-
9Tap the Enter key to go to the next line. This key is usually near the bottom-right corner of the keyboard and looks like a squared-off arrow.
-
10Insert another check mark. Now that you know how to find the check mark, you can add one to the beginning of each line to create a check list.
- Add as many lines beginning with check marks as you wish.
-
11Edit your ad as necessary and tap Save changes. Your item listing is now updated.Advertisement


About This Article

1.Open the item for editing.
2. Tap the description box.
3. Switch to the emoji keyboard.
4. Tap the "symbol" category of emoji.
5. Tap a check mark to insert it.
6. Switch back to the regular keyboard to add text.
7. Tap the Enter key.
8. Add additional lines and tap Save Changes.