This article was co-authored by wikiHow staff writer, Madeleine Criglow. Madeleine Criglow is a wikiHow Staff writer based in the Pacific Northwest. She has over six years of experience working in copywriting, editing, and journalism. In addition to her work for wikiHow, she writes a monthly film column for Tigard Life and Tualatin Life newspaper. Madeleine graduated from the University of Puget Sound with a BA in English with an emphasis in Creative Writing.
There are 12 references cited in this article, which can be found at the bottom of the page.
The wikiHow Video Team also followed the article's instructions and verified that they work.
This article has been viewed 10,021 times.
Learn more...
If you’d like to save some money in between trips to the barbershop, trimming your hairline can be a great means to do so. As convenient as it may be, though, cutting your own hair is pretty nerve-wracking! This article walks you through the process of trimming your hairline to achieve a stylish, even hairstyle. Think of it as your guide to avoid any glaring mistakes or being forced to wear a hat for the next couple of months!
Steps
Method 1
Method 1 of 8:Gather your materials.
-
1Find a pair of hair clippers, a razor, and a handheld mirror. Though you may be tempted to use beard trimmers, it’s important that you use clippers specifically meant to cut the hair atop your head for a tidy hairline. Use a razor to clean up the edges and get the closest shave. A handheld mirror may be the most important tool, as you need to use that in combination with your bathroom mirror to see the back of your neck and other tricky spots on your hairline.[1]Advertisement

Method 2
Method 2 of 8:Determine your hair’s natural hairline.
-
1Your hairline follows a specific pattern and direction. To find this, look for the line in which most of your hair grows. For example, find the hairline on your neck by standing with your handheld mirror in front of you with your bathroom mirror behind you. Look for the place in which your hair grows most densely and determine where that stops. It may not follow an exactly even line, but this pattern is your general guideline nonetheless.[2]
- Note any stray hairs below the hairline. These are what you will trim!

Method 3
Method 3 of 8:Use a number 2 clipper guard.
-
1A number 2 clipper guard is the best choice for beginners. It won't cut too harsh a line compared to something like a number 1 clipper guard. This is super important if you are new to cutting your own hair, as harsh lines can make mistakes more obvious and difficult to hide. A number 2 clipper guard's softer lines help you avoid making glaring mistakes and even disguises any slip-ups.[3]
- The setting is ultimately up to you and what hairstyle you're going for, but keep this advice in mind if you are new to trimming your hairline.
Advertisement

Method 4
Method 4 of 8:Trim the back of your neck.
-
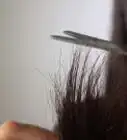
1Hold your handheld mirror in front of you with your bathroom mirror behind you. This will give you a view of the back of your neck! Next, hold the clippers upside down with your other hand. Gently push the blade up toward your hairline on the back of your neck, starting at the bottom of your neck where any stray hairs may be. Stop at your natural hairline so that you do not over trim.[4]
- To trim the other side of your neck, you may need to switch which hand is holding the clippers and which hand is holding the mirror. That way you're not reaching too far with your opposite hand!
- Repeat the process until you have trimmed all the excess hairs on the back of your neck and your back hairline is smooth and even.
Method 5
Method 5 of 8:Clean up the hair on your neck with a razor.
-
1The clippers probably won’t get all of the stray hairs on your neck. For a really clean cut, go over your neck again with your razor. Apply a layer of shaving cream to the back of your neck. Make sure the layer is thin enough so that you can still see your hairline! Hold your handheld mirror in front of you with the bathroom mirror behind you to get a good view. Next, hold the razor with the hand that is on the same side as the part of the neck you are shaving. Using steady, small strokes, shave any excess hair in the direction that it grows. This can help you avoid cuts and razor bumps.[5]
- Avoid shaving past your natural hairline!
Advertisement
Method 6
Method 6 of 8:Trim the sides of your hairline.
-
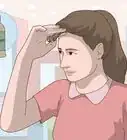
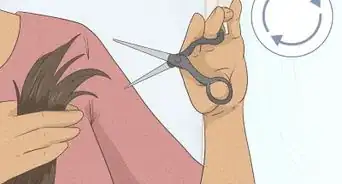
1Position yourself in front of your bathroom mirror. You won't need your handheld mirror for this step! Look for the natural hairline along the sides of your face. Take the clipper guard off of your clippers. Then, hold the straight blade of your clippers alongside your hairline. In other words, match up the straight blade of your clippers to the straight line of your hairline. Pushing toward that hairline, trim any stray hairs that fall out of the natural hairline to make it a straight line. This should tidy up any excess hair on your face![6]
- Avoid cutting past the natural hairline or shaping the hairline so that it is curved. For the most flattering haircut, you want a straight line at the sides of your hairline![7]
Method 7
Method 7 of 8:Trim around your ears.
-
1Use one of the corners of the bare clipper blade to trim the hair around your ears. Pull the top of your ear away from your head with one hand, holding your clippers in the other. Use the corner of the blade to trim your hairline, following the natural curve of your ear. Remove any excess hair growing over and behind your ears. This will give you an even hairline that looks neat and fresh![8]
- Using only the corner of the blade helps you reach difficult spots on your hairline. Use this trick behind the ears to avoid making a mistake![9]
Advertisement
Method 8
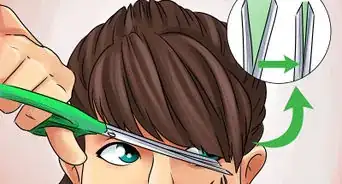
Method 8 of 8:Tidy up your forehead hairline.
-
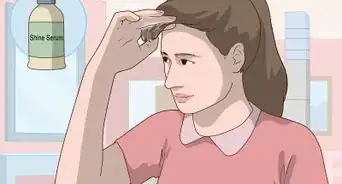
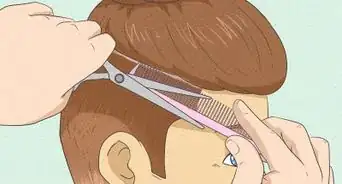
1Trim excess hair on your forehead if you are going for a buzzcut or extra short style. For the best results, use a number 3 clipper guard.[10] Facing the bathroom mirror, pull the hair on the front of your face back to find your natural hairline. Once you've determined your natural hairline, trim the excess hair on your forehead in the direction of hair growth. Consider making a guideline at the center or middle of your hairline to follow along as you trim both sides of your forehead hairline. Use small, even cuts to make the hairline as straight as possible. [11]
- Be very careful to avoid over-trimming when it comes to your forehead hairline! You don't want to cut past your natural hairline.[12]

References
- ↑ https://www.mensjournal.com/style/a-barbers-guide-to-cutting-mens-hair-at-home/
- ↑ https://youtu.be/5WvEshES5jw?t=61
- ↑ https://youtu.be/3ynWHFrg7iY?t=93
- ↑ https://youtu.be/5WvEshES5jw?t=125
- ↑ https://www.byrdie.com/how-to-shave-the-back-of-your-own-neck-2326481
- ↑ https://youtu.be/RljLJF38vZ4?t=22
- ↑ https://youtu.be/RljLJF38vZ4?t=20
- ↑ https://youtu.be/RljLJF38vZ4?t=36
- ↑ https://youtu.be/RljLJF38vZ4?t=7
About This Article