This article was written by Darlene Antonelli, MA. Darlene Antonelli is a Technology Writer and Editor for wikiHow. Darlene has experience teaching college courses, writing technology-related articles, and working hands-on in the technology field. She earned an MA in Writing from Rowan University in 2012 and wrote her thesis on online communities and the personalities curated in such communities.
Many modern Androids are shipped with Google Photos installed, but you can also manually install the app and use it to backup your photos if you want to transfer them to another Android. However, if you only want to share photos between Androids, you can use your phone's Nearby Share feature, which is only available to Android versions 6 and up. This wikiHow will teach you how to transfer photos between Androids by using Google Photos and Nearby Share.
Steps
Method 1
Method 1 of 2:Backing Up and Restoring with Google Photos
-
1Open Photos. This app icon looks like a yellow, red, blue, and green pinwheel that you'll find on one of your Home screens, in the app drawer, or by searching.
- If your Android doesn't have Google Photos, you can download it from the Google Play Store for free.
-
2Tap your profile picture. It's in the top right corner of your screen. If you don't have a profile picture, you'll see your initials instead.
-
3Tap Photos Settings. It's in the third or fourth grouping of menu options with "Your data in Google Photos."
-
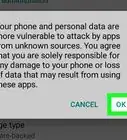
4Tap Backup & sync. This is usually the first option in the menu.
-
5
-
6Set up your new Android. If the Android is out-of-the-box new, continue through the on-screen prompts to set it up. If you're setting up a new phone, you'll be able to sign in to the Google account that backed up the photos from your original Android. In that case, once you sign in, you'll have successfully transferred photos between Androids and can skip the rest of this part.
-
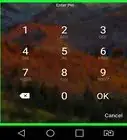
7Sign in to your Google account. Open Settings, then tap Google. Tap Sign in and sign in with the same Google account that you used on your original Android to back up your photos.[1]
- Once you have logged in, your photos will begin populating from your Google backup, which may take several minutes depending on the size and amount of photos you have.


Method 2
-
1Turn on Bluetooth. You can swipe down from the top of your screen to access the Quick Panel, where you'll see the Bluetooth icon. Tap it to enable it (make the color filled in instead of grey).
-
2Turn on Location. Swipe down from the top of your screen to access the Quick Panel and tap the location icon (it looks like a map pin). Tap it to enable Location (a filled-in color means that Location is on, while a grey icon means the feature is off).
-
3Enable Nearby Share. Go to Settings > Google > Devices & sharing > Nearby Share and make sure it's on.
-
4Open the photo you want to share. You'll find your photos gallery app on one of your Home screens, in the app drawer, or by searching. If you use the Google Photos app, the icon looks like a yellow, green, red, and blue pinwheel.
-
5
-
6Tap Nearby Share. It's towards the top of the menu. You may be prompted to turn on the feature if it isn't on.
-
7Tap your friend's device under "Looking for nearby devices." Their phone must also have turned on Nearby Share, Bluetooth, and location as well as be close to your phone.
- To accept the share, your friend must tap Accept on their phone.
-
8Tap Done. After you see the "Sent" message, you can close the sharing window.[2]


References
About This Article

1. Back up your photos with Google Photos.
2. Sign in to the same Google account on your new Android.