This article was co-authored by wikiHow Staff. Our trained team of editors and researchers validate articles for accuracy and comprehensiveness. wikiHow's Content Management Team carefully monitors the work from our editorial staff to ensure that each article is backed by trusted research and meets our high quality standards.
There are 11 references cited in this article, which can be found at the bottom of the page.
The wikiHow Video Team also followed the article's instructions and verified that they work.
This article has been viewed 3,515 times.
Learn more...
Sewing an elastic waistband is an easy way to finish a garment without having to resort to adding buttons and zippers. The easiest way is to create a fold-over casing. If you don't have enough fabric to work with for that, however, you'll have to make a separate casing instead. Alternatively, you can always sew an extra-wide elastic to the top of the garment, and make it part of the design.
Steps
Method 1
Method 1 of 3:Creating a Fold-Over Casing
-
1Add 2 1⁄2 inches (6.4 cm) to the top of your pattern, if needed. You will need 2 inches (5.1 cm) for the front and back of the casing, plus 1⁄2 inch (1.3 cm) for the seam. Double-check your pattern to find out what the seam allowance for the waist is, then adjust it as needed.[1]
- This method assumes that you'll be using a 1 in (2.5 cm) wide elastic. If your elastic is different, double its width, then add 1⁄2 inch (1.3 cm).
- This method is great if you're sewing a garment from scratch. If you already made the garment, then consider making a separate casing for it.
-
2Sew the garment according to the pattern, then turn it inside-out. For example, if you're sewing a skirt, sew the side edges together, then turn it inside-out. If you're making a pair of pants, sew the front and back center seams first, then the side seams.[2]
- If the material is woven, you should finish the seams with a serger or zigzag stitch. Garments made from knit materials, like jersey, don’t need to be finished.
- If your pattern requires any top stitching, then take care of that at this point.
-
3Fold the top edge down by 1⁄4 inch (0.64 cm) and press it with an iron. Working your way around the garment, fold and pin the raw, top edge of the garment by 1⁄4 inch (0.64 cm). Press the edge with an hot iron, then remove the pins.[3]
- Make sure that you're folding to the outside (wrong side) of the garment.
- How far apart you space the pins does not matter. You can insert them parallel or perpendicular to the edge of the fabric. The goal here is to keep the fabric down.
- Use a heat setting on the iron that is appropriate for the fabric. Read the label on your iron. In most cases, you'll use hot for cotton and warm for synthetics.
-
4Fold the top edge down by 1 1⁄4 inches (3.2 cm). This is assuming that you'll be using a 1 in (2.5 cm) wide elastic. If your elastic is a different width, then fold the top edge down by that width, plus 1⁄4 inch (0.64 cm). Make sure that you're folding to the outside of the garment (wrong side of the fabric).[4]
- For example, if your elastic measures 2 inches (5.1 cm), you'd fold it down by 2 1⁄4 inches (5.7 cm).
- You need the extra 1⁄4 inch (0.64 cm) for the stitching.
-
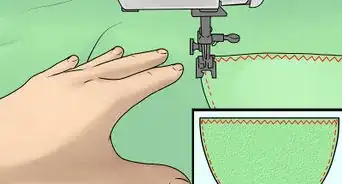
5Sew the hem with a straight stitch, leaving a 1 to 2 in (2.5 to 5.1 cm) gap. Try to sew as close to the bottom, folded edge as possible. A 1⁄8 in (0.32 cm) seam allowance would be ideal. Leave a 1 to 2 in (2.5 to 5.1 cm) gap between your first and last stitches.[5]
- You should use a straight stitch even for knit materials. The waistband should already be at its fullest width, so it won't be stretching any more.
- Backstitch when you start and finish sewing to keep the stitches from unraveling. This is simply where you reverse the sewing machine for a couple of stitches.
-
6Cut your elastic 1 inch (2.5 cm) longer than you want it. Figure out where you want the waistband to sit on your body, then wrap a 1 in (2.5 cm) wide elastic around that point. Pull the elastic as tight as you want it, add {convert|1|in|cm}}, then cut it.[6]
- Make sure that the elastic still has enough slack to it so that you can pull it over your hips.
- You need the extra 1 inch (2.5 cm) because you'll be overlapping and sewing the ends of the elastic.
-
7Use a safety pin to feed the elastic through the casing. Clip a safety pin to each end of the elastic. Pin 1 of the safety pins to the right side of the gap in the casing. Use the other safety pin to feed the elastic through the casing. Start on the right side of the gap, then finish by pulling it out on the left.[7]
- You don't have to use 2 safety pins, but pinning the end of the elastic in place will prevent it from slipping into the casing.
- Be careful not to twist the elastic as you pull it through the casing.
-
8Remove the safety pins, then overlap and sew the ends of the elastic. Unclip the safety pins first, the scrunch the garment along the elastic so that the ends are exposed. Overlap the ends by 1⁄2 inch (1.3 cm), then sew across them 3 to 4 times using a zigzag stitch.[8]
- Make sure that you sew across the width of the elastic from top-to-bottom and not side-to-side.
- The color of the thread you use here does not matter. It can be the same color as the skirt.
-
9Tuck the elastic into the gap, then sew the gap shut. Before you sew the gap, adjust the waistband so that the fabric lays smoothly. If you need to, pull on the waistband so that the fabric is smooth. Sew the gap shut using a straight stitch.[9]
- Try to match the original seam allowance as much as possible. It will help if you overlap the first and last stitches with the stitches to either side of the gap.


Method 2
Method 2 of 3:Making a Separate Casing
-
1Sew your garment, adding 1⁄2 inch (1.3 cm) to the top. If you already have completed garment, then you can skip this step; otherwise, add 1⁄2 inch (1.3 cm) to the top edge of the pattern pieces when you cut them out.[10]
- Be sure to sew the front, back, and side seams on your garment. This includes any serging, finishing, and top stitching as well.
- Turn the garment right-side out when you're done.
-
2Double your elastic's width, then add 1 inch (2.5 cm). This will give you the width for your casing. It will be enough to cover the front and back of the elastic, plus 1 inch (2.5 cm) for the seam allowances.[11]
- For example, if your elastic is 1 inch (2.5 cm) wide, your casing width would be 3 inches (7.6 cm) wide.
-
3Add 1 inch (2.5 cm) to the circumference of your waistband. Place a measuring tape across the top edge of your garment, then multiply the measurement by 2. Add 1 inch (2.5 cm). This will give you the length of your casing, including 1 in (2.5 cm) seam allowances.[12]
- You are placing the measuring tape across just the front of your garment, not around the circumference.
-
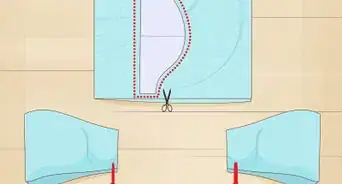
4Cut a strip of fabric according to your 2 length and width measurements. You can use the same color and pattern as the rest of your garment, or you can use something different. Try to use the same material, however.[13]
- For example, if you're adding a waistband to a blue cotton skirt, you could make the waistband out of white cotton.
- If your fabric is knitted, then the grain should be parallel to the narrow edges of the strip.
-
5Sew the narrow ends of the strip with a 1⁄2 inch (1.3 cm) seam. Fold the strip in half so that the right sides are touching and the narrow ends are aligned. Sew across the narrow ends using a straight stitch and a 1⁄2 inch (1.3 cm) seam allowance.[14]
- You should use a straight stitch even for knit materials. The fabric won't be stretching that way, anyway.
- Reverse the sewing machine for a few stitches when you start and finish sewing. This is also known as "backstitching."
-
6Press the seam open, then fold the top and bottom raw edges together. Use a hot iron to press open the side seam on your casing. Next, roll the raw, top edge down to meet the raw bottom edge. You should end up with a ring that has the right side of the fabric on the outside and inside.[15]
-
7Pin the casing to the outside of the garment so that the raw edges align. Turn the waistband so that the raw edge is facing up. Slide it onto the top edge of the garment so that the raw edges align. Make sure that the waistband is on the outside of the garment, then secure it with pins.[16]
- Try to align the side seam on the waistband with the back seam of the garment.
- If the garment doesn't have a back seam, then just center the waistband's seam in the back-center.
-
8Sew the waistband with a 1⁄2 in (1.3 cm) seam allowance and a small gap. The size of the gap will depend on the thickness of your elastic, but 1 to 2 inches (2.5 to 5.1 cm) should be plenty for most elastics. Be sure to backstitch when you start and finish sewing and to remove the pins as you sew.[17]
- Use a straight stitch. Your waistband is already stretched out to its fullest length here, so there's no need for a stretch stitch or a zigzag stitch.
-
9Cut the elastic 1 inch (2.5 cm) longer than you want it. Wrap your elastic around your waist. Pull it tight enough so that it feels comfortable, but loose enough so that you can still slide it over your hips. Add 1 inch (2.5 cm) for the seam, then cut it.[18]
-
10Insert the elastic into the casing. Clip a safety pin to each end of the elastic. Use 1 safety pin to secure 1 end of the elastic to the casing, and the other safety pin to pull the elastic through the casing. Remove both safety pins at the end.[19]
- You can't have to secure the end of the elastic to the casing if you don't want to; just be careful not to let it slip into the gap.
-
11Overlap the ends of the elastic, then sew them with a zigzag stitch. Scrunch the casing along the elastic so that the ends are exposed. Overlap the ends of the elastic by 1⁄2 inch (1.3 cm), making sure that it's not twisted. Sew 3 to 4 times across the elastic with a zigzag stitch.[20]
- Make sure that you sew top-to-bottom across the width of the elastic, not side-to-side.
- The color of the thread does not matter here. You can use the same color as you did for the waistband.


Method 3
Method 3 of 3:Sewing an Exposed Elastic Waistband
-
1Finish your garment according to your pattern, except for the waistband. Cut out your pattern pieces, then sew them together. If the side seams need any pressing, serging, or finishing, be sure to take care of that as well.[21]
- This method works the best for skirts and pajama bottoms.
- You will need about a 5⁄8 inch (1.6 cm) seam allowance along the top edge. Adjust the pattern as needed.
-
2Cut your desired elastic 1 inch (2.5 cm) shorter than your waist size. Wrap a measuring tape around your waist to find out your size. Subtract 1 inch (2.5 cm) and cut your elastic accordingly. The elastic will end up smaller than the garment’s waistband, which is a good thing.[22]
- If your elastic doesn’t have a lot of stretch to it, then cut it according to your waist size instead.
- Choose elastic that’s at least 2 inches (5.1 cm) wide and that coordinates nicely with your fabric. It will be visible and part of the garment's design.
-
3Sew the ends of the elastic using a 1⁄2 in (1.3 cm) seam allowance. Fold the elastic in half so that the narrow ends match up, then sew them together using a straight stitch and a 1⁄2 in (1.3 cm) seam allowance.[23]
- Backstitch when you start and finish sewing. Alternatively, sew up and down the seam 3 to 4 times for extra durability.
- If your elastic has a clear right and wrong side, make sure that you fold it with the right sides touching.
- Don’t overlap the ends of the elastic. You want to actually fold the elastic in half so that you can press the seam open later.
-
4Press the seam open with your finger or a cold iron. Turn the elastic ring so that the seam is on the outside. Press the seam open by pressing down on it with your finger or a cool iron. If you want to, you can tack them down with sewing pins.[24]
-
5Mark the back, front, and sides of the elastic with pins. Find the back-center, front-center, and sides of the elastic ring, then insert sewing pins into each point. This will help you align the elastic later.[25]
- Keep the pins perpendicular to the edges of the elastic.
- The back-center of the elastic is the seam you just sewed. You should still mark it with a sewing pin, however.
-
6Mark the front, back, and sides on the garment’s waist with sewing pins. You should still do this even if your garment has front, back, and side seams. In fact, you can use these seams as placement guides for the pins![26]
- Make sure that the garment is turned right-side-out.
- Keep the pins perpendicular to the edge of the waistband, not parallel.
-
7Pin the elastic inside the garment, using the existing pins as guides. Make sure that your garment is turned right-side-out, then tuck the elastic waistband inside so that the wrong sides touch. Make sure that the top edge of the elastic is sticking out of the garment by 1⁄8 to 1⁄4 inch (0.32 to 0.64 cm). Pin the elastic to the garment at the front, back, and sides.[27]
- Position the seam on the elastic on the back seam of the garment, if possible.
- The garment will be wider than the elastic, which is good. It will bunch up between the front, back, and side seams.
- You only need to insert 4 pins. Use the pins you inserted in the elastic and garment as guides.
-
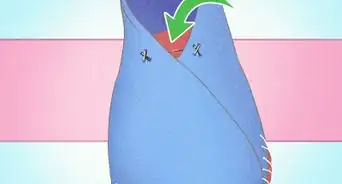
8Stretch and sew the elastic to the garment with a zigzag stitch. Use 1 hand to pull the elastic towards you, and your other hand to pull it away from you. Sew the elastic to the garment using a zigzag stitch. Try to keep the edge of the fabric aligned with the edge of the foot; this will create a seam allowance that’s around 5⁄8 inch (1.6 cm).[28]
- Be careful when sewing across the pins so that you don’t break your needle. You can remove them as you sew, but you may lose your placement.
- Backstitch when you start and finish sewing.
- This stitching will be visible. Match the thread color to the elastic or use a coordinating color instead.
-
9Flip the elastic up, then sew the bottom edge down with a zigzag stitch. Fold the elastic up so that it is fully visible and the bottom edge is overlapping the top of the garment. Sew the bottom of the elastic to the garment with a zigzag stitch, pulling the elastic taut as you go.[29]
- Remove any remaining pins as you sew and remember to backstitch.
- Sew as close to the bottom edge of the elastic without actually going past it.


Things You'll Need
Creating a Fold-Over Casing
- Partially-finished pants or skirt
- 1 in (2.5 cm) elastic
- Thread
- Fabric scissors
- Measuring tape
- Sewing machine
- Sewing pins
- Safety pins
Making a Separate Casing
- Partially-finished pants or skirt
- 1 in (2.5 cm) elastic
- Extra fabric
- Thread
- Fabric scissors
- Measuring tape
- Sewing machine
- Sewing pins
- Safety pins
Sewing an Exposed Elastic Waistband
- Partially-finished pants or skirt
- 2 in (5.1 cm) elastic
- Thread
- Fabric scissors
- Measuring tape
- Sewing machine
- Sewing pins
-Step-24-Version-5.webp)
References
- ↑ https://thesewingloftblog.com/elastic-waistband/
- ↑ https://thesewingloftblog.com/elastic-waistband/
- ↑ https://thesewingloftblog.com/elastic-waistband/
- ↑ https://thesewingloftblog.com/elastic-waistband/
- ↑ https://thesewingloftblog.com/elastic-waistband/
- ↑ https://thesewingloftblog.com/elastic-waistband/
- ↑ https://thesewingloftblog.com/elastic-waistband/
- ↑ https://thesewingloftblog.com/elastic-waistband/
- ↑ https://thesewingloftblog.com/elastic-waistband/
- ↑ https://www.fabric.com/blog/sewing-101-elastic-waistbands/
- ↑ https://www.fabric.com/blog/sewing-101-elastic-waistbands/
- ↑ https://www.fabric.com/blog/sewing-101-elastic-waistbands/
- ↑ https://www.fabric.com/blog/sewing-101-elastic-waistbands/
- ↑ https://www.fabric.com/blog/sewing-101-elastic-waistbands/
- ↑ https://www.fabric.com/blog/sewing-101-elastic-waistbands/
- ↑ https://www.fabric.com/blog/sewing-101-elastic-waistbands/
- ↑ https://www.fabric.com/blog/sewing-101-elastic-waistbands/
- ↑ https://www.fabric.com/blog/sewing-101-elastic-waistbands/
- ↑ https://www.fabric.com/blog/sewing-101-elastic-waistbands/
- ↑ https://www.fabric.com/blog/sewing-101-elastic-waistbands/
- ↑ https://www.youtube.com/watch?v=fO5bMrhCnRo&feature=youtu.be&t=43s
- ↑ https://www.youtube.com/watch?v=fO5bMrhCnRo&feature=youtu.be&t=56s
- ↑ https://www.youtube.com/watch?v=fO5bMrhCnRo&feature=youtu.be&t=1m3s
- ↑ https://www.youtube.com/watch?v=fO5bMrhCnRo&feature=youtu.be&t=1m25s
- ↑ https://www.youtube.com/watch?v=fO5bMrhCnRo&feature=youtu.be&t=1m33s
- ↑ https://www.youtube.com/watch?v=fO5bMrhCnRo&feature=youtu.be&t=1m51s
- ↑ https://www.youtube.com/watch?v=fO5bMrhCnRo&feature=youtu.be&t=2m12s
- ↑ https://www.youtube.com/watch?v=fO5bMrhCnRo&feature=youtu.be&t=3m48s
- ↑ https://www.youtube.com/watch?v=fO5bMrhCnRo&feature=youtu.be&t=4m54s
About This Article