X
wikiHow is a “wiki,” similar to Wikipedia, which means that many of our articles are co-written by multiple authors. To create this article, volunteer authors worked to edit and improve it over time.
The wikiHow Tech Team also followed the article's instructions and verified that they work.
This article has been viewed 21,953 times.
Learn more...
The cover photo on Facebook is the banner photo that appears at the top of your main profile page. This is a horizontally cropped photo and is much bigger that your profile picture. You can use a photo from your computer or device or a photo existing from your albums on Facebook.
Steps
Method 1
Method 1 of 6:Downloading the Cover Photo on a Browser
Method 1
-
1Go to Facebook. Visit Facebook’s home page from any web browser.
-
2Log in. Use your Facebook account and password to log in. The login fields are found on the upper right corner of the page. Click the “Log in” button to proceed.
-
3Go to your Timeline. Click your name on the header to reach your Timeline page.
-
4Click on the cover photo to view the full picture.
-
5Click Options.
-
6Click Download. The file will automatically download to your downloads folder.


Method 2
Method 2 of 6:Downloading on Facebook Mobile
Method 2
-
1Go to the Facebook application on your phone.
-
2Navigate to your profile. Tap the three horizontal lines, then tap View Your Profile.
-
3View your cover photo. Tap on your cover photo on your profile, then tap View Photo.
-
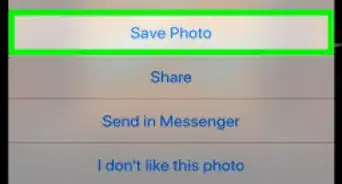
4Download the picture. On an Android, tap the three vertical dots in the upper right corner, then tap Save Photo. On an iPhone, tap and hold on the picture until a menu appears, then tap "Save Photo".


Method 3
Method 3 of 6:Uploading a Cover Photo on a Browser
Method 3
-
1Go to Facebook. Visit Facebook’s home page from any web browser.
-
2Log in. Use your Facebook account and password to log in. The login fields are found on the upper right corner of the page. Click the “Log in” button to proceed.
-
3Go to your Timeline. Click your name on the header to reach your Timeline page.
-
4Upload a cover photo. Hover over the camera icon on your cover (it’s on the upper left side) and click the “Upload photo” option that will appear. The file explorer window will open.
- Select the photo from your local computer that you want to be used as your new cover photo, and click on it. Click “Open” on the file explorer window, and the selected image file will be uploaded to Facebook as your new cover photo.
-
5Reposition the photo. Once uploaded, you can immediately see your new cover photo. You will be given an option to reposition your photo. Drag the photo to reposition it properly. Since the cover photo is horizontal, you have to ensure that the area covered can fit in the allocated cover photo box.
-
6Click the “Save Changes” button at the bottom right corner of the cover photo box. This will save the new cover photo you’ve uploaded. It will also be saved under your “Cover photos” album on Facebook.


Method 4
Method 4 of 6:Using an Existing Photo as Cover Photo on a Browser
Method 4
-
1Go to Facebook. Visit Facebook’s home page from any web browser.
-
2Log in. Use your Facebook account and password to log in. The login fields are found on the upper right corner of the page. Click the “Log in” button to proceed.
-
3Go to your Timeline. Click your name on the header to reach your Timeline page.
-
4Change the cover photo. Hover over the camera icon on your current cover photo and click the “Choose From My Photos” option. A window will appear containing your photos uploaded on Facebook.
- Browse through the photos and albums, and click on the one you’d like to use as your new cover photo.
-
5Reposition the photo. Once uploaded, you can immediately see your new cover photo. You will be given an option to reposition your photo. Drag the photo to reposition it properly. Since the cover photo is horizontal, you have to ensure that the area covered can fit in the allocated cover photo box.
-
6Click the “Save Changes” button at the bottom right corner of the cover photo box. This will save the new cover photo you’ve uploaded. It will also be saved under your “Cover photos” album on Facebook.


Method 5
Method 5 of 6:Uploading a Cover Photo on the Facebook Mobile App
Method 5
-
1Launch the Facebook app. Look for the Facebook app on your mobile device. It’s the one with the app icon with the Facebook logo. Tap on it to launch it.
-
2Log in. If you logged out of your previous Facebook session, you will be asked to log in. Enter your registered email address and password into the fields provided, and tap “Log in” to access your account.
-
3Go to your Timeline page. Tap your name on the header toolbar, and you will be brought to your Timeline screen. Your current cover photo is clearly displayed at the top part of the screen.
-
4Upload a new cover photo. Tap your current cover photo, and a short menu will appear. Tap on “Upload Photo,” and your mobile device’s media gallery or camera roll will be brought up.
- Tap the folder where the photo you want to be used as your new cover photo is located. Browse through your pictures, and tap the one you want to use to upload it.
-
5Reposition the photo. Once it’s uploaded, you can immediately preview your new cover photo. You will be given an option to reposition your photo. Tap and drag the photo to reposition it properly. Since the cover photo is horizontal, you have to ensure that the area covered can fit in the allocated cover photo box.
-
6Tap the “Save” button at the top right corner of the screen. This will save the new cover photo you’ve uploaded. It will also be saved under your “Cover photos” album on Facebook.


Method 6
Method 6 of 6:Using an Existing Photo as a Cover Photo on the Facebook Mobile App
Method 6
-
1Launch the Facebook app. Look for the Facebook app on your mobile device. It’s the one with the app icon with the Facebook logo. Tap on it to launch it.
-
2Log in. If you logged out of your previous Facebook session, you will be asked to log in. Enter your registered email address and password into the fields provided, and tap “Log in” to access your account.
-
3Go to your Timeline page. Tap your name on the header toolbar, and you will be brought to your Timeline screen. Your current cover photo is clearly displayed at the top part of the screen.
-
4Change the cover photo. Tap on your current cover photo, and a short menu will appear. Tap “Choose From Photos,” and a screen will appear containing your photos uploaded on Facebook. Browse through the photos and albums, and tap on the one you’d like to use as your new cover photo.
-
5Reposition the photo. Once it’s uploaded, you can immediately see your new cover photo. You will be given an option to reposition your photo. Tap and drag the photo to reposition it properly. Since the cover photo is horizontal, you have to ensure that the area covered can fit in the allocated cover photo box.
-
6Tap the “Save” button at the top right corner of the screen. This will save the new cover photo you’ve uploaded. It will also be saved under your “Cover photos” album on Facebook.