X
wikiHow is a “wiki,” similar to Wikipedia, which means that many of our articles are co-written by multiple authors. To create this article, volunteer authors worked to edit and improve it over time.
This article has been viewed 50,055 times.
Learn more...
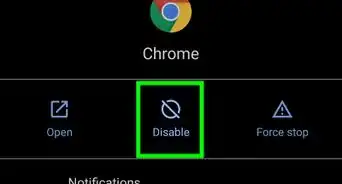
Rooting your Android device will allow you to customize its software, extend its battery life, boost its memory, and install apps exclusive to rooted devices. You can root your Android 2.3.6 Gingerbread device using Kingo for Windows, or using One Click Root software for Windows or Mac OS X.
Steps
Method 1
Method 1 of 3:Kingo
Method 1
-
1Navigate to Kingo's website at http://www.kingoapp.com/.
-
2Select the option to download the Kingo app to your Windows-based computer.
- If using Mac OS X, skip to method two of this article and root your Android using One Click Root software.
-
3Double-click on the Kingo installation file, and follow the on-screen prompts to install Kingo on your computer.
-
4Back up all personal data on your Android to Google's server, your computer, or to another cloud storage service. All personal data will be erased from your device during the rooting process.
-
5Tap on “Settings,” then tap on “About phone.”
-
6Tap repeatedly on “Build number” until a pop-up message informs you that you're now a developer.
-
7Tap on “Developer options,” then place a checkmark next to “USB debugging.” This is required to allow Kingo to root your Android.[1]
-
8Connect the Android device to your computer using a USB cable. Upon recognizing your device, Kingo will automatically search for and install the necessary updated drivers for your device.
-
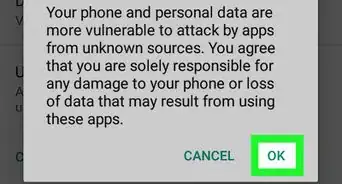
9Place a checkmark next to “Always allow from this computer” on your Android, then tap on “OK.”
-
10Click on “Root” in the Kingo app. Kingo will automatically root your device, which may take up to several minutes. Your Android will be rebooted several times throughout the rooting process.
-
11Click on “Finish” in Kingo when the app informs you rooting has been successful.
-
12Disconnect your Android from the computer, then restart your device. After your device reboots, the SuperSU app will display in the app tray, and your device will be officially rooted.[2]
-Step-1-Version-2.jpg)
-Step-2-Version-2.jpg)
-Step-3-Version-2.jpg)
-Step-4-Version-2.jpg)
-Step-5-Version-2.jpg)
-Step-6-Version-2.jpg)
-Step-7-Version-2.jpg)
-Step-8-Version-2.jpg)
-Step-9-Version-2.jpg)
-Step-10-Version-2.jpg)
-Step-11-Version-2.jpg)
-Step-12-Version-2.jpg)
Method 2
Method 2 of 3:One Click Root
Method 2
-
1Navigate to the One Click Root website at http://www.oneclickroot.com/.
-
2Select the option to download One Click Root to your computer.
-
3Double-click on the One Click Root installation file, and follow the on-screen prompts to install the application on your computer.
-
4Back up all personal data on your Android to Google's server, your computer, or to another cloud storage service. All personal data will be erased from your device during the rooting process.
-
5Tap on “Settings,” then tap on “About phone.”
-
6Tap repeatedly on “Build number” until a pop-up message displays on-screen informing you that you're now a developer.
-
7Tap on “Developer options,” then place a checkmark next to “USB debugging.” This is required to allow One Click Root to root your Android.
-
8Connect the Android device to your computer using a USB cable. Upon recognizing your device, One Click Root will automatically search for and install the necessary updated drivers for your device.
-
9Place a checkmark next to “Always allow from this computer” on your Android, then tap on “OK.”
-
10Click on “Root” in the One Click Root app. The application will automatically root your device, which may take up to several minutes. Your Android will be rebooted several times during the rooting process.
-
11Click on “Finish” in One Click Root when the app informs you rooting has been successful.
-
12Disconnect your Android from the computer, then restart your device. After your device reboots, the SuperSU app will display in the app tray, and your device will be officially rooted.[3]
-Step-13-Version-2.jpg)
-Step-14-Version-2.jpg)
-Step-15-Version-2.jpg)
-Step-16-Version-2.jpg)
-Step-17-Version-2.jpg)
-Step-18-Version-2.jpg)
-Step-19-Version-2.jpg)
-Step-20-Version-2.jpg)
-Step-21-Version-2.jpg)
-Step-22-Version-2.jpg)
-Step-23-Version-2.jpg)
-Step-24-Version-2.jpg)
Method 3
Method 3 of 3:Troubleshooting
Method 3
-
1Perform a hard reset on your Android if the device stops working after rooting is complete. Rooting is not guaranteed to work on every Android with 2.3.6 Gingerbread, and a hard reset will restore your device back to the original factory settings.
-
2Download and install the latest drivers for your Android from the manufacturer's website if the rooting process fails. While Kingo and One Click Root are designed to automatically find and install the latest device drivers, you may need to manually install drivers prior to rooting.[4]
-
3Follow these steps to unroot your Android device if you want SuperSU and all associated rooting software removed from your device. Unrooting your software will return your Android back to its original state, and may reinstate the manufacturer's warranty.
-
4Follow these steps to unbrick your Android if the device becomes bricked, or inoperable as a result of rooting. Rooting is not guaranteed to work on all Androids, but unbricking your device can help restore your device back to a working state.
-Step-25-Version-2.jpg)
-Step-26-Version-2.jpg)
-Step-27-Version-2.jpg)
-Step-28-Version-2.jpg)
Warnings
- Root your Android device at your own risk. Rooting your device will void the manufacturer's warranty, and could render your device inoperable if any mistakes are made during the rooting process.Thanks!