X
wikiHow is a “wiki,” similar to Wikipedia, which means that many of our articles are co-written by multiple authors. To create this article, 13 people, some anonymous, worked to edit and improve it over time.
This article has been viewed 101,972 times.
Learn more...
Replace the tail light on your Dodge Grand Caravan with new and efficient Dodge auto Taillight. Auto tail lights are important part of the vehicle's safety system, and fully operational tail lights are the law. There are lots of items in various types and designs to choose from like Dodge taillights so you will surely get the product that will suit your personal choice.
Steps

Method 1
Method 1 of 3:Remove the assembly
Method 1
-
1Open your tailgate.
-
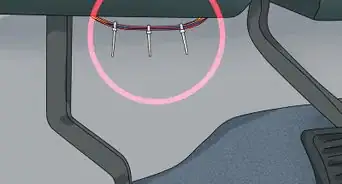
2Look for two (2) round flat black discs about the size of a dime (but thicker) on the inside of the body (between the red lens and the weather striping).[1]
-
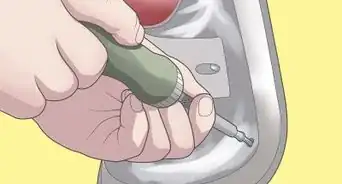
3Using a pair of pliers, pull out each of these two discs.[2]
- Note they are in tight and may require a fair bit of force to remove.
-
4Make sure the inner part of the disc also comes out. There are two parts to this system, a grommet and a plug:
- Push the plug backwards through the grommet.
- The grommet fits into the actual hole in the body, and is spread by the plug, the pressure holding them in place.
- Carefully remove both grommet and plug.
- The lens assembly will fall away from the vehicle when you pull out the second grommet so be careful.
- Push the plug backwards through the grommet.
-
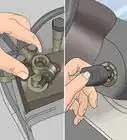
5Note the wiring harness that connects to a plug inside. Beside that plug are two holders for the actual lamps. It is not necessary to disconnect the wiring harness to replace only a lamp rather than the assembly. To disconnect the wiring harness slide red tab lock out and squeeze grey tab to disengage and separate connectors.
-
6Remove the holder by pressing the sides inwards and pulling. The light socket should come out.[3]
-
7Replace with the correct lamp (The 2004 Dodge Caravan uses a 3057 lamp that has metal rim and a flat plastic base with 2 wires running over it. Check your manual for your lamp.)
- Pull on the old lamp to remove it from the holder.
- Press the new lamp firmly into the holder.
-
8Replace lamp holder in the Taillight assembly. Make sure the plastic tab locks engage securely. Clean away any interfering dirt as required.[4]
-
9Reattach the vehicle wiring harness to the Taillight assembly if necessary.
- Wipe the outer shell of both connectors to remove dirt and grit. Check the vehicle harness connector tab and red lock for grit and clean as necessary.
- Position red connector lock disengaged - flat side pushed out, prongs pushed in.
- Press connector shells together slowly and firmly until grey tab engages. A faint click sound is usually audible.
- Press red connector lock tab in to engage tab lock.
-
10Replace Taillight assembly in vehicle.
- Guide Taillight forward into recess pushing vehicle wiring harness back into cavity behind fender. A trailer lighting harness, if present, is attached between the vehicle wiring harness and the Taillight assembly and should be positioned with the foam wrapped connector stack in the cavity behind the fender and the trailer lighting harness exiting the Taillight recess continuing downward behind the bumper cover.
- Engage Taillight assembly tab in vehicle recess.
- Gently press Taillight assembly into final position. Avoid wiggling assembly into position as this may break the mounting tab.
- Press both plastic retaining posts into Taillight assembly to lock it in place. If the posts were removed from the vehicle, place the outer grommet into the hole then put the post into the grommet and press it in until it engages the Taillight assembly.
-
11Check the light with the aide of an assistant:
- Press the brake pedal.
- Turn on the signal light.
- Turn on the running lights.
- Put the vehicle in reverse.
-
12Make sure it lights before replacing the lens assembly.


Method 2
Method 2 of 3:Troubleshoot and inspect
Method 2
-
1While you have the assembly removed is a good time to check for signs of failure, or potential future failure. It's also a good time to clean things up.
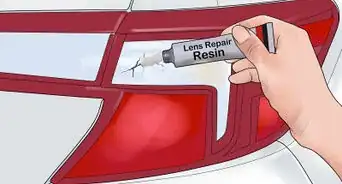
- Look for cracks and burns which can be a common sign of electrical problems. Replace any components that are too damaged to be used.
- Clean the reflectors and lenses.
- Use compressed gas, alcohol, soft rags or big Q-tips to clean heavy dirt accumulated on the auto tail lights.
- Use the utmost care to prevent scratches on the reflectors or accidentally removing the plastic's coating.
- Soapy water mixed with raw rice can be used to clean the Taillight cluster.
- After cleaning rinse with distilled water and allow to dry naturally for 24 hours.
- Repaint the reflectors with silver paint to repair scratched reflective coating
- Check for moisture. Moisture is one of the main causes of burned halogen auto tail lights. The trapped water vapor inside the light can cause it to explode or even burn out. Moisture inside the light usually indicates faulty seals and gaskets.
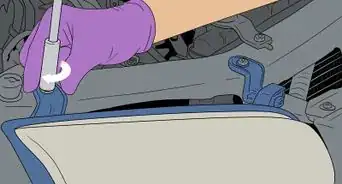
- Replace crumbling gaskets:
- Place a thin layer of silicon sealer in the seating groove.
- Mix in a little oil while the silicon is still soft.
- Allow this concoction to dry and get hard.
- Check the electrical connections that join the bulbs. For a better connection, the spring connections on the bulb base can be moved towards the bulb base to generate more pre-load against the bulb.


Method 3
Method 3 of 3:Replace the assembly
Method 3
-
1Slide the front edge of the assembly into the guide.
-
2Press the back end into place.
-
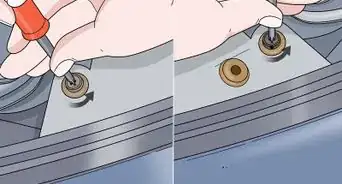
3Hold it in place and press the inner part of the grommet into the hole.
-
4Push the outer (central) part of the grommet into the inner part.
- This takes a fair bit of pressure, and you must make sure that the hole in the inner grommet lines up with the outer plug grommet.
-
5Check the lights and you're done.
Community Q&A
-
QuestionWhat if I break the tab while replacing a tail light?
 Community AnswerYou will have to replace the part the tab broke on. Tabs can be glued, but they will usually not last.
Warnings
- Give yourself plenty of time to begin and complete this job in a single session. The last thing you want is to lose a small component.Thanks!
- Disconnect the battery before working with electrical connections.[5]Thanks!
- Do not use acetone or other solvents to clean plastic parts.Thanks!