This article was co-authored by Emily Fazio. Emily Fazio is a Home Improvement and DIY Specialist and the author behind Merrypad, a home improvement and DIY lifestyle blog. Emily develops content for Discovery including HGTV.com and DIYNetwork.com, among other influential interior design and homesteading websites. Her partnerships include companies such as Legrand, Sherwin-Williams, Stihl, and Kohler. Emily studied at St. Bonaventure University.
This article has been viewed 175,167 times.
A door replacement is a fairly large project. If your door can simply be refinished or otherwise mended, try that first. This door was very badly scratched by the previous owners' dog and it had warped to the point where no weatherstripping could keep the kitchen cozy.
Steps
-
1Read and understand all the instructions before beginning. Don't forget to read the door manufacturer's included instructions, too. They may have details specific to your door. There will be moments when it's inconvenient to stop and read directions.
-
2Size up the job. Is there trim on both sides of the door, or will you need to patch plaster, drywall, or stucco when the door is replaced? Examine the door frame and notice anything about the floor, threshold, or other surroundings that may cause trouble. Pull up a piece
-
3Recruit an assistant or two. A door, especially an exterior door, is large and heavy, and you'll need somebody there to help lift it into place. You and your assistant will also help each other to shim the door and spot alignment on both sides at once. Also, one of you can hold something up while the other fastens it in place. Do not try this job alone.
-
4Choose a mild, dry day, if this is an exterior door. This project involves taking the door all the way out of its frame, meaning that you'll have a wide, door-sized hole for a period of time. If you have the choice, avoid extreme temperatures and rainy weather.
-
5Measure the door carefully and select the right door. A door is not something you will change often, so choose a classical styling and a sturdy design, especially for an exterior door. It is worth investigating the relative merits of steel, fiberglass, and wood and making an informed decision.
-
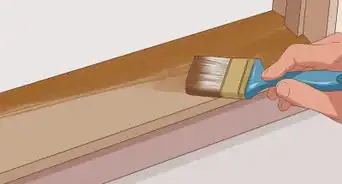
6Paint the door before installing it, if you wish.
-
7Gather all supplies. The moment with the door off or halfway up and the breezes blowing in is not the right time to stop and visit the hardware store.
-
8Clear a work area. You'll need enough space on either side of the door to lay the door down, plus space for tools and materials. Plan in advance to move furnishings, flower pots, and any other obstructions out of the way.
-
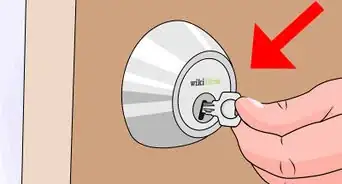
9Prepare the lockset, doorknob, and/or deadbolt. Rekey the lock, if you wish. Have it ready to go when the time comes to install it.
-
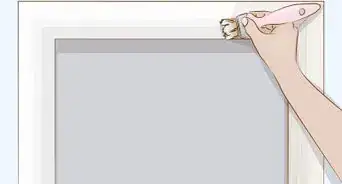
10Remove the trim from both sides of the old door, exposing the door frame. If you will reuse this trim, take care to remove it gently and get it off in one piece. You can fill in old nail holes with putty before you repaint. If you will replace the trim, you may wish to save the old trim until you have measured and cut the new trim to the same size.
-
11Separate the old door from its frame.
- Remove the old door from its hinges, then carefully lift it off. Exterior doors are heavy! Then, make sure the longest screws are out of the hinges on the jamb side. There are a few screws that just hold the hinges to the jamb, and there are others that go all the way through to the frame.
-
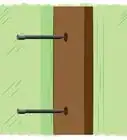
12Separate the old door jamb from the frame. Unless you can find and pull the nails (they were probably driven in and puttied over), use a reciprocating saw with a metal-cutting blade to cut right through the nails. The reciprocating saw can also cut through screws, but they are usually made from hardened metal, so it will take a long time.
-
13When it is loose, tip the jamb out of the frame and remove it. Remove the threshold if you are replacing it.
-
14Clean up the opening. Pull remaining nails or parts of nails, or pound them in, flush with the surface of the frame. Also remove any old insulation or caulk.
-
15Some exterior pre-hung doors come with brick molding already attached. Depending on the fit of the jamb to the frame, it may be necessary to remove this molding. Should this be necessary or desirable, place a small block of wood on the back side of the molding and tap lightly with hammer working around door until molding comes off.
-
16Look at the door jamb and determine if the hinge screws are sticking through, many times they will be. If they are, sand them flush with a belt sander or grinder.
-
17Look at doorknob cut-out and be sure that any device used to hold door aligned can be removed after installation. It is advisable to leave this in place if it can be removed after installation.
-
18Check very carefully for any nails going through the jamb into the door, and pull them out. Many door manufacturers use this technique to hold door secure during shipping.
-
19Pull any staples, shipping materials, etc. out.
-
20Test fit the new door. Secure the door against opening (remember that it has no doorknob yet). With your assistant, set it into place and see how it hangs. You will be adjusting this fit in subsequent steps, but you can get a general idea of problems this way. Remove the door again, for the moment.
- If the new door is too large for the opening, carefully shave away a little of the wood to make them match.[1]
-
21Check the frame for level and plumb and correct any major problems now. The rough opening should be about an inch wider and a half inch taller than the new jamb, make note of these margins. If you need to trim or build up flooring to provide a level surface for the door, do that now.
-
22Position door so that it can be tipped up into opening, if possible.
-
23Look at the bottom of the new door and get an idea of the areas that will contact the door sill. Please note, some doors have adjustable thresholds, be sure caulk will not interfere with this mechanism. Apply generous beads of caulk along the sill, across the opening. This will be your weather- and waterproofing there, so be generous. Caulk is fairly inexpensive, and you can always wipe up excess.
-
24Tip door into opening, and adjust in or out till door jamb is flush with wall surfaces. If jamb is narrower than original door, set jamb flush with out side wall.
-
25Begin shimming between the jamb and the door frame. Stack wedge-shaped shims pointing in opposite directions and drive them in until they take up the required space. Start at the bottom on the hinge side, then at the opposite bottom corner. Proceed to the top of the hinge side, and the top of the opposite side. Then shim directly behind the top, middle and bottom hinges. You will be driving screws through the jamb, shims, and frame, so for the shim locations behind the hinges, put the shims directly behind the empty hole. Finally, shim opposite the top and bottom hinges and just above and below the deadbolt.
- The objective of all this shimming is to center the jamb in the door frame and to square, plumb, and level the door. Use a piece of material of an appropriate thickness, probably about 1/8", to feel all the way around the door, to ensure that the spacing between the door and the jamb is consistent and even. This is somewhat a process of trial and error. Use the door itself to gauge where the frame must be to be square. Be patient and make adjustments as necessary, pushing the shims further in or pulling them out. It is worth being picky at this stage, since these adjustments will affect the fit and operation of your new door for years to come.
- Also adjust the door location front to back. If the door is weatherstripped, look for even compression of the weatherstripping from top to bottom. If not, look for an even gap when the door is closed. The door jamb should also be flush with the wall, as much as possible. Remember, the trim needs to go back on at the end.
- If the door has pre-cut openings for the knob and deadbolt, make sure that they align properly as you shim the jamb.
- Putting a screw through the jamb and shims will pull the jamb slightly towards the frame.
- Shims can be used to correct the parallelogram of the jamb and to flex the wood in or out a little bit near the shim.
-
26When the door is shimmed all around, you can test opening and closing it, but be sure to support its weight so that it does not pull out all your careful adjustments. Don't open it more than about 30º.
-
27Install the long screws into each hinge, through the shims, into the frame. These will hold the door in place. Keep in mind that the screws will pull the jamb toward the frame, so proceed this way: fasten, check, adjust, repeat. Here, the screws are hidden under the weather stripping.
-
28Proceed around to the other shim locations and screw or nail through those into the frame, again checking and adjusting as you go. The door should be well supported now, so you can check opening and closing.
-
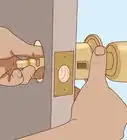
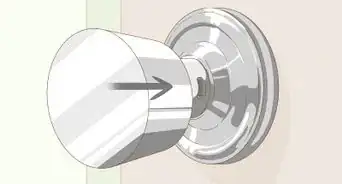
29When the door jamb is level, plumb and square, install the deadbolt, doorknob, and strike plates. See the related wikiHows for those procedures.
-
30Cut off the shims so that they are flush with the jamb and rough opening. You can use a small saw, but shims are generally made from soft enough wood that you can trim them by scoring them with a utility knife and snapping them off.
-
31Insulate the space between the door jamb and frame. You can purchase very small rolls of fiberglass insulation or you can use another material. Do be careful of using the foam-in-place insulation, the sort that comes in a spray can. Some formulations can expand enough to push the door jamb out of place. You should use the minimally expanding foam if you decide to.
-
32Replace the trim, adjusting it if necessary. The trim in the photos was shortened a bit and moved down on the inside and extended on the outside because the new door rests slightly lower than the old one.
-
33Caulk around the trim or molding, inside and out. On an exterior door, this is weatherproofing; on an interior door, it is more of a cosmetic matter, done to prepare for paint.
-
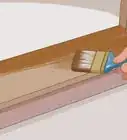
34Paint or finish the door, if you didn't already, and paint the trim to match its surroundings.
-
35Install weatherstripping, kick plates, and any other accessories.
-
36Method for hanging with molding attached. Measure distance from sill to hinges and note the measurements.
-
37Measure from floor up, on hinge side of jamb and mark locations of hinges.
-
38Subtract width of door assembly from width of rough opening and divide by 2. This is the vertical margin.
-
39Stack shims up in alternating directions until you get a stack that is equal in thickness to the vertical margin. This is your shim-pack.
-
40Place shim-pack directly over the mark on the framing for the lowest hinge and nail in place. These are the bottom shims. Shims should be horizontal or across the framing, with some sticking out on both sides.
-
41Make another shim-pack.
-
42Place a 6 foot (1.8 m) level against bottom shims and place the shim-pack across top hinge line. Press level against top shim-pack and adjust by pulling shims apart, or pushing them together until the level reads plumb. Nail the shims in place. These are the top shims.
-
43Make another shim-pack.
-
44Place level against bottom shims and top shims, and slip the shim pack between level and framing, at the middle hinge, and adjust as above until it is snug against level. Nail in place. Repeat if door has more hinges.
-
45Cut excess shim material off slightly narrower than wall thickness.
-
46Look at the door jamb and determine if the hinge screws are sticking through, many times they will be. If they are, sand them flush with a belt sander or grinder.
-
47Look at doorknob cut-out and be sure that any device used to hold door aligned can be removed after installation. It is advisable to leave this in place if it can be removed after installation.
-
48Check very carefully for any nails going through the jamb into the door, and pull them out. Many door manufacturers use this technique to hold door secure during shipping.
-
49Pull any staples, shipping materials, etc. out.
-
50Position door so that it can be tipped up into opening, if possible.
-
51Look at the bottom of the new door and get an idea of the areas that will contact the door sill. Please note, some doors have adjustable thresholds, be sure caulk will not interfere with this mechanism. Apply generous beads of caulk along the sill, across the opening. This will be your weather- and waterproofing there, so be generous. Caulk is fairly inexpensive, and you can always wipe up excess.
-
52Run a bead of caulk on the back of the brick mold near the edge. This will provide a seal around the door.
-
53Tip the new door up onto the caulk.
-
54Place door in opening and push hinge side tight to shims, and brick molding tight to outside wall.
-
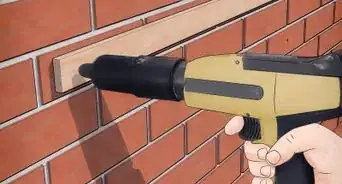
55Nail a 16 penny galvanized finish nail through the brick molding into the wall framing, at the top hinge location.
-
56Now you can carefully open the door and nail another 16 penny finish nail through jamb into framing at the top hinge location. (Move the weather strip side and try to place nails in such a way that when the stripping is in place it will cover the nail holes. Close door
-
57Check margin between top of door and the head jamb, at the corners. If the sill/floor was level this should be right where you want it.
-
58Nail through brick molding at next hinge location working from top to bottom. Be sure the jamb is held tight against the shims behind the hinge. Open door. Repeat above nailing sequence until you have the hinge side nailed securely.
-
59Remove the middle screws from the hinges where they attach to the jamb, and replace with screws of sufficient length to go through shims and into framing at least 1-1/2 inch. You may replace as many screws with long ones as you wish to.
-
60At this point the door is basically hung. now we must fit it. push brick mold on the latch side tight to exterior wall. Slowly open and close door and see if there any problems. Things to look for, does it drag anywhere?, when it is shut is the door slab touching the weather strip evenly all around? If the door looks OK then place one screw through the threshold at the end near the latch side, making sure brick mold is tight to the wall.
-
61Place a 16 penny finish nail through brick mold at top on the latch side of door.
-
62Break off the thin end of a shim until the end is the same width as the margin between the door and jamb. This is your spacer or gauge.
-
63Make another shim pack
-
64Place spacer between door and jamb at the strike (doorknob). slightly above or below the strike mortise, (the area cut out of jamb to accept the strike plate).
-
65Insert shim pack between jamb and framing at the strike.
-
66Adjust shims until they are snug.
-
67While pushing the jamb tight to the shim pack, open the door.
-
68Nail through jamb into framing at this location as described above.
-
69Nail through brick mold at the same location.
-
70Repeat this procedure at locations opposite the hinges, as well as in two locations at top of door, and above and below the dead bolt, be careful not to allow shims to cover or block the dead bolt hole.
-
71Cut off excess shim stock off and wipe any excess caulk off.
-
72Screw sill to floor.
-
73Adjust sill to fit door, if necessary.
-
74Insulate between jamb and framing.
-
75You may now install the trim and any hardware.


Warnings
- Think ahead about the possible dangers of any operation and how you can avoid accidents.Thanks!
- Read manuals and understand the safe operation of all the tools you will use.Thanks!
- Wear appropriate safety gear: safety glasses, gloves, hearing protection, dust mask.Thanks!
- Doors are large, heavy objects, and installing one requires at least one strong person on either side. Do not attempt this project alone.Thanks!
- Always lift safely when handling heavy items. Use the knees, not the back.Thanks!
Things You'll Need
- An assistant or two
- Replacement pre-hung door
- Shims
- Caulk, exterior grade
- Insulation (purchase in small batts or borrow a bit from the attic)
- Doorknob and deadbolt
- Replacement screws and nails
- Hammer
- Screwdrivers
- Nail puller
- Channel-lock pliers
- Reciprocating saw
- Power screwdriver (recommended)
- Caulk gun
- Bubble level
- Framing square
- Step stool or short stepladder
- Kneepads
- Safety glasses
- Belt sander or grinder


References
- ↑ Emily Fazio. Home Improvement & DIY Specialist. Expert Interview. 27 July 2021.
About This Article