This article was co-authored by Jeremy Mercer and by wikiHow staff writer, Jack Lloyd. Jeremy Mercer is the Manager and Head Technician at MacPro-LA in Los Angeles, CA. He has over ten years of experience working in electronics repair, as well as retail stores that specialize in both Mac and PC.
This article has been viewed 6,817 times.
If you're ready to sell your iPhone, great news--between carrier trade-ups and the informal market, doing so has never been easier! Before you and your smartphone part ways, however, you'll need to perform a series of steps to ensure that your data is safe and ready to apply to your next phone.
Steps
Part 1
Part 1 of 4:Backing Up Your iPhone
-
1Attach your iPhone cable to your phone and computer. The large end of the cable should fit into your computer's USB slot, while the smaller end should fit in your iPhone's Lightning port (the charging port).
- Use the USB cable that came with your iPhone for best results.
-
2Wait for iTunes to boot up. While the iTunes program should open automatically after you plug your iPhone in, you may have to manually open it.Advertisement
-
3Wait for your iPhone to sync to iTunes. The bar at the top of your iTunes window will tell you how many steps remain in the process; after your iPhone finishes syncing, you can back up your iPhone.
-
4Click iPhone icon in the top left corner of your screen. This icon resembles an iPhone and is located beneath the "Account" tab; clicking it will open your iPhone's summary menu.[1]
-
5Click "Back Up Now" under the "Backups" section. This will back up your phone's data. When it comes time to restore this data, you'll use this backup to transfer your phone's data over to a new device.
- If you have automatic backups enabled, you don't need to back up again--your phone will have done so when you plugged it into your computer. Check the date of the latest backup under the "Backups" section to confirm that your phone's data backed up.
- When backing up your phone, you can choose either iCloud, which backs up your phone to your iCloud account, or "This computer", which saves your phone's data on your current computer.
-
6Unplug your iPhone. Now that you've backed up your data, it's time to sign out of your iCloud account.Advertisement


Part 2
Part 2 of 4:Signing Out of iCloud
-
1Tap the Settings app to open your iPhone's settings. The Settings app resembles a grey gear.
-
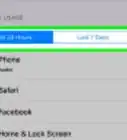
2Tap the "iCloud" tab. You'll need to scroll down to reach this option; tapping it will open the iCloud settings menu.
-
3Tap the "Sign Out" option. This is located at the very bottom of the iCloud settings menu.
-
4Tap "Delete from my iPhone" on the pop-up menu. This will confirm that you're ready to sign out of iCloud.[2]
-
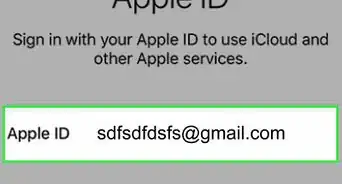
5Enter your Apple ID password to sign out of iCloud. This will definitively sign your iPhone out of iCloud, erasing all of your iCloud-stored notes from your iPhone in the process.
- You'll be able to get these notes back when you sign into your iCloud account again.
Advertisement


Part 3
Part 3 of 4:Erasing Your iPhone
-
1Double-check to make sure you're signed out of iCloud. If your backup is in iCloud and you're still signed in when you erase your iPhone, you can inadvertently erase your backup file.
- If you don't see your name or an Apple ID at the top of the iCloud settings menu, you've successfully signed out of iCloud.
-
2Tap the "Settings" option in the top left corner of your screen. This will return you to the Settings main menu.
-
3Tap the "General" tab. You'll find this toward the top of the Settings menu.
-
4Tap the "Reset" option. This should be at the bottom of the General menu.
-
5Tap "Erase All Content and Settings". This will prompt you to enter a passcode if you have one enabled.
-
6Enter your passcode if necessary. This will prompt a warning regarding the ramifications of deleting your iPhone's data.
-
7Make sure you're ready to erase your iPhone's data. Before doing this, you should have backed up your iPhone to iTunes or iCloud and then signed out of iCloud.
-
8Tap "Erase iPhone". This will begin erasing your iPhone's data.
- If you have "Find My iPhone" enabled, you might need to enter your Apple ID and password before your iPhone will begin erasing your data.[3]
Advertisement


Part 4
Part 4 of 4:Removing Your SIM Card
-
1Hold down your iPhone's Lock button. The best way to remove your SIM card is to take your iPhone to your current carrier; if that isn't an option, you can remove your SIM card with a paperclip. Holding down the Lock button is the first step in powering down your iPhone.
-
2Swipe right on the "Slide to Power Off" text. This should be at the top of the screen; doing so will turn off your iPhone.
-
3Remove your iPhone's case if you use one. You'll need to access the SIM card slot, which is beneath the Lock button on the right side of your iPhone when looking at the screen.[4]
- The SIM card slot is also on the right side of iPhones newer than the iPhone 3, regardless of Lock button placement.
-
4Locate your iPhone's SIM slot. You should see a small hole on the right edge of your iPhone. The SIM card holds all of your carrier data, so you'll need to transfer your card over to your new smartphone.
-
5Insert one end of a paperclip into the hole. The SIM tray should pop open.
- You can also use any similarly-proportioned item, such as a needle, a pin, or a SIM removal tool.
-
6Remove your SIM card from its tray. Be gentle when doing this, since the SIM card is fragile.
- Until you have a new phone, store your SIM card in a ziploc bag or an airtight container for safekeeping.
- If your new phone uses a different SIM card model than the one you're selling, you'll need to take your SIM card into a carrier store and have them transfer the data for you.
-
7Replace your SIM tray. Again, be careful when doing this--don't force it back into place. You are now ready to sell your iPhone!Advertisement


Community Q&A
Did you know you can get expert answers for this article?
Unlock expert answers by supporting wikiHow
-
QuestionShould I unlock my iPhone before selling?
 Jeremy MercerJeremy Mercer is the Manager and Head Technician at MacPro-LA in Los Angeles, CA. He has over ten years of experience working in electronics repair, as well as retail stores that specialize in both Mac and PC.
Computer Repair TechnicianCarriers have different standards, and some phones won't work with certain carriers. Typically, Verizon is unlocked to most other phones, so if you're selling a Verizon phone, you can sell it to someone who has T-Mobile or AT&T. However, it doesn't necessarily work the other way around. Some brands, like Sprint, are not very easy to sell, because you typically have to call into Sprint to allow someone else access to the phone.
Support wikiHow by unlocking this expert answer.
-
QuestionWhat should you do with your iPhone before you sell it?Jeremy MercerJeremy Mercer is the Manager and Head Technician at MacPro-LA in Los Angeles, CA. He has over ten years of experience working in electronics repair, as well as retail stores that specialize in both Mac and PC.
Computer Repair TechnicianErasing your iPhone will essentially make the phone like new again, and the phone will be ready to sell.Support wikiHow by unlocking this expert answer.
Warnings
- Failing to erase your device's data can result in anything from account hacking to identity theft.Thanks!


References
About This Article