This article was co-authored by wikiHow staff writer, Janice Tieperman. Janice is a professional and creative writer who has worked at wikiHow since 2019. With both a B.A. and M.A. in English from East Stroudsburg University, she has a passion for writing a wide variety of content for anyone and everyone. In her free time, you can find her working on a new crochet pattern, listening to true crime podcasts, or tackling a new creative writing project.
There are 9 references cited in this article, which can be found at the bottom of the page.
This article has been viewed 4,010 times.
Learn more...
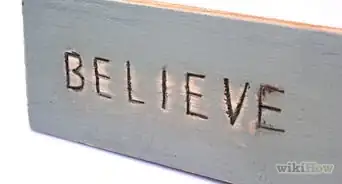
Distressed wood can add a lot of rustic flair to any piece of furniture or decoration. If you want to combine the antique vibes of distressed wood with a colorful layer of paint, you have several options at your disposal. With some specific paint supplies and common household items, you will easily be able to paint any of your distressed furniture.
Steps
Method 1
Method 1 of 3:Using Milk Paint
-
1Apply the first layer of milk paint. Milk paint is a thin type of paint that has an inconsistent color when applied to objects.[1] Once you have selected a color of milk paint, use a traditional paintbrush to begin applying the paint to the wood. You may want to use a larger or smaller brush depending on the size of your wooden project.[2]
- Depending on the size of your project, you may want to use a specialized type of brush when painting trim or smaller details on the wood.[3]
-
2Add a second layer of milk paint in a lighter color. After the first coat of paint has dried, you can apply a second layer of paint in a lighter color. Using long, even strokes, apply the new paint on top of the initial layer.[4]
- Due to the thin consistency of milk paint, you won’t have to use that much while painting.[5]
Advertisement -
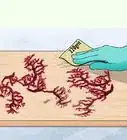
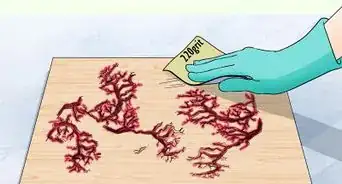
3Use a moist cloth to wipe and blend the paint. Even after it has dried, you can blend milk paint by rubbing against it with a moist cloth. Use even strokes to remove and blend the second layer of paint as you see fit. Once you have achieved your desired color on the wood, give your project a moment to dry.[6]
-
4Apply some wax as a finishing touch. Use a safe container to microwave the wax for about half a minute. With a clean cloth or special waxing brush, buff the wax into the wood. You can do this with short, thorough motions, but you will want to avoid putting too much wax on the outside of the wood.
- The finished product should be covered in a thin layer of wax.
- Once you are finished, rub the waxed surface gently with a cloth to remove any stray marks.
Advertisement


Method 2
Method 2 of 3:Adding Wax After Painting
-
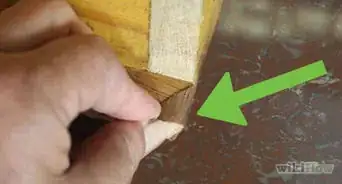
1Sand the wood to make it look more distressed.[7] Use a piece of finely-grained sandpaper to help buff the wood before you apply any paint. If you want to ensure that your wooden project is clean before proceeding, use a moist cloth to remove any lingering dust. Wipe and sand the wood as needed until you are ready to paint it.[8]
-
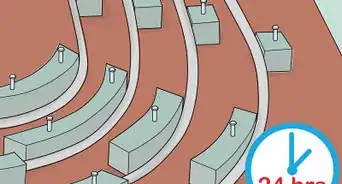
2Apply the first coat of paint to the distressed wood. Using a paintbrush, cover the wood with long, consistent strokes of paint. After the first coat of paint has dried, you can experiment with a different color for the second coat. Let all layers of paint dry completely before you continue.[9]
- The size of the paintbrush will depend on the size of your project. You can find descriptions and explanations of different paintbrushes online.[10]
-
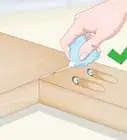
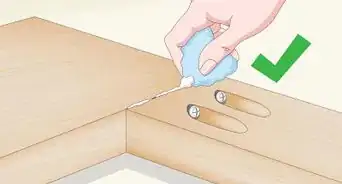
3Rub wax onto the wood using a candle. If you applied a second layer of paint, use the waxy end of a candle to allow the first paint layer to be visible in some spots. The wax works as an informal paint remover, and it can help you to add more color variety to your distressed wood project.[11]
-
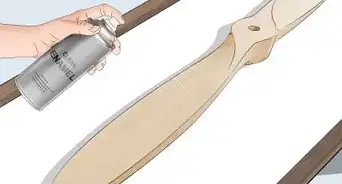
4Add a coat of paint sealer to the wood. Since you have added a lot of new color and decorative elements to your distressed wood, you should apply a layer of paint sealant to keep the wood protected.[14] Paint sealant generally comes in a liquid form, but there are also spray options available.[15]
- If you’d prefer, you can use wax to seal off your project.[16]
Advertisement


Method 3
Method 3 of 3:Layering the Paint with Glaze
-
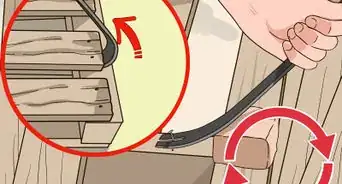
1Distress the wood additionally with sandpaper as needed. Although your wooden object might already be old and distressed, you can make these marks more obvious by using sandpaper.[17] Use a medium-to- smooth sandpaper during this process, as you don’t want to overdo the worn appearance.[18]
- Only sand the parts of the object that you plan on painting.[19]
-
2Paint the wood with a brush. Use long, even brush strokes to apply paint to the wood’s surface. You will want to aim on the smaller side when it comes to brush size, in case your project has any detail work. Try to keep the coat of paint from being too thick, as you will be adding another layer in a bit.[20]
-
3Use a sponge to add a layer of glaze. Sponges are a common and simple tool that you can use to apply glaze. Dip the sponge into the glaze so that at least a third of its surface is coated, and use smooth strokes to cover the rest of your project. You want to tint the original paint color, but not change it altogether.[21]
- Depending on the size and shape of the sponge, you can implement a repetitive pattern along the wood’s surface.[22]
-
4Add a layer of paint sealer on top of the glaze. Using a standard brush, apply a coat of paint sealant over the wood’s painted surface. This will help the wood to maintain its distressed appearance. Adding this layer can provide your project with a lot more protection, as well as give it a more professional finish.[23]Advertisement


Community Q&A
-
QuestionWhat type of paint is best for distressing wood?
 Tanglewood SueTanglewood Sue is a DIY and Upcycling Specialist and the Owner of Tanglewood Works out of Hyattsville, Maryland. With over nine years of experience, Sue specializes in upcycled painted furniture and other handmade, personalized, and sustainable goods. With her passion for art and reinvention, marketing experience, and Bachelor’s Degree in Broadcast Media, Sue has been able to create a business that not only provides quality pieces but empowers customers to create their works through her library of DIY tutorials and live demos as well as DIY supplies.
DIY & Upcycling SpecialistIt depends on the method you want to use, but you can use chalk paint, milk paint, or clay-based paint. Any of those will give you the distressed look that you want. -
QuestionCan I just use a regular latex paint?Tanglewood SueTanglewood Sue is a DIY and Upcycling Specialist and the Owner of Tanglewood Works out of Hyattsville, Maryland. With over nine years of experience, Sue specializes in upcycled painted furniture and other handmade, personalized, and sustainable goods. With her passion for art and reinvention, marketing experience, and Bachelor’s Degree in Broadcast Media, Sue has been able to create a business that not only provides quality pieces but empowers customers to create their works through her library of DIY tutorials and live demos as well as DIY supplies.
DIY & Upcycling SpecialistI wouldn't, no. House paint is designed to expand and contract with the weather, and that's what makes it so gooey. That texture and quality makes it very difficult to create the distressed look that you're trying to get here. It's possible to pull it off if you put enough effort in with the sandpaper, but it's going to be very difficult. -
QuestionHow do you distress wood to make it look old?
 Jeff HuynhJeff Huynh is the General Manager of Handyman Rescue Team, a full service solution in home services, renovations, and repair in the Greater Seattle area. He has over five years of handyman experience. He has a BS in Business Administration from the San Francisco State University and his Certificate in Industrial Electronics Technology from North Seattle College.
Professional HandymanThere are many different methods. You can try finishing the edges of the wood so that they appear darkened. You can also consider using a belt sander to create some rough edges.
Things You’ll Need
- Milk paint
- Paint
- Moist cloth
- Furniture wax
- Candle
- Paintbrush
- Paint sealer
- Sandpaper
- Steel wool
- Glaze
- Stain
- Sponge

References
- ↑ Tanglewood Sue. DIY & Upcycling Specialist. Expert Interview. 24 March 2021.
- ↑ https://www.thecreativityexchange.com/2013/08/what-is-milk-paint-and-how-to-use-it-on-furniture-paint-it-monday.html
- ↑ https://www.paintbrushcorp.com/choose-brush/choosingtherightbrush
- ↑ https://www.thecreativityexchange.com/2013/08/what-is-milk-paint-and-how-to-use-it-on-furniture-paint-it-monday.html
- ↑ https://www.thecreativityexchange.com/2013/08/what-is-milk-paint-and-how-to-use-it-on-furniture-paint-it-monday.html
- ↑ Tanglewood Sue. DIY & Upcycling Specialist. Expert Interview. 24 March 2021.
- ↑ Jeff Huynh. Professional Handyman. Expert Interview. 30 April 2019.
- ↑ Tanglewood Sue. DIY & Upcycling Specialist. Expert Interview. 24 March 2021.
- ↑ Tanglewood Sue. DIY & Upcycling Specialist. Expert Interview. 24 March 2021.
- ↑ https://www.justthewoods.com/distress-painted-wood/
- ↑ https://www.architecturaldigest.com/story/how-to-distress-furniture-in-6-easy-steps
- ↑ https://www.architecturaldigest.com/story/how-to-distress-furniture-in-6-easy-steps
- ↑ https://www.architecturaldigest.com/story/how-to-distress-furniture-in-6-easy-steps
- ↑ https://www.architecturaldigest.com/story/how-to-distress-furniture-in-6-easy-steps
- ↑ https://www.lovelyetc.com/the-best-and-worst-sealers-for-painted-furniture/
- ↑ https://www.apartmenttherapy.com/how-to-paint-furniture-222412
- ↑ Jeff Huynh. Professional Handyman. Expert Interview. 30 April 2019.
- ↑ Tanglewood Sue. DIY & Upcycling Specialist. Expert Interview. 24 March 2021.
- ↑ https://www.justthewoods.com/distress-painted-wood/
- ↑ https://www.justthewoods.com/distress-painted-wood/
- ↑ https://www.justthewoods.com/distress-painted-wood/
- ↑ http://sites.tntech.edu/wpitelka/wp-content/uploads/sites/45/2016/03/Applying-Glazes.pdf
- ↑ https://www.lovelyetc.com/the-best-and-worst-sealers-for-painted-furniture/
- ↑ https://www.apartmenttherapy.com/how-to-paint-furniture-222412
- ↑ https://www.apartmenttherapy.com/how-to-paint-furniture-222412