X
wikiHow is a “wiki,” similar to Wikipedia, which means that many of our articles are co-written by multiple authors. To create this article, 15 people, some anonymous, worked to edit and improve it over time.
The wikiHow Video Team also followed the article's instructions and verified that they work.
This article has been viewed 134,345 times.
Learn more...
Making your own pencil bag is a great way to use up scrap fabric that you love but that isn't large enough for bigger craft projects. It's also an eco-friendly option for toting pencils around, and a reflection of your own style.
Steps
Method 1
Method 1 of 2:Preparing the Design
Method 1
-
1Decide upon the fabric type. Use a sturdy fabric. Cottons work well, as would corduroy, denim or heavier weight fabrics.
- The stronger the fabric, the longer it'll last and endure being toted about and having sharp items poked into it if you can not find stronger fabric just double it.
-
2Decide upon the size and shape. These will depend upon the amount, length and width of the items you'll be placing inside the case. The shape of a square or rectangle works best for a pencil bag.
- Use a ruler or measuring tape to work out the size of the bag; measure the contents and allow for a little extra room around the edges (for ease of movement) to calculate the total size.
Advertisement -
3Decide on which side you'll be placing a zipper. A zipper can be placed either at the short side or long side of a rectangle, depending upon your preference.Advertisement

Method 2
Method 2 of 2:Sewing the Pencil Bag
Method 2
-
1Cut the fabric into two equally sized square or rectangle shapes. Allow for a half-inch/1 centimeter (0.4 in) seam allowance on all sides.
- Another alternative is to fold one large piece of fabric in half and use the fold as the base of the pencil bag. You'll need to press the fold line before stitching the bag together if you do this instead of using two pieces of fabric.
-
2Hold the two pieces of fabric in place with sewing pins.
-
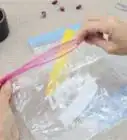
3Attach the zipper to both pieces of the fabric, at the side you've chosen to have it. Fold over a half-inch/1 centimeter (0.4 in) of fabric on one side of the square or rectangle and iron it flat. Place the edge of the zipper beneath the fold. Stitch the zipper in place with a tight, sturdy stitch.
-
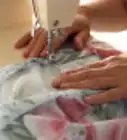
4With right sides together, stitch the remaining three sides of the case together. Double stitch the seams to ensure strength.
-
5Unzip the zipper. Turn the case right side out and make sure you can not see the part that you sewed .
-
6Done. Fill with pencils and related items and you're all set.Advertisement

Community Q&A
-
QuestionHow can I make this without a zipper?
 Community AnswerAdd buttons or hook-and-loop tape (Velcro). If you space the buttons or Velcro too far apart, the pencils will stick out of the gap.
 -
QuestionWhere do I need to buy the zipper?
 Community AnswerYou can buy a zipper from a craft store.
 -
QuestionHow do I sew on the zipper?
 Community AnswerYou can use a sewing machine (if you have one) or hand sew, but that takes longer.
 -
QuestionCan I make a purse or makeup bag using the same method?Community AnswerYes you can.
-
QuestionHow do I make a pencil bag without sewing?Community AnswerYou can use the exact same method but with hot glue, Tacky Glue, or Invisible Thread. You'll have to wait for it to dry to make sure it's sturdy.
-
QuestionCan I find zippers in Michael's?Community AnswerYes, you can find zippers in Michael's as well as any other craft store. You can find different lengths of zippers to choose from to make your pencil case.
-
QuestionHow long does it take to make a pencil bag?Community AnswerIt should take about 30 minutes max. Take your time, mistakes are made when you rush.
-
QuestionCan I make it with a hot glue gun?Community AnswerYes, but be careful. You will also need to give it time to dry if you use hot glue.
-
QuestionWhat do I use to sew it?Community AnswerYou could sew it with a sewing machine, or a simple needle and thread, depending on what's available.
Things You'll Need
- Fabric
- Zipper
- Scissors
- Needle
- Matching thread
- Sewing pins
- Iron
- Sewing machine (optional)

About This Article
Advertisement