X
wikiHow is a “wiki,” similar to Wikipedia, which means that many of our articles are co-written by multiple authors. To create this article, 12 people, some anonymous, worked to edit and improve it over time.
This article has been viewed 43,343 times.
Learn more...
All you need to make these simple stitch markers is a bit of wire (paper clips will work) and a pair of fine-point pliers. Because they are an open loop, these stitch markers can be inserted and removed at any point in the knitting or crochet process.
Steps
-
1Start with a spool of craft wire or straighten a paper clip or two. Any small paper clip will do, whether or not it is plastic coated, as long as it is made of wire. Craft wire, if you have it, is a little softer and easier to work.
-
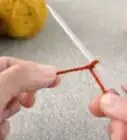
2Grip the very end of the wire in the pliers. Loop the end of the wire closely around the tip of the pliers.
-
3Grip the wire just past the loop you just formed and fold it over the other way.
-
4Grip the wire and turn it one more time. This time, grip it higher up and turn it a little more loosely.
-
5Curl the wire out a little at the loose end.
-
6Cut the wire off where you want it, generally a bit past the bottom of the second loop. Many pliers have a wire cutting edge like these do.
-
7Curl the wire back toward itself. This will help when inserting the marker and it will help keep the marker from catching things.


Warnings
- The small loops on these may catch certain sorts of yarn. If you're not sure, carefully try them on a small piece first.Thanks!
- Wear safety glasses when cutting wire. Little pieces can go flying.Thanks!
- Cut wire ends are sharp. File them round if you need to.Thanks!
Things You'll Need
- Craft wire or paper clips.
- Fine point pliers.
- Means of cutting the wire. Many pliers have a wire cutting edge built in, near the hinge.