This article was co-authored by wikiHow Staff. Our trained team of editors and researchers validate articles for accuracy and comprehensiveness. wikiHow's Content Management Team carefully monitors the work from our editorial staff to ensure that each article is backed by trusted research and meets our high quality standards.
This article has been viewed 90,410 times.
Learn more...
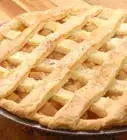
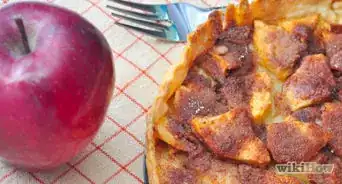
Nothing beats a homemade banana cream pie made from scratch. Using pudding from a packet might be quick and easy, but it will still taste too much like pudding. This article will show you how to make a banana cream pie from scratch.
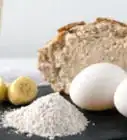
Ingredients
Crust[1]
- 1½ cups (150 grams) unbleached all-purpose flour
- ½ teaspoon salt
- 4 tablespoons shortening
- 5 tablespoons unsalted butter
- 3 to 5 tablespoons ice water
Filling[2]
- ½ cup (115 grams) plus 2 tablespoons granulated sugar
- ¼ cup (30 grams) cornstarch/cornflour
- 1/8 teaspoon table salt
- ½ cup (120 milliliters) half-and-half or heavy cream
- 5 large egg yolks, lightly beaten
- 2 cups (475 milliliters) whole milk
- 2 teaspoons vanilla extract
- 2 tablespoons butter
- 2 – 3 medium bananas
Steps
Part 1
Part 1 of 4:Preparing the Crust
-
1Mix the flour and salt in a medium sized bowl. If you want to save time for the next few steps, place the flour and salt into a food processor.
-
2Cut in the shortening and blend until the mixture looks like coarse crumbs. You can do this in a food processor fitted steel blades or in a medium sized bowl with a pastry blender.[3] Do not over mix, or the dough will get too soft and mushy.Advertisement
-
3Cut in the butter and blend some more. Again, don't over mix it. The butter, shortening, salt, and flour should just come together. You want the mixture to still resemble coarse crumbs.
- If you are using a food processor, you can transfer the mixture into a medium sized bowl once you mix the butter in.
-
4Add cold water, one tablespoon at a time, until the dough stops clinging to the side of the bowl. Gently toss the dough while you add the water. The dough should just barely come together. If it is too dry, add a little bit more water, until it does. Don't worry if it looks too dry; it will dampen once you put it in the fridge.
-
5Transfer the mixture onto a flat surface, and form it into a flat disk. Scoop the crumbs towards the center, and press them into the dough. Make the disk about 4 inches (10.16 centimeters) thick. You will be rolling it out later, so don't worry if it looks too thick now.
- If the mixture is too dry and crumbly, spritz it with some cold water.
-
6Wrap the disk with some parchment paper, wax paper, or plastic wrap. This will help the dough keep its disk shape. It will also trap moisture and keep it from drying it.
-
7Place the packet into the fridge and leave it there for 30 minutes. This will give the flour enough time to soak up the water and become softer.[4]Advertisement


Part 2
Part 2 of 4:Baking the Crust
-
1Pre-heat the oven to 375°F (190.56°C).
-
2Take the dough out of the fridge and roll it out into a disk on a lightly floured surface. Unwrap the dough first, then lightly flour a flat, smooth surface. Place the dough onto the surface.
-
3Roll the dough out to a 11 to 12 inch (27.94 to 30.48 centimeters) circle. This will be big enough for a 9 inch (22.86 centimeters) pie pan. You are making the crust larger so that it can fit inside the pan.
- If the dough is too hard, wait 10 to 15 minutes so that it can soften up.
-
4Ease the dough into a 9 inch (22.86 centimeters) pie pan. Gently press the bottom of the dough until it lays flat against the bottom of the pie pan. Run your finger around the inside edges, so that the dough fits into the corners.
-
5Fold the top edges of the dough under. Use your finger to gently press the top edges of the dough against the rim of the pie pan. If the edges stick out beyond the rim, tuck them under each other. Do not tuck the excess dough under the rim itself.
- Consider putting a fancy edge on the crust. You can do this simply by pinching the dough all around the rim, or making shallow indents with a fork.
-
6Prick the bottom of the dough a few times with a fork. The tiny holes will help the dough lay flat as it bakes.
-
7Line the crust with parchment paper and fill it with pie weights. This will help the pie crust keep its shape while you bake it. If you don't have parchment paper, you can use a sheet of aluminum foil instead. If you can't find pie weights you can use dried beans or rice.[5]
-
8Bake the pie crust. Place it into the oven and let it bake for 20 minutes. Then, take it out of the oven, pull out the parchment paper/aluminum foil and weights. Place the pie crust back into the oven and back it for another 15 to 20 minutes. It is done when it is golden brown on the bottom.
-
9Take the pie crust out of the oven, and let it cool in the pan. The pie crust should be cool before you add the banana cream filling. Do not take the crust out of the pan.Advertisement


Part 3
Part 3 of 4:Making the Filling
-
1Mix the sugar, cornstarch, and salt in a medium saucepan. There is no need to use any heat just yet.
-
2Gradually whisk in the half-and-half. Do not pour it in all at once. Instead, slowly pour it into the mixture while you stir with a whisk.
- If you don't have any half-and-half, you can use heavy cream instead
-
3Separate the egg yolks from the whites, and stir them in. If you have not already done so, separate the egg yolks from the egg whites. Discard the whites, or save them for another recipe. Stir the mixture until the yolks break.
- If you have an egg separator, use that.
- Another way to separate yolks from whites is to crack open an egg and pass the yolk between the two shell halves over a bowl. The whites will drain into the bowl and the yolks will stay in the shells.
-
4Add the milk last, and stir once more. Keep stirring until everything is mixed together, and there are no streaks, swirls, or clumps.
-
5Cook the mixture over medium-low to medium heat until it thickens. This will take about 5 to 10 minutes. Be sure to stir constantly, and do not try to rush through it by turning the heat up. After about 5 to 10 minutes, the mixture will look a little bit like pudding that has not yet set.
-
6Remove the saucepan from heat, and strain the mixture if you want a smoother filling. Place a fine, mesh strainer over another medium sized saucepan. Pour the mixture through the strainer and discard and lumps or curdles.
-
7Stir in the butter and vanilla and let the mixture cool for about 5 minutes. Stir often until the mixture has cooled slightly. Your pie filling is now done and ready to use. Don't worry if it looks a little thin. You will need to refrigerate the entire pie after you put it together. This will "set" the filling and make it thicker.Advertisement


Part 4
Part 4 of 4:Putting the Pie Together
-
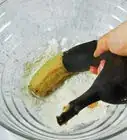
1Peel and slice up 2 bananas. You want the slices to be thin, about ¼ inch (0.64 centimeter) thick.
- Plan on having another extra banana so that you can slice it up and use it to decorate the pie with. Do not pre-slice this "decorating" banana, however, or it will turn brown.
-
2Fill the bottom of the pie crust the with sliced bananas. To get the most out of your sliced bananas, place the slices down flat, one by one. Don't just dump them all in. This will give you a 2-layer pie.
- If you want a 3-layer pie, fill the bottom of crust part way with the pie filling first. Spread a thin layer of sliced bananas on top of the mixture. Fill the crust the rest of the way with the remaining pie pilling.
-
3Fill the crust with the pie filling. You may need to use a spoon or spatula to help guide the filling into the crust. Keep adding the filling until it just reaches the top of the crust.
- If you run out of pie filling, don't fret. You can always top the pie off with more sliced bananas and whipped cream.
-
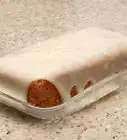
4Place a sheet of plastic wrap over the filling. The plastic wrap will keep the pie from forming a "skin" on top.
-
5Refrigerate the pie 3 to 6 hours, then remove the plastic wrap. This will give the pie filling enough time to set into a thick, pudding or custard like consistency.
-
6Decorate the pie with whipped cream and a few banana slices before serving. Make "stars" with whipped cream all around the edge of the pie. Slice up a banana, and arrange the slices in a flower shape in the center of the pie. Finish off with a swirl of whipped cream in the middle of the banana flower.
- You can make the little star shapes using a piping bag filled with whipped cream and fitted with a spiky decorators tip. You can also just use the kind of whipped cream that comes i a can with a nozzle.
-
7Serve the pie immediately. The pie will still taste just as good the next day, but the bananas may turn brown.[6]Advertisement


Community Q&A
-
QuestionMy cream filling is too thin and runny, how do I make it thicker?
 Community AnswerIt might need more time to set. Most cream fillings need 3 to 6 hours in the fridge to set properly. You can also try using less milk, and more corn starch and heavy cream the next time you make it. Let it cook longer as well.
 -
QuestionCan I make a banana cream pie in a crumb crust two days before serving it?
 Community AnswerYou could, but the crust would be soggy by the time you served it. I would recommend making it the day of for the best quality.
 -
QuestionCan you make the filling without half-and-half or heavy cream?
 Community AnswerYes, but you will have to use a bit more cornstarch to make sure it thickens. You could also use a few whole eggs. Make sure you cook it until its nice and thickened, but keep stirring so it doesn't burn.
 -
QuestionWhat can I use if I don't have shortening?Community AnswerYou can use butter or coconut oil as a replacement. They are both healthier and they have a similar texture.
-
QuestionI don't have time to bake the pie. Any other ideas?
 CaeiiaTop AnswererBuy one or make banana cream pudding.
 -
QuestionCan I use any other type of milk besides half and half?
 QamarTop AnswererYes, you are welcome to use heavy cream. This will still keep the mixture of the pie creamy and rich.
Things You'll Need
Preparing the Crust
- Medium sized bowl
- Pastry blender or food processor
- Cutting board or smooth surface
- Plastic wrap
- Refrigerator
Baking the Crust
- Rolling pin
- Pie pan
- Parchment paper or aluminum foil
- Pie weights, dried beans, or uncooked rice
- Fork
- Oven
Making the Filling
- Medium sized saucepan
- Whisk
- Fine, mesh strainer (optional)
Putting the Pie Together
- Silicone spatula
- Plastic wrap
- Refrigerator


References
- ↑ http://www.kingarthurflour.com/blog/2015/05/10/banana-cream-pie/
- ↑ http://www.melskitchencafe.com/old-fashioned-banana-cream-pie/
- ↑ http://www.melskitchencafe.com/old-fashioned-banana-cream-pie/
- ↑ http://www.kingarthurflour.com/recipes/classic-single-pie-crust-recipe
- ↑ http://www.kingarthurflour.com/blog/2015/05/10/banana-cream-pie/
- ↑ http://www.melskitchencafe.com/old-fashioned-banana-cream-pie/
- http://www.epicurious.com/recipes/food/views/Banana-Cream-Pie-107728
About This Article

To make banana cream pie filling, mix sugar, cornstarch, and salt in a saucepan, then gradually whisk in half-and-half. Stir in egg yolks until the yolks break, then add milk. Cook on medium-low heat until the mixture starts to thicken, then remove from the heat and add vanilla and butter. Grab your homemade or store-bought pie crust and arrange banana slices in a layer, then pour the filling over the banana slices. Cover the pie with plastic wrap and refrigerate for 3-6 hours, then remove the plastic wrap and top with banana slices and whipped cream. To learn how to make your own pie crust, keep reading!