This article was written by Nicole Levine, MFA. Nicole Levine is a Technology Writer and Editor for wikiHow. She has more than 20 years of experience creating technical documentation and leading support teams at major web hosting and software companies. Nicole also holds an MFA in Creative Writing from Portland State University and teaches composition, fiction-writing, and zine-making at various institutions.
The wikiHow Tech Team also followed the article's instructions and verified that they work.
This article has been viewed 32,260 times.
This wikiHow teaches you how to view Facebook photos without the black background that blocks zooming and editing. Due to recent changes in Facebook’s interface, viewing a photo on its own now requires opening it outside of Facebook, such as in a web browser or by saving it to your mobile device.
Steps
Method 1
Method 1 of 4:Using the iOS App
-
1Tap a photo in the Facebook app. To view a photo without a black background, you’ll have to save it to your iPhone or iPad.
-
2Tap …. It’s at the top right corner of the screen.Advertisement
-
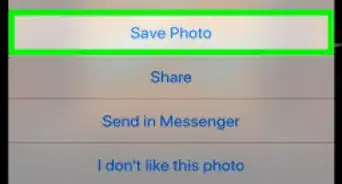
3Tap Save Photo.
-
4Press the Home button to return to the home screen. This is the large round button below the screen.
-
5Open the Photos app. It’s an app on your home screen with a multicolored flower-like icon.
-
6Tap Albums. It’s at the bottom right corner of the screen.
-
7Select the “All Photos” album.
-
8Tap the photo. Now you can pinch (or reverse-pinch) the photo to zoom, share it with another app, or edit it in your favorite image editor.Advertisement


Method 2
Method 2 of 4:Using the Android App
-
1Tap a photo in the Facebook app. You can save any Facebook photo to your Android to view it without a black background.
-
2Tap …. It’s at the top right corner of the screen.
-
3Tap Save Photo.
-
4Press the Home button to return to the home screen. It’s the circle icon at the bottom center area of the screen.
-
5Open the Photos app. You’ll find it in the app drawer (or on your home screen). Its icon is a 4-color geometric design.
- If you use a different Android app to manage your photos (such as the Gallery app that came with your device), you can use that.
-
6Tap the photo. Now you can pinch (or reverse-pinch) the photo to zoom, share it with another app, or edit it in your favorite image editor.Advertisement


Method 3
Method 3 of 4:Using a macOS Web Browser
-
1Click a photo on Facebook. The photo will open with its usual black background.
-
2Press Ctrl as you click the photo.
-
3Click Copy image address.
- If you don’t see this option, press Ctrl while clicking on a different part of the photo.
-
4Press ⌘ Command+T to open a new browser tab.
-
5Click in the address bar. This is the bar at the top of the screen where you type web addresses.
-
6Press ⌘ Command+V. The direct URL to the photo will appear in the box.
-
7Press ⏎ Return. You will now see the picture without a black background.
- To save the image to your Mac, hold down Ctrl as you click the image, then select Save Image As.
Advertisement


Method 4
Method 4 of 4:Using a Windows Web Browser
-
1Click a photo in on Facebook.
-
2Right-click the photo.
-
3Click Copy Image Address.
- If you don’t see this option, try right-clicking on a different area of the photo.
-
4Press Ctrl+T to open a new browser tab.
-
5Click in the address bar. This is the bar at the top of the screen where you type web addresses.
-
6Press Ctrl+V. A long URL will appear in the box.
-
7Press ↵ Enter. The picture will now appear without a black background.
- To save it to your computer, right-click the image and select Save Image As.
Advertisement


Community Q&A
-
QuestionI have a black background on my inbox with white lettering, how do I change it back?
 Community AnswerIt sounds like you may have accidentally inverted the colors in your device's screen settings. The steps to correct this vary by device, but that should give you a good starting point.
 -
QuestionCan I turn off black in theater on my iPhone or only on a laptop? How did I add this anyway? Even the comments under the pictures are in black!
 Community AnswerYou can view the image without the black background on any device.
 -
QuestionHow do I do this on my phone in the Facebook app?Community AnswerSelect the "View the version for web" option in your phone's browser and it will work just fine.


About This Article