X
wikiHow is a “wiki,” similar to Wikipedia, which means that many of our articles are co-written by multiple authors. To create this article, 37 people, some anonymous, worked to edit and improve it over time.
This article has been viewed 119,418 times.
Learn more...
An origami paper box folded into four neat little compartments is a handy way to hold tiny gifts or keepsakes. It's not too hard to make and once you're comfortable with the method, you can make many for gift giving or display. NOTE: The size of the paper used for the divider should be the same size as the paper used for the box.
Steps
-
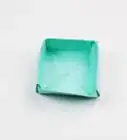
1Fold an origami box from a coloured square of paper.
-
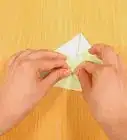
2Rotate the other square of coloured paper in front of you, so that it appears as a diamond. (If you have paper coloured on both sides, the side that faces up now is the colour that will show in the end.)
-
3Crease the paper horizontally and vertically, as shown.
-
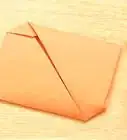
4Turn the paper over and rotate it 45 degrees, so that it appears as a square.
-
5Fold it horizontally and vertically.
-
6Divide the square into thirds both ways, as explained in this article, using the template square. (You will see a small square created by the fold lines in the middle of the paper.)
-
7Fold the bottom edge up to meet the bottom one-third line (one side of the central square, just created).
-
8Repeat with the other three sides.
-
9Unfold completely.
-
10Fold all four corners inwards to meet the corners of the inner square.
-
11Fold all four sides inwards to meet the sides of the small square.
-
12Pick the paper up and fold the diagonal fold lines outwards and horizontal fold lines inwards. This forms a double-layered triangle, known as the waterbomb-base.
-
13Press your new triangle flat.
-
14Fold its upper tip down as far as possible.
-
15Insert your finger between the double layers of the triangle and push the upper layer upwards. This turns the model 3-D.
-
16Observe the line that runs down the center.
-
17Pinch this line, so that it folds upwards.
-
18Smooth all the folds into their positions, so that your model looks like the one on the photo.
-
19Insert it into your origami box that you folded earlier, and you're done!
Community Q&A
-
QuestionDo I need the same sized paper as I used with my box? Or does it have to be bigger/smaller?
 Community AnswerI found that it helps to have the paper a bit smaller than the box. I used the same sized paper and I had to cut down the paper for the inside a bit.
 -
QuestionWhy is my box taller than it should be?Community AnswerIt could be due to the wrong size paper. Before you start, make sure that the paper you are using is correct.
-
QuestionHow can I make origami slime?
 Community AnswerThere is no such thing.
 -
QuestionI followed the first instructions, but my divider was the wrong way around. Why?
 Community AnswerDid you have the paper the wrong way to begin? If you didn’t use double-sided paper, that could also be the problem.
Things You'll Need
- Two squares of coloured origami paper, of the same size
- One other square of the same size (this can be ordinary printer paper)