This article was co-authored by wikiHow Staff. Our trained team of editors and researchers validate articles for accuracy and comprehensiveness. wikiHow's Content Management Team carefully monitors the work from our editorial staff to ensure that each article is backed by trusted research and meets our high quality standards.
Learn more...
The classic trestle table—a tabletop resting on two or more supports that are connected by one or more horizontal cross-pieces called stretchers—is still a stylish and functional choice for today’s home. That said, even a well-built trestle table can get wobbly with use. And, even if you’ve handled wobbly tables before, the trestle table’s unique features may leave you a bit flummoxed. To help out, this article identifies several common causes of the problem and a range of DIY-friendly fixes.
Steps
Method 1
Method 1 of 3:Fixing an Uneven Trestle Table Leg
-
1Identify the spot(s) where the leg isn’t touching the floor. The best way to do this is to get down on the floor and take a closer look at the leg bottoms. Most trestle tables have wide pillar-type supports with even wider feet at the bottom, so check especially at the ends of the feet for open space between the table and floor.
- To be extra thorough, use a tape measure or ruler and jot down the height of any gaps between the floor and table legs. Also take a piece of chalk to mark these locations on the legs so you don’t get confused when you flip the table over to fix it.
- Especially if you live in an older home, keep in mind that the problem might be your floor, not your table. If you’re not dead-set on having the table in that exact spot, try moving it to see if it’s still wobbly.
-
2Flip the table over without damaging the tabletop. If the tabletop easily separates from the legs, remove it and then flip the legs over so the feet are facing up. If the tabletop is securely in place, lay a large blanket on the floor and have a friend help you flip the entire table over onto it.[1]
- The blanket will ensure that you don’t accidentally scratch up your tabletop.
-
3Tap nail-on gliders onto the legs that aren’t causing problems. Head to the hardware store and pick up a pack of nail-on table leg gliders, which look a bit like really big thumbtacks. Hold the nail-tip side of a glider against the wood on the underside of one of your table’s feet and tap it in fully with a rubber mallet. Repeat the process with the other table feet, excepting for the time being the uneven leg.[2]
- Buy gliders with a felt-like material on the flat side for use on hard floors, or with smooth plastic for rugs or carpet.
- Most trestle tables have “beefy” legs, not thin, spindly ones that might split if you pound nails into the bottom. If you’re concerned about this, drill pilot holes with a power drill, using a bit that is smaller in diameter than the nails in the gliders. Set each nail tip into a pilot hole and tap them in with a mallet.
-
4Slide washers over the nail of the glider for the uneven leg. Grab a pack of metal washers from the home improvement store when you go shopping for nail-on gliders. Based either on your measurement of the gap or just your best guess, slip on enough washers to equal the spacing between the uneven table leg and the floor.[3]
- Add as many washers as you need, so long as at least half of the nail tip is still available to be driven into the table leg.
-
5Tap on the washer-adjusted glider, then flip and test the table. Tap this glider into the foot of the table leg with the mallet like before, this time until the washers are pinned between the slider disc and the bottom of the leg. Put the table back into its original position and test it out. The wobble should be gone, and the table will be easier to slide along the floor as an added bonus.[4]


Method 2
Method 2 of 3:Securing a Wobbly Tabletop
-
1Investigate how your tabletop connects to the legs. In its original form, a trestle table’s top wasn’t connected to the legs at all so that it could be easily taken apart and stored. Most modern trestle tables, however, do have some type of connection between the top and the legs. Take a peek under the tabletop to figure out if and how it’s connected.[5]
- Check out the remaining steps in this section for help in identifying and repairing the most common trestle tabletop connections.
-
2Tighten up loose screws or bolts if your table uses mechanical fasteners. You’ll frequently find screws (or sometimes bolts) holding the tabletop to the legs on a modern trestle table, especially if it’s a mass-produced model. These mechanical fasteners usually go through metal collars or brackets that secure the legs to the tabletop. If you spot this configuration, grab a screwdriver and hand-tighten each screw by twisting clockwise. Test to see if the wobble is gone.[6]
- If the mechanical fasteners are bolts instead of screws, tighten them with a socket wrench.
-
3Relocate any screws that won’t hold tight in a loose cleat. Cleats are blocks of wood that surround the top of a table leg to hold the tabletop in place. They’re typically screwed into the underside of the tabletop and may or may not be screwed into the leg as well. If any of the cleats are loose, try tightening all the screws to secure them. If the screws won’t “bite” into the wood to hold the cleat firmly, try the following:[7]
- Use a drill to carefully create new pilot holes in other spots along the loose cleat. Remove the old screws first and make sure that your pilot holes are slightly smaller in diameter than the screws, as well as shorter in depth than the length of the screws. (The last thing you want to do is drill through the tabletop!) Secure the old screws—or new screws of the same size—into the new pilot holes.
-
4Fix a tabletop that slides around by making cleats yourself. Not all trestle tables come with cleats—the blocks that surround the tops of the table legs to hold the tabletop in place. If your table is missing its cleats or never had them to begin with, it's easy to add new ones. You can buy plastic screw-on cleats, make simple cleats out of 1 in × 1 in (2.5 cm × 2.5 cm) craft sticks, or fashion more intricate cleats out of fine wood to match the table. To install them:[8]
- Flip the table over and position the legs in place on the underside of the tabletop.
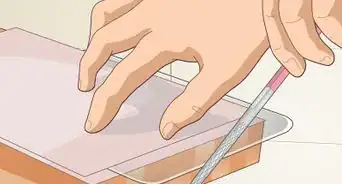
- Use a pencil to trace the outline of the table legs where they meet the underside of the tabletop, then remove the legs.
- Drill pilot holes into the cleats and position them around the outside of the tracing lines. Use enough cleats to prevent the tabletop from sliding in any direction.
- Make matching pilot holes in the underside of the tabletop, making sure not to drill all the way through it.
- Screw the cleats onto the underside of the tabletop, confirming beforehand that the screws are short enough that they won’t go all the way through the tabletop.
- Set the table right-side up, using the cleats to hold the tabletop in place while also enabling it to be removed as desired.
-
5Replace failing tenons or glue if your table has mortise and tenon joints. In this setup, the tabletop is held steady by wood tenons (cylinder, disc, or domino-shaped pieces) that protrude from the tops of the legs and fit into mortises (hollowed-out pockets that match the tenon shape) cut into the underside of the tabletop. With the help of a friend, lift the tabletop straight up and off of the tenons to inspect and repair them as needed. For instance:[9]
- If a tenon has come loose, re-glue it into the mortise cut into the top of the table leg. Remove as much of the old glue as you can with sandpaper, then squeeze wood glue into the mortise pocket and onto the side of the tenon that fits into it. Press the tenon into the mortise, tap it lightly with a mallet to set it firmly, wipe away any excess glue, and allow the glue to dry before reassembling the table.
- If a tenon has broken, replace it either by buying a match at a woodworking store or by making a matching replacement yourself. Install it by following the same process as listed above for a loose tenon.


Method 3
Method 3 of 3:Repairing a Loose Trestle Stretcher
-
1Confirm the stretcher has traditional “tusk tenon” joints. A stretcher is a horizontal support beam that runs near the floor and connects two table legs to give them greater stability. In the classic trestle table style, the wooden stretcher passes through pockets in the legs and extends several inches/centimeters beyond them—these extensions are called “tusks.” Wedge-shaped wood tenons are driven down vertically through mortises in the tusks to hold the stretcher in place (and thereby stabilize the legs and table).[10]
- If you need more help visualizing this, do an image search for “tusk tenon joint” with your preferred search engine.
-
2Tap down on the wedges to drive them deeper into the tusks. Part of the beauty of a tusk tenon joint is its simplicity! Tapping down on the wedge-shaped tenons not only tightens their connection to the stretcher, it also pushes the wedges against the table legs and stabilizes the entire setup. Tap fairly gently with a rubber mallet so you don’t damage the fine craftsmanship of the tusk tenon joint.[11]
-
3Try tightening the fasteners if it isn’t a tusk tenon stretcher. Modern and/or mass-produced trestle tables sometimes use stretchers without tusk tenons, or have faux tusk tenons that don’t actually do anything. Such tables usually use screws or bolts instead, in which case you can probably stabilize the table by tightening these mechanical fasteners with a screwdriver or wrench.[12]
- Some trestle tables might employ standard mortise and tenon joints instead of tusk and tenon joints. In this case the unseen tenons will fit into mortises cut into the ends of the stretcher and the inner sides of the legs. This repair involves removing the stretcher, replacing any broken tenons or failed glue, and reassembling the trestle as before.


References
- ↑ https://www.popularmechanics.com/home/interior-projects/how-to/g2538/furniture-problems-you-can-fix/
- ↑ https://www.popularmechanics.com/home/interior-projects/how-to/g2538/furniture-problems-you-can-fix/
- ↑ https://www.popularmechanics.com/home/interior-projects/how-to/g2538/furniture-problems-you-can-fix/
- ↑ https://www.popularmechanics.com/home/interior-projects/how-to/g2538/furniture-problems-you-can-fix/
- ↑ https://www.thisoldhouse.com/furniture/21053945/trestle-table-new-yankee-workshop
- ↑ https://popularask.net/how-do-you-fix-a-wobbly-table-leg/
- ↑ https://www.finewoodworking.com/media/TabletopsFlat.pdf
- ↑ https://www.ultraselective.com/blog/attaching-ikea-trestle-legs-desktop-steps
- ↑ https://www.popularmechanics.com/home/interior-projects/how-to/g2538/furniture-problems-you-can-fix/
About This Article