This article was co-authored by Dave Jones and by wikiHow staff writer, Hunter Rising. Dave Jones is a Professional Plumber and the Midwest Regional Vice President at Roto-Rooter Plumbing & Water Cleanup. In 1992, Jones joined Roto-Rooter as a drain service technician at the age of 18. Since then, he has risen through the ranks into positions of increasing authority. Dave served as general manager of Roto-Rooter’s Charlotte, North Carolina, and Atlanta, Georgia branches before being promoted to Contractor Area Manager and later to Regional Vice President. Dave holds Master Plumber Licenses in Pennsylvania, North Carolina, and Georgia.
There are 10 references cited in this article, which can be found at the bottom of the page.
This article has been viewed 1,336 times.
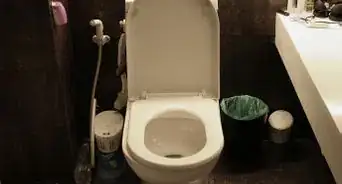
Does your toilet keep running and you’re not sure why? When you flush, the fill valve inside the tank refills the water, but it could also cause leaks if there’s an issue. Even though a new fill valve sounds like a lot, they’re pretty inexpensive and it only takes a few minutes to install. In no time, you’ll have a working, leak-free toilet!
Steps
Method 1
Method 1 of 11:Turn off the water supply.
-
1You can find the supply valve behind your toilet. Turn the valve clockwise until it won’t spin any further. That way, you’ll stay dry when you eventually disconnect the fill valve from your toilet.[1]
- If the supply valve is stuck, you can always turn off the water intake to your home, but that prevents water from reaching all of your fixtures.
Advertisement

Method 2
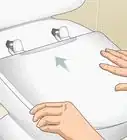
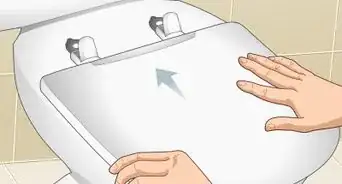
Method 2 of 11:Empty the tank.
-
1Water will leak around the valve if the tank is full. Flush your toilet like normal to get all of the remaining water out of the tank so you can easily access the valve inside. If there’s still water in the bottom of your tank, use an old towel or a shop vac to get rid of it. Otherwise, it will spill out on the floor when you remove your fill valve.[2]
Method 3
Method 3 of 11:Disconnect the water supply hose.
-
1It should easily unscrew by hand or with a wrench. Lay a towel out on the floor underneath the hose to catch any water that might still spill out. Follow the supply hose up to the bottom of the toilet tank and spin the nut counter-clockwise to loosen it completely. Set the hose aside for now so it’s out of your way.[3]Advertisement

Method 4
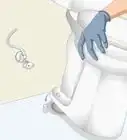
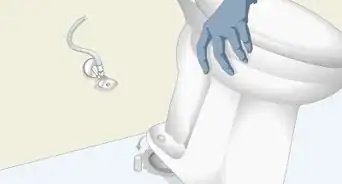
Method 4 of 11:Unscrew the fill valve’s nut to remove it.
-
1Find the nut on the bottom of the toilet’s tank. Take the lid off of your toilet and hold the top of the flush valve with your hand. Secure a wrench around the plastic nut connected to the bottom of the toilet tank. Hold the flush valve tightly and turn the nut counter-clockwise to loosen it. Once it’s loose, take it off by hand. After that, you can simply pull the fill valve straight out from the tank.[4]
- When you remove the fill valve completely, a little more water could spill out onto the floor, so keep it dry with a towel.

Method 5
Method 5 of 11:Buy a replacement fill valve.
-
1You can find fill valves at any hardware store. Fill valves are universal and adjustable, so they work no matter what toilet you have. If you want to match the fill valve that you already have, bring it with you to the hardware store so you can buy the same one.[5]
- Fill valves usually only cost around $10–15 USD.
Advertisement

Method 6
Method 6 of 11:Slide the rubber gasket on the new valve.
-
1This seals any gaps between the valve and the hole in the tank. Your new fill valve will come with a circular rubber gasket that has tapered sides. Position the gasket on the threaded end of the fill valve so the narrow end of the gasket points down and push it on as far as it will go.[6]

Method 7
Method 7 of 11:Screw the new valve into your toilet.
-
1Your new valve will fit perfectly where the old one was. Feed the threaded end of the new fill valve into the hole so it pokes out from the bottom of your toilet. Find the plastic nut that came with your new fill valve and screw it clockwise onto the threading. Tighten the nut by hand up against the base of the toilet before giving it one more quarter-turn with your wrench.[7]
- Be careful not to overtighten the plastic nut since you could easily strip or break it.
Advertisement

Method 8
Method 8 of 11:Clip the refill tube into the overflow pipe.
-
1This tube sprays water into your toilet bowl to refill it. The refill tube is the small plastic tubing sticking out from the side of the fill valve. Use the clip on the tube to attach it to the top of the overflow pipe. Make sure the tube points down inside the pipe so it works properly.[8]

Method 9
Method 9 of 11:Reconnect your water supply.
-
1The supply pipe connects directly to the bottom of the valve. Position the end of the hose on the fill valve’s threading underneath your toilet. Turn the end of the supply hose clockwise by hand until it’s tight on the valve.[9]Advertisement

Method 10
Method 10 of 11:Turn your water back on.
-
1Refill the tank to check for leaks. Turn the supply valve handle counter-clockwise so the water turns back on and refills the tank. If you notice any water spraying or leaking from the hose, then it’s not tight enough. Try giving it another quarter-turn to help secure it.[10]
Method 11
Method 11 of 11:Set the water level below the overflow pipe.
-
1The water level should be 1–1 1⁄2 in (2.5–3.8 cm) below the overflow pipe. If the water level is still too high and leaking into the pipe, find the adjustment screw on top of the fill valve and turn it counter-clockwise to lower it back down.[11]Advertisement

Community Q&A
-
QuestionWhy is my toilet fill valve leaking?
 Dave JonesDave Jones is a Professional Plumber and the Midwest Regional Vice President at Roto-Rooter Plumbing & Water Cleanup. In 1992, Jones joined Roto-Rooter as a drain service technician at the age of 18. Since then, he has risen through the ranks into positions of increasing authority. Dave served as general manager of Roto-Rooter’s Charlotte, North Carolina, and Atlanta, Georgia branches before being promoted to Contractor Area Manager and later to Regional Vice President. Dave holds Master Plumber Licenses in Pennsylvania, North Carolina, and Georgia.
Master Plumber, Roto-Rooter Plumbing & Water CleanupUsually, this occurs when water seeps past the flush valve assembly causing the fill valve assembly to turn on and add water to the toilet tank. -
QuestionHow do you tell if there is an issue with the flush valve assembly?Dave JonesDave Jones is a Professional Plumber and the Midwest Regional Vice President at Roto-Rooter Plumbing & Water Cleanup. In 1992, Jones joined Roto-Rooter as a drain service technician at the age of 18. Since then, he has risen through the ranks into positions of increasing authority. Dave served as general manager of Roto-Rooter’s Charlotte, North Carolina, and Atlanta, Georgia branches before being promoted to Contractor Area Manager and later to Regional Vice President. Dave holds Master Plumber Licenses in Pennsylvania, North Carolina, and Georgia.
Master Plumber, Roto-Rooter Plumbing & Water CleanupYou can add a couple of drops of food coloring to the water. Wait for 10-15 minutes. If the water in the toilet bowl starts changing colors, you could have an issue with the flush valve assembly. -
QuestionHow can you stop a toilet from running if it has a flapper-style flush valve assembly?Dave JonesDave Jones is a Professional Plumber and the Midwest Regional Vice President at Roto-Rooter Plumbing & Water Cleanup. In 1992, Jones joined Roto-Rooter as a drain service technician at the age of 18. Since then, he has risen through the ranks into positions of increasing authority. Dave served as general manager of Roto-Rooter’s Charlotte, North Carolina, and Atlanta, Georgia branches before being promoted to Contractor Area Manager and later to Regional Vice President. Dave holds Master Plumber Licenses in Pennsylvania, North Carolina, and Georgia.
Master Plumber, Roto-Rooter Plumbing & Water CleanupCheck that the chain connecting the flapper valve to the toilet handle is not too tight or loose. Then check if there is any obstruction around the flapper that is not allowing it to move freely and create a tight seal.
Warnings
- Try to stop leaks as soon as possible so you don’t run up your water bill.[12]Thanks!


References
- ↑ https://youtu.be/H5G4OeIDXMk?t=17
- ↑ https://youtu.be/z5324QzZB38?t=89
- ↑ https://youtu.be/dAp-xr-QH7E?t=54
- ↑ https://youtu.be/dAp-xr-QH7E?t=79
- ↑ https://www.friscotexas.gov/DocumentCenter/View/24442/FIX-A-Leak-Manual-2021?bidId=
- ↑ https://youtu.be/dAp-xr-QH7E?t=160
- ↑ https://youtu.be/UV-peiKW9gM?t=353
- ↑ https://youtu.be/H5G4OeIDXMk?t=61
- ↑ https://youtu.be/H5G4OeIDXMk?t=64
About This Article