This article was co-authored by Joy Cho. Joy Cho is the Founder and Creative Director of the lifestyle brand and design studio, Oh Joy!, founded in 2005 and based in Los Angeles, California. She has authored three books and consulted for creative businesses around the world. Joy has been named one of Time's 30 Most Influential People on the Internet for 2 years in a row and has the most followed account on Pinterest with more than 13 million followers.
wikiHow marks an article as reader-approved once it receives enough positive feedback. In this case, 90% of readers who voted found the article helpful, earning it our reader-approved status.
This article has been viewed 276,726 times.
Glass etchings can be done at home with a few supplies from the craft store. By applying a cream such as Armour Etch to a stencil, you can customize your own drinking glasses and baking dishes and make professional-looking gifts for others. To etch glass with cream, cut a design on vinyl, tape the stencil onto the glass, paint over it with cream, and then wash it off.
Steps
Part 1
Part 1 of 3:Making a Stencil
-
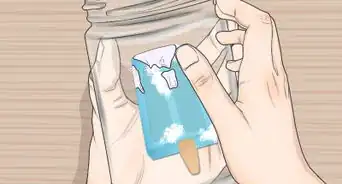
1Draw the design you want to etch. Blank vinyl pieces can be bought at a craft store. Use a pencil to outline your design on the non-adhesive side. Some vinyl has an adhesive backing. Non-adhesive stencils can also be used but must be taped with an adhesive. Your design can be anything you want, such as a bird, a tree, or letters, but remember that what you draw will be cut out and this shape will be what’s etched on the glass.[1]
- Patterned stencils may also be available, ordered online, or designed and printed.
- For letters, instead of using a stencil, you can etch around tape letters.
-
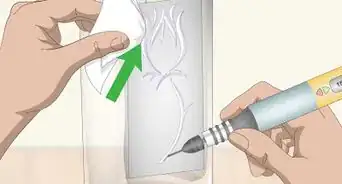
2Place your stencil over vinyl shelf liner. This is only necessary if your stencil cannot adhere directly to the glass. Get a piece of vinyl larger than your stencil. Set the stencil in front of it, then secure the stencil to it by applying tape over the stencil’s edges.Advertisement
-
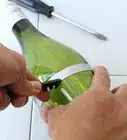
3Cut the stencil with a knife. Using an X-acto knife or other sharp knife, cut out your design along the outlines you made. Hold the blade upwards so only the tip touches the stencil. Remove the parts you want to be etched into the glass, taking care not to tear the surrounding space.[2]Advertisement


Part 2
Part 2 of 3:Attaching the Stencil to Glass
-
1Clean the glass with rubbing alcohol. While glass cleaners such as Windex can be used, these may leave a residue that causes uneven etching. Isopropyl rubbing alcohol will remove all debris and fingerprints. Grip the glass in a place that won’t be etched and use a fresh, soft cloth to spread the cleaner and dry the glass.[3]
-
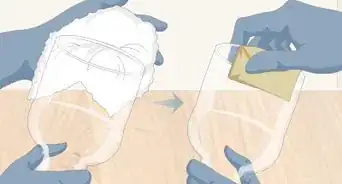
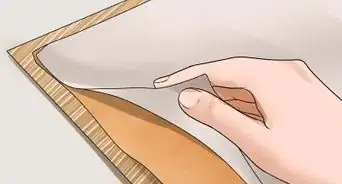
2Peel the backing off the vinyl. When using vinyl shelf liner or a stencil with an adhesive backing, peel off the back surface. Bring the stencil up to the area you wish to etch, then use the adhesive to attach it to the glass.
- If you’re using tape to create letter outlines, tape the letters and then cover the rest of the glass you don’t want to etch.
-
3Smooth out the tape. Whatever adhesive you use, check it over for bubbles. Any raised areas of tape can ruin the etching since the cream will get in there. Run a smoothing tool over the tape to flatten it. Something sturdy, such as a plastic gift card, works well.[4]Advertisement


Part 3
Part 3 of 3:Using the Etching Cream
-
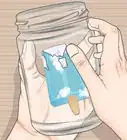
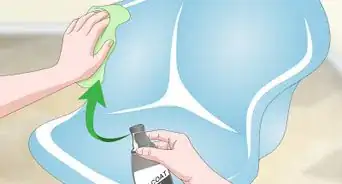
1Spread etching cream over the stencil. Only the area you want to be etched should be covered. Use a paint brush or popsicle stick to spread a thick, even coating over the area. Wear gloves to prevent any of the irritating cream from getting on your skin.[5]EXPERT TIPJoy Cho is the Founder and Creative Director of the lifestyle brand and design studio, Oh Joy!, founded in 2005 and based in Los Angeles, California. She has authored three books and consulted for creative businesses around the world. Joy has been named one of Time's 30 Most Influential People on the Internet for 2 years in a row and has the most followed account on Pinterest with more than 13 million followers.Designer & Style Expert, Oh Joy!
 Joy Cho
Designer & Style Expert, Oh Joy!Make sure you stick to the outline of the stencil. You don’t want the etching cream to bleed underneath the design. Some stencils require you to hold them down to keep it defined at the edge.
-
2Stir the cream twice over five minutes. For a more pronounced etching, use your brush to move the cream on top of your stencil. At about the 1 ½ minute and 3 ½ minute marks, do this to break up air pockets that will cause uneven etching.[6]
-
3Leave the cream for five minutes. Overall, including stirring, the cream needs to stay on the glass at least five minutes. If you remove the cream before five minutes,your design will appear lighter. After five minutes, you won’t notice much more improvement in the etching.
-
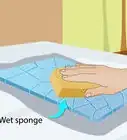
4Rinse off the cream with water. Hot water from a faucet will remove the cream while loosening the tape. If you have a ceramic sink or are worried about your plumbing, dip the glass in a clean bucket of water and use a clean cloth to make sure all the cream is gone.[7]
-
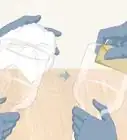
5Remove the vinyl. Peel back the adhesive you used. A hook-shaped tool can be used to attack the corner of stubborn tape. To avoid scratching the glass, avoid pointing any sharp object at it.
-
6Dry off the glass. Wipe off any moisture with a clean cloth. Your etching will be finished. It is permanent, so the glass can be used safely and washed in a dishwasher.Advertisement


Community Q&A
-
QuestionWhat if I don't have vinyl shelf liner, can I use something else instead?
 Community AnswerYes, you can use vinyl from a local sign shop. It's great because it's stickier than contact paper. They might even be able to cut the stencil for you on their vinyl cutting machine, if you bring in your design. Craft stores might have some vinyl as well.
 -
QuestionCan the etching cream be reused?Community AnswerYes, it can. Just scrape off any extra cream from your project and put it back into the container.
-
QuestionHow do I etch outside of a stencil?Community AnswerYou can use tape to cover areas you don't want etched. For example, if you want to make your name, tape the letters, then tape over the rest of the glass you don't want etched. If you want to etch a large area, this isn't a good idea for cream, since cream isn't strong enough. You can use a sandblaster on larger pieces of glass.
-
QuestionIf the Armor Etch is applied thicker in some areas, will that be evident in finished product?
 Community AnswerIf you make it thicker in one area while using a stencil, though, it won't make a difference because only so much cream reaches the surface and wears it away at a time. If you leave a thin and thick layer on an exposed area for the same amount of time, the thicker area will be more clearly etched though.
 -
QuestionHow do I clean up afterwards?Community AnswerIt is best to do this project over newspaper in case of any spilled cream. To clean up, rinse any cream out of you brush and put it away. Make sure you still have your gloves on when doing this. Next peel off the painter's tape and throw it away. Cover your bottle of cream and put it away in a cool place out of reach of children. Throw out the newspaper and wipe down the table. Remove the gloves, turn them inside out, and throw them away.
-
QuestionIs there a way to make etching with a sandblaster instead of chemical etching creams?
 Community AnswerYes. You'll use a sandblaster to blast abrasive over the stencil area. Sandblasting actually gives you more control over your etching so you can do more advanced techniques like shading.
 -
QuestionCan this be used to etch initials into Corelle dishes?
 Community AnswerIt can be etched. Most glass and ceramic can. Pyrex tempered for high heat is the most resistant to etching.
 -
QuestionCan I paint with etching cream using a brush?Community AnswerYes, you can use a brush. Synthetic brushes are better, though, because the cream has a similar texture to acrylic paint.
-
QuestionCan I use etching cream to etch on mirrors?Community AnswerYes, you should be able to use it on any glass surface.
-
QuestionWhy would there be a shadow/halo left on the glass after washing the etch cream off and removing the stencil?Community AnswerWhen the stencil is not securely adhered to the glass, capillary action can pull some of the cream under the stencil causing the halo. You can use the back of a spoon to ensure that the stencil is firmly set.
Warnings
- Wear gloves when handling etching cream, as it is irritating to the skin.Thanks!
- Be careful when using a knife and secure it when not in use.Thanks!
Things You'll Need
- Etching cream
- Latex or plastic gloves
- Vinyl shelf Liner
- Paint brush or popsicle stick
- Glass
- A stencil
- X-acto knife
- Rubbing alcohol
- Paper Towels
- Scotch Tape
References
- ↑ http://www.makeit-loveit.com/2010/06/glass-etching.html
- ↑ http://www.glassetchingsecrets.com/howtosteps.html
- ↑ http://www.theyummylife.com/etched_glass_tutorial
- ↑ https://www.thisoldhouse.com/how-to/everything-you-need-to-etch-glass/page/4
- ↑ http://www.thinkingcloset.com/2013/09/30/personalized-etched-glass-bakeware-tutorial-silhouette-winner/
- ↑ http://www.theyummylife.com/etched_glass_tutorial
- ↑ http://www.etchworld.com/faq
About This Article
To etch glass with etching cream, you’ll need adhesive vinyl, a piece of glass, a pencil, and etching cream. First, draw your design on the vinyl and cut it out. Then, wash the glass with rubbing alcohol, which will help your stencil stick. Then, stick your stencil onto the glass, making sure that it’s smoothed out. If you leave any bubbles, the cream will get inside them and ruin the etching. Cover your stencil with cream and leave it on for 5 minutes. After the time is up, wash off the cream with warm water and peel off the stencil to reveal your etching design. For tips from our Design co-author on how to make your etching appear stronger, read on!