X
wikiHow is a “wiki,” similar to Wikipedia, which means that many of our articles are co-written by multiple authors. To create this article, volunteer authors worked to edit and improve it over time.
This article has been viewed 7,777 times.
Learn more...
Time mapping will allow you to change the speed of a clip at different points inside the clip. This is very useful for creating professional, cinematic shots and looks great for any kind of video clip. This tutorial is for someone who has intermediate experience with Adobe After Effects.
Steps
-
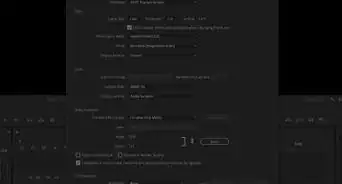
1Open up Adobe After Effects and create a new project.
- Your composition settings should look like this. You can change the duration to however long you want this project to be.
-
2Import your clips and drag them into the timeline.
- Your clip(s) should now be available in the projects window. Drag your clip(s) down into the timeline.
Advertisement -
3Go down to the timeline and select your clip.
- Note that this project will work best if you have multiple clips to use. At least two clips would be best. You can just repeat these steps for the other clips as well.
- You may want to trim you clips to where you want the effect to start and where you want it to end, but it doesn't necessarily matter.
-
4Select the clip and enable time remapping by pressing Ctrl+Alt+T or by right clicking the clip and hover over "Time" and click "Enable Time Remapping."
- You should now have two keyframes on your clip. One at the beginning one at the end.
-
5Adjust the clip further if desired.
- If you want to speed up the clip, drag the keyframe at the end of the clip closer to the first keyframe and then cut the clip.
- If you want to cut the clip from the end to wherever the timeline cursor is press Alt+].
- If you want to cut the clip from the beginning to wherever the timeline cursor is press Alt+[.
-
6Create a third keyframe in the middle of your clip.
- Move your cursor to the middle of your clip and click on the blue diamond that is located under your clip's name in the timeline.
-
7Highlight all your completed keyframes and press the F9 key.
- Your keyframes should now look like hourglasses.
- Your keyframes have just been easy eased. What easy ease allows you to do is change the speed of each keyframe in the clip(s).
-
8Select whichever keyframe you want to work on and press the graph editor button.
- If you have multiple clips that are lined up so the next clip plays right after the previous clip is done you will only need to work on the keyframe at the end of each clip.
- If you have only one clip, you can work on all three or just one of the keyframes. It is up to you.
-
9Drag the three yellow lines, changing the shape of the curve:
- Those lines are for the keyframes. You can drag each line to whatever side you want allowing you to change the shape of the curve. This process allows you to edit the speed of the clip at that keyframe and the acceleration and deceleration of the speed.
- Try experimenting with the shape of the curve. Your curve can be made to whatever you want your time mapping to look like.
-
10Export your project!Advertisement


About This Article
Advertisement