X
wikiHow is a “wiki,” similar to Wikipedia, which means that many of our articles are co-written by multiple authors. To create this article, 24 people, some anonymous, worked to edit and improve it over time.
This article has been viewed 110,053 times.
Learn more...
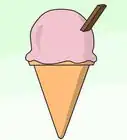
This article will show you how to draw a detailed ice cream cone both with and without a scoop of ice cream. This ice cream cone will also be semi-realistic in its details. Follow the instructions below carefully to complete this accurately. Let's begin!
Steps
Method 1
Method 1 of 2:Ice Cream Cone without Scoop
Method 1
-
1Draw a V shape.
-
2Add two slanted lines overlapping each other on top of the V shape. Cover the cone with a convex line.Advertisement
-
3Draw two more slanted lines on top mimicking the first two you have drawn earlier. sketch criss-crossed slanted lines on the rest of the cone.
-
4Outline the side of the cone making curves where the criss-crossed lines meet.
-
5Darken outline on the mouth of the cone.
-
6Draw small squares inside each compartment from the criss-crossed lines.
-
7Erase unnecessary lines.
-
8Color your drawing.Advertisement


Method 2
Method 2 of 2:Ice Cream Cone with Scoop
Method 2
-
1First with your pencil, start off by drawing the ice cream scoop itself. Draw it as if you were going to draw a half circle.
-
2Next, draw the bottom portion of your ice cream scoop. The scoop's base should have a ruffled appearance almost.
-
3Continue drawing in more detail to your scoop's base like so.
-
4With the details added, your scoop is starting to take form and look a bit more realistic than in the first step.
-
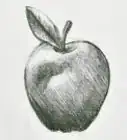
5A real life ice cream scoop is not perfectly round like you see in cartoony ones. There are tons of lines and indentations in the scoop itself.
-
6Now, we are ready to move on to the cone portion. Draw your cone like a narrow, upside down triangle.
-
7Think about the overall design of an ice cream cone. It's crisscrossed like a waffle. Start drawing in your crisscross pattern in this step.
-
8After you are finished with your crisscross design, that is all for the drawing process!
-
9Feel free to color your ice cream cone using an art medium of your choice. Get creative with it if you want! That's a wrap!
-
10Finished.Advertisement


Community Q&A
-
QuestionHow do I add a scoop to the picture?
 CraftsmartTop AnswererAdd the bottom part of the scoop (the part that looks like a cloud) onto the top of the dome of the original scoop. This should overlap the last scoop.
 -
QuestionHow do I make the cone look like a cream-colored cone, instead of a waffle cone?
 Community AnswerStart off by drawing a cup shape, with a rectangle on top of it. Afterward, go in and add details such as brand names, cracks in the cone, or machinery markings.
 -
QuestionDo I need to erase the unnecessary lines? And do I have to color it?
 Community AnswerNeither step is mandatory, it just depends on how you want it to look.
 -
QuestionWhere do I get the pencils?
 Community AnswerYou could get some regular pencils at a grocery, drug or office supply store.
 -
QuestionHow do I make the lines in the cone look like waffle lines?Community AnswerMake them squares and almost 3-D. Don't fully connect the squares though; leave a small gap in the middle for the 3-D effect.
-
QuestionWhat can I do to make my ice cream cone more detailed?Community AnswerAdd texture and ridges. Also, be sure to shade the darker parts of your cone and use lighter colors for the front.

About This Article
Advertisement