This article was co-authored by Alison Buchanan. Alison Buchanan is a Power Vinyasa Yoga Teacher based in Seattle, Washington. She completed over 300 hours of training with yoga instructor, Baron Baptiste, and is a certified Baptiste Teacher. She is a teacher with The Art of Yoga Project, a non-profit organization that brings the mindfulness of yoga to teenage girls in the California Justice System.
There are 11 references cited in this article, which can be found at the bottom of the page.
wikiHow marks an article as reader-approved once it receives enough positive feedback. In this case, 89% of readers who voted found the article helpful, earning it our reader-approved status.
This article has been viewed 268,327 times.
Crow or crane pose, which is called bakasana in Sanskrit, is one of the first arm balances learned by yoga students. Crow pose strengthens the arms, wrists and abdominal muscles.[1] It also stretches the upper back and the groin.[2] Bakasana can be slightly tricky to learn, but with regular practice you can master crow pose and then tackle more difficult variations of this asana, or position.
Steps
Method 1
Method 1 of 2:Mastering Bakasana
-
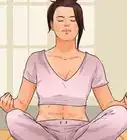
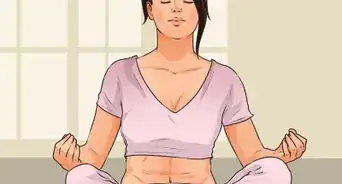
1Start in garland pose. Garland pose, or malasana in Sanskrit, is a hip-opening pose that resembles bakasana but in an upright position. This asana may make it easier for you to enter crow pose if you are new to yoga or don’t have a lot of arm or wrist strength.[3]
- Keep your head up and press your elbows and knees against one another. It’s important to not press your elbows against your inner thighs so that you can keep your chest area as open as possible.[4]
- Don’t collapse your shoulders. Pull your shoulder blades down your back to lift your chest.[5]
- Keep your gaze straight ahead.[6]
-
2Place your hands on the floor. From either malasana or uttanasana, place your palms flat on the floor. They should be about a shoulder-width apart, or slightly wider. This will help you support your weight while performing bakasana.[7]
- Spread your fingers wide. This will provide you with more stability once you are in the pose. If it feels more comfortable, turn your fingertips slightly towards each other.[8]
- Use a strap to keep your arms in line, if necessary. To use a strap properly for bakasana, make a loop and measure it so that it is approximately the width of your shoulders when flattened.[9]
Advertisement -
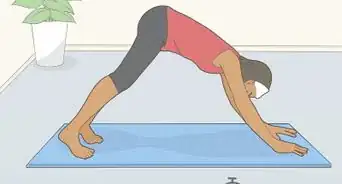
3Shift your weight forward and pull up your sitting bones. The transition from uttasana or malasana can be tricky. Slowly begin shifting your weight on to your hand and lifting your sitting bones toward the sky to help you enter full bakasana more easily.[10]
- If you are in malasana, you’ll want to bend your elbows and move your chest forward while you shift your weight forward.[11]
-
4Place your knees on your triceps. To move into bakasana, bend your elbows slightly, lift up onto your toes and try to position your knees onto your triceps, as high above the elbows as possible. Imagine you are trying to get your knees into your armpits![12]
-
5Squeeze or snuggle your inner thighs against the sides of your torso, burrow your shins into your upper arms.[13]
- Use your mula bandha, or root lock, to suck your abdominal muscles inwards and keep you sitting bones lifting towards the sky.[14]
- To make the transition into crow pose easier, you can try standing on a block. This will give you extra height and make it easier to get your knees into position against your upper arms.[15]
-
6Gaze forward. One of the most important aspects of mastering bakasana is keeping your gaze forward. If you try to look down at your hands or back at your feet, you may lose your balance.
-
7Lift one foot off the ground, then the other. Shift your weight onto your hands by leaning your knees into your triceps and lifting your feet up off the floor.[18]
- Never hop into crow pose (or any yoga pose)! Gently and gradually shift your weight forward until your feet come off the ground.[19]
- If you are nervous, begin by slowly lifting one foot off the ground, then replace it and lift the other. When you feel strong and balanced, try lifting both feet at the same time.[20]
- Once both feet are off the floor, try touching your big toes together and tuck your heels as close to your buttocks as you can manage.
-
8Straighten your arms and lift your sitting bones. Once you have achieved crow and can hold it for more than a few seconds, straighten your arms and lift your sitting bones.[21] This will help you master the pose and cycle through a vinyasa if you choose. you can make a few adjustments in order to master the pose.
- Straighten your arms as much as possible. They should not be splayed out to the sides.
- Round out your spine and draw your abdominal muscles inwards and upwards using mula bandha.[22]
- Gradually work towards holding this pose for up to a minute. If your wrists start to hurt, make sure that your palms are fully flat to the floor.[23]
-
9Finish the asana or cycle through a vinyasa. Once you’ve finished practicing bakasana, you can either lower back to malasana or cycle through a vinyasa if you are more experienced. Remember to only do what asanas you can without losing proper form.Advertisement
-Step-1-Version-2.jpg)
-Step-5.jpg)
-Step-6.jpg)
Method 2
Method 2 of 2:Practicing Bakasana from Tripod Headstand
-
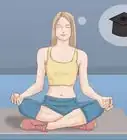
1Attempt bakasana from tripod headstand, or Sirsasana II. Once you’ve mastered bakasana and are practicing yoga regularly, you can attempt to move from tripod headstand, which is called Sirsasana II into bakasana.[24]
-
2Raise up into sirsasana II. From prasarita padottanasana, begin to lift your toes up off the floor. You can either bring your knees to your chest and then raise your legs up into tripod headstand, or, if you’re a stronger yogi, can lift your legs directly into sirsasana II.
- If you choose to lift directly into tripod headstand from wide-legged forward bend, be aware that this requires a great deal of balance and abdominal strength. Engaging your mula bandha can significantly help you master this variation.[27]
-
3Transition from sirsasana II to bakasana. Although this is a much more difficult variation than simple crow pose, it’s much more fun to practice and flows elegantly when done properly. From sirsasana II, bring your knees to your triceps and gently push back into bakasana.[28]
- Just as in crow pose, make sure your knees are high up on your arms. They should be close to your armpits.[29]
- Once your knees are in place, push up on your arms and shift your weight slightly back. This should put you in an optimal crow pose.[30]
- It may take some practice to make the transition from tripod headstand to crow pose. Playing with it and practicing regularly will help you master this series of asanas.
-
4Complete the asana or a vinyasa. Once you’ve finished practicing sirsasana II to bakasana, you can either lower back to malasana, or garland pose, or cycle through a vinyasa. Only perform what asanas you can without losing proper form.Advertisement
Warnings
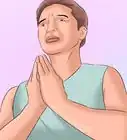
- Crow pose is not recommended for people with wrist or shoulder injuries, including carpal tunnel syndrome. If you are pregnant, avoid practicing bakasana.[32]Thanks!
Things You'll Need
- Yoga mat
- Wide, open space
- Cushion or pillow (optional)
- Block (optional)
- Strap (optional)


References
- ↑ http://www.yogajournal.com/pose/crane-pose/
- ↑ http://www.yogajournal.com/pose/crane-pose/
- ↑ http://www.yogajournal.com/pose/garland-pose/
- ↑ http://www.yogajournal.com/pose/garland-pose/
- ↑ http://www.yogajournal.com/pose/garland-pose/
- ↑ http://www.yogajournal.com/pose/garland-pose/
- ↑ http://www.yogajournal.com/slideshow/3-steps-prep-core-side-crow-pose/#slide-1
- ↑ http://www.yogajournal.com/slideshow/3-steps-prep-core-side-crow-pose/#slide-1
- ↑ http://www.yogajournal.com/article/intermediate-section/winged-migration/
- ↑ http://www.yogajournal.com/pose/crane-pose/
- ↑ http://www.yogajournal.com/pose/crane-pose/
- ↑ http://www.yogajournal.com/pose/crane-pose/
- ↑ http://www.yogajournal.com/pose/crane-pose/
- ↑ https://yogainternational.com/article/view/a-beginners-guide-to-mula-bandha-root-lock
- ↑ http://www.yogajournal.com/pose/crane-pose/
- ↑ http://www.yogajournal.com/article/philosophy/the-eye-of-the-beholder/
- ↑ http://www.yogajournal.com/article/philosophy/the-eye-of-the-beholder/
- ↑ http://www.yogajournal.com/pose/crane-pose/
- ↑ http://www.yogajournal.com/pose/crane-pose/
- ↑ http://www.yogajournal.com/pose/crane-pose/
- ↑ http://www.yogajournal.com/pose/crane-pose/
- ↑ https://yogainternational.com/article/view/a-beginners-guide-to-mula-bandha-root-lock
- ↑ http://www.yogajournal.com/pose/crane-pose/
- ↑ http://www.yogajournal.com/practice-section/challenge-pose-sirsasana-ii-tripod-headstand/
- ↑ http://www.yogajournal.com/practice-section/challenge-pose-sirsasana-ii-tripod-headstand/
- ↑ http://www.yogajournal.com/practice-section/challenge-pose-sirsasana-ii-tripod-headstand/
- ↑ https://yogainternational.com/article/view/a-beginners-guide-to-mula-bandha-root-lock
- ↑ http://www.yogajournal.com/practice-section/challenge-pose-sirsasana-ii-tripod-headstand/
- ↑ http://www.yogajournal.com/pose/crane-pose/
- ↑ http://www.yogajournal.com/pose/crane-pose/
- ↑ http://www.yogajournal.com/pose/crane-pose/
- ↑ http://www.yogajournal.com/pose/crane-pose/
About This Article

To do the crow pose, first start in malasana, or garland pose, with your head up and elbows and knees pressed against one another. From malasana, place your palms flat on the floor shoulder width apart and with your fingers spread wide for stability. Next, shift your weight forward and pull up your sitting bones. This can be tricky, but bending your elbows and moving your chest forward will help the shift. Once you’re up, place your knees on your triceps and snuggle your inner things against the sides of your torso. To finish the pose, slowly lift your feet off the ground one at a time. For more tips from our Yoga Instructor co-author, like how to do the crow pose from tripod headstand, read on!