This article was co-authored by Babis Kanellopoulos and by wikiHow staff writer, Hannah Madden. Babis Kanellopoulos is a Personal Trainer and the Owner of Pod Fitness in London, UK. Babis specializes in helping clients use fitness to overcome difficulties and gain self-confidence. He has experience in kickboxing, long distance running, and martial arts. Pod Fitness sessions combine the focus of personal training with the benefits of small group, personalized, and structured training.
There are 14 references cited in this article, which can be found at the bottom of the page.
This article has been viewed 4,992 times.
You’ve probably heard of (and done) the classic plank position to build your abs and core muscles. However, this position doesn’t do much for your obliques, so it can be a little lacking. Adding hip dips to your plank can help you strengthen the sides of your torso and give you a nice workout in your glutes and your lower abs. Try doing hip dips instead of a normal plank to elevate your core workout today.
Steps
Method 1
Method 1 of 2:Classic Hip Dips
-
1Lay face down on a yoga mat. Spread a yoga mat out on the floor and start face down, with your belly on the mat and your legs straight out. You’ll be putting a lot of pressure on your elbows in this exercise, so it’s important to give yourself a cushion with your yoga mat.[1]
- If you don’t have a yoga mat, try spreading a soft blanket on the ground where it won’t slip and slide.
-
2Press your toes and forearms into the ground. Place your elbows underneath your shoulders with your hands beneath your face. Press your toes into the ground behind you, keeping your legs straight.[2]
- You can keep your fingers spread wide or ball them into fists—whichever you prefer.
- If you’re doing this with bare feet, you might slip and slide around. Try putting on some running shoes to give yourself more of a grip.
-
3Engage your core muscles to lift up into a plank position. Keeping your body in this position, engage your abs, your lower back, and your glutes.[3] Lift up into position with your body weight resting on your forearms and your toes, keeping your back straight. Point your head down so you’re looking directly at your hands, and keep your neck in line with your spine.[4]
- This is called an “elbow plank” or a “forearm plank.”
-
4Rotate your hips to the right, dipping your body almost to the floor. Keeping your body in a plank position, quickly lean your hips down to the right, stopping them before they touch the floor.[5] Keep your forearms on the mat and your toes on the floor to hold your core in a straight position.[6]
- Squeeze your glute muscles to stop your hips before they hit the floor.
-
5Return to your plank position. Hip dips go quickly, so you don’t have to hold your rotated position for very long (2 to 3 seconds is fine). Use your core muscles to lift your hips back up into a straight plank position.[7]
- You’ll feel this in your obliques and your lower back.
-
6Rotate your hips to the left. To even out your workout, quickly lower your hips down to the left side of your body, stopping just before they hit the floor.[8] Again, keep your forearms and toes touching the floor the whole time to avoid twisting over too far.[9]
- If you start to fall, engage your abs and your glutes to stop yourself.
-
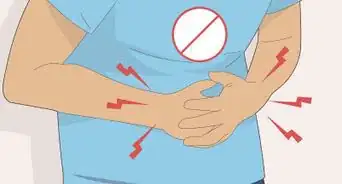
7Keep your core engaged the entire time. The most important part of this exercise is keeping your core engaged the whole time so you don’t lose your plank position.[10] If you feel a twinge in your lower back, engage your abs and pull your belly back toward your spine to straighten your body out again.[11]
- If you don’t engage your core, you won’t get the full benefits of this workout!
- You can really hurt your lower back if you aren’t engaging your core enough.
-
8Repeat the movement for 10 to 15 reps. When you first start out, hip dips might be a little tough. Push yourself to complete 10 reps (going left to right counts as 1 rep), then push it to 15 or even 20.[12]
- This is a great workout to add into your core routine.


Method 2
Method 2 of 2:Variations and Stretches
-
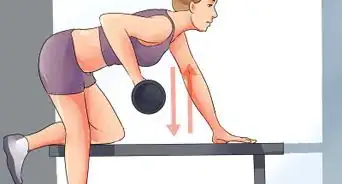
1Strengthen one side at a time with side plank dips. Get into a side plank position with your right forearm and foot on the ground. Use your glutes and core to lift your hip off the ground, keeping your spine straight. Dip your hip toward the ground, then use your abdominals to push it back up toward the ceiling. When you’re done, switch to the other side.[13]
- If a classic side plank is too much, bend your knees and support your weight with your right knee instead of your right foot.
-
2Try up and down planks for a dynamic core workout. Start in an elbow plank position with your forearms and your toes supporting your weight. Push your arms up one at a time and switch from using your forearms to using your hands. When you reach a classic plank position, lower back down onto your forearms again.[14]
- This also doubles as a cardio exercise since it will get your heart rate up.
- If you’re just starting out and the up and down plank is too much, do a plank on your knees instead of your toes and then try it again.
-
3Do a cat and cow stretch to soothe your abs and back. Start on your yoga mat on all fours, with your knees bent at a 90-degree angle to the floor. Keeping your hands and knees on the ground, push your spine upwards toward the ceiling, tucking your chin, and hold it for 15 seconds. Then, arch your back and let your stomach fall toward the floor as you look up toward the ceiling and hold that for 15 seconds.[15]
- Both of these exercises help to relieve stress on your core and your lower back muscles.
- Try inhaling on the cat stretch and exhaling on the cow stretch to get the most out of these exercises.
-
4Use your legs to stretch your obliques as you lie flat. Lie flat on your back with your knees bent upward and your feet on the floor. Drop your legs down to the left, letting your knees touch the floor. Hold this position for about 5 seconds, then drop your legs down to the right.[16]
- Your hips and feet might lift off the ground just slightly as you do this stretch, which is fine!
- You’ll feel this stretch in your obliques and your lower back.
-
5Stand up to stretch your obliques further. Stand straight up with your feet about shoulder-width apart. Lift your hands up toward the ceiling, then slowly lean your torso over to the right, keeping your legs straight. Hold this position for 3 to 5 seconds, then lean to the left.[17]
- This is a great stretch for the sides of your torso and your abs.
- You can do this in addition or instead of the oblique stretch lying down.
-
6Use a yoga ball for a deep ab stretch. Lie back on a yoga ball, keeping your feet on the ground with your torso facing the ceiling. Extend your arms upward and let them hang above your head to really feel the stretch in your abs. Hold this pose for about 10 seconds, and stop if you feel a twinge in your lower back.[18]
- If you have any lower back problems, this stretch may be too intense for you. Take it slow, and stop if you feel any sharp pain.


Community Q&A
-
QuestionHow do you do hip dips for beginners?
 Babis KanellopoulosBabis Kanellopoulos is a Personal Trainer and the Owner of Pod Fitness in London, UK. Babis specializes in helping clients use fitness to overcome difficulties and gain self-confidence. He has experience in kickboxing, long distance running, and martial arts. Pod Fitness sessions combine the focus of personal training with the benefits of small group, personalized, and structured training.
Personal TrainerMake sure that your core is in engaged at all times, your bellybutton is sucked in, and your neck stays straight and relaxed.
Warnings
- If you feel a pinch in your lower back, straighten your spine to align your neck with your torso.Thanks!


References
- ↑ https://www.youtube.com/watch?v=em4gADvYvMA&feature=youtu.be&t=9
- ↑ https://www.youtube.com/watch?v=em4gADvYvMA&feature=youtu.be&t=9
- ↑ Babis Kanellopoulos. Personal Trainer. Expert Interview. 6 July 2021.
- ↑ https://www.youtube.com/watch?v=XAT8SDAj5EM&feature=youtu.be&t=19
- ↑ Babis Kanellopoulos. Personal Trainer. Expert Interview. 6 July 2021.
- ↑ https://www.youtube.com/watch?v=XAT8SDAj5EM&feature=youtu.be&t=20
- ↑ https://www.youtube.com/watch?v=onrtqZL5L20&feature=youtu.be&t=5
- ↑ Babis Kanellopoulos. Personal Trainer. Expert Interview. 6 July 2021.
- ↑ https://www.youtube.com/watch?v=em4gADvYvMA&feature=youtu.be&t=33
- ↑ Babis Kanellopoulos. Personal Trainer. Expert Interview. 6 July 2021.
- ↑ https://www.youtube.com/watch?v=XAT8SDAj5EM&feature=youtu.be&t=28
- ↑ https://www.youtube.com/watch?v=em4gADvYvMA&feature=youtu.be&t=44
- ↑ https://www.youtube.com/watch?v=rCxF2nG9vQ0&feature=youtu.be&t=61
- ↑ https://www.youtube.com/watch?v=3Wn0-JyAZm8&feature=youtu.be&t=8
- ↑ https://www.acefitness.org/education-and-resources/lifestyle/exercise-library/15/cat-cow/
- ↑ https://www.youtube.com/watch?v=VSJUfWO6Zv8&feature=youtu.be&t=4
- ↑ https://www.youtube.com/watch?v=9fl5X-GwDi4&feature=youtu.be&t=5
- ↑ https://www.youtube.com/watch?v=hiMeDj1jj5I&feature=youtu.be&t=331
About This Article