This article was co-authored by wikiHow Staff. Our trained team of editors and researchers validate articles for accuracy and comprehensiveness. wikiHow's Content Management Team carefully monitors the work from our editorial staff to ensure that each article is backed by trusted research and meets our high quality standards.
This article has been viewed 1,640 times.
Learn more...
Vinyl is a great crafting material that you can use to create your own custom designs to apply to t-shirts, windows, and just about anything else. Cutting vinyl is actually easier than you might think. To cut a design or image out of vinyl, you’ll need an electronic cutting machine. But you can also cut simple shapes out of vinyl paper with scissors or a craft knife.
Steps
Method 1
Method 1 of 2:Using an Electronic Cutting Machine
-
1Get an electronic cutting machine if you don't already have one. Vinyl cutting machines like a Cricut or a Silhouette are easy to load vinyl paper into and simple to operate. They work by using software on a computer connected to the machine to design and size images that can then be printed and cut on the vinyl paper loaded in the machine.[1]
- You can purchase electronic cutting machines at craft stores or online.
-
2Use the cutting machine software to prepare your design. The first thing you need to do when you’re cutting vinyl with a machine is make sure the design file is ready to be used by your cutting machine. Different cutting machines may require different types of digital files to print and cut your design, so you need to make sure that your cut file is set up so it’s compatible with your machine.[2]
- Most machines accept SVG files, .studio, .png, .dxf, or .jpeg file types. If you’re not sure, check the owner’s manual of your cutting machine.
- Make sure the design is scaled to the size you want.
Tip: You can go online to search for free cut files that you can download and use.
-
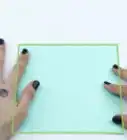
3Place the vinyl paper onto the cutting mat with the backing-side down. Put your adhesive vinyl paper onto the mat with the color side facing up and smooth out any wrinkles or bubbles with your hands.[3]
- If your vinyl is on a roll, cut off a piece that fits onto the cutting mat.
-
4Adjust the cut settings for the type of vinyl you are using. Use your cutting software to choose the type of vinyl you’re using. Different types of vinyl may require different settings in order for your machine to effectively cut the material.[4]
- For example, glitter vinyl will require different cut settings than glossy vinyl.
-
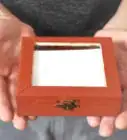
5Load the cutting mat and cut the vinyl. Insert the cutting mat where it’s indicated on your machine and make sure it’s properly attached and won’t fall out. Use your cutting software to start the machine and cut the vinyl.[5]
- Do not interrupt or touch the vinyl while it’s being cut.
-
6Use a weeding hook to remove any excess vinyl. “Weeding” is the process of removing the excess vinyl around your design so you’re left with just the cut vinyl. Use a weeding hook and pry up and remove the vinyl surrounding your design.[6]
- You can purchase weeding hooks online or at your local craft or hobby store.
- If you can’t see the cut lines in the vinyl, try gently bending it so they’ll separate a little and you can see them better.
-
7Apply the vinyl design. Remove the adhesive backing and place one end of the vinyl on the surface. Apply the vinyl slowly and smooth it out with your fingers as you go. Once the vinyl has been attached, apply firm pressure and use your hands to rub the vinyl so the adhesive binds with the surface.[7]


Method 2
Method 2 of 2:Cutting by Hand
-
1Use scissors to cut simple shapes out of your vinyl paper. Cutting vinyl by hand makes it difficult to cut intricate shapes out of adhesive vinyl paper, so it’s best to stick to basic shapes like triangles and squares. Take a pair of scissors and cut out some shapes from your adhesive vinyl paper.[8]
Tip: Use scrap vinyl paper to cut by hand so it doesn’t go to waste!
-
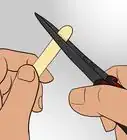
2Use a craft knife if you're trying to cut out intricate designs. You can trace a design onto vinyl paper and use a sharp craft knife to cut it out. Lay the vinyl paper on a cutting surface with the adhesive backing down. Apply pressure with the knife to cut through the paper and then remove your cut design by separating it along the cut lines.[9]
- Be very careful when using a craft knife as the blade is very sharp.
-
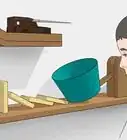
3Apply the vinyl to your surface. When you have enough shapes cut out of your vinyl that you want to use, peel off the sticky backing of the vinyl and place one end of the vinyl on the surface you want to attach it to. Gently apply the rest of the sticky paper to the surface and smooth it out with your fingers as you go.[10]
- Use your hands to push out any bubbles or wrinkles that form in the vinyl.
-
4Hold pressure on the vinyl shape for 10 seconds. To make sure the vinyl fully adheres to the surface, use your hands to apply firm pressure and hold it for about 10 seconds. Then slowly release the pressure.[11]


Things You’ll Need
Using an Electronic Cutting Machine
- Electronic cutting machine
- Vinyl paper
- Weeding hook
- Cutting mat
Cutting by Hand
- Scissors or craft knife
- Vinyl paper
References
- ↑ https://www.creativecuttingclassroom.com/blogpost/cutting-applying-adhesive-vinyl
- ↑ https://blog.signwarehouse.com/basic-guide-to-cutting-vinyl-with-a-cricut-craft-robo-or-cameo/
- ↑ https://www.creativecuttingclassroom.com/blogpost/cutting-applying-adhesive-vinyl
- ↑ https://blog.signwarehouse.com/basic-guide-to-cutting-vinyl-with-a-cricut-craft-robo-or-cameo/
- ↑ https://blog.signwarehouse.com/basic-guide-to-cutting-vinyl-with-a-cricut-craft-robo-or-cameo/
- ↑ https://www.creativecuttingclassroom.com/blogpost/cutting-applying-adhesive-vinyl
- ↑ https://www.creativecuttingclassroom.com/blogpost/cutting-applying-adhesive-vinyl
- ↑ https://www.creativecuttingclassroom.com/blogpost/cutting-applying-adhesive-vinyl
- ↑ https://www.creativecuttingclassroom.com/blogpost/cutting-applying-adhesive-vinyl
About This Article