X
wikiHow is a “wiki,” similar to Wikipedia, which means that many of our articles are co-written by multiple authors. To create this article, volunteer authors worked to edit and improve it over time.
This article has been viewed 15,138 times.
Learn more...
Origami is the Japanese tradition of folding paper into art. Not only can it be beautiful, but also therapeutic for the mind, body, and soul. For those interested in more advanced designs and making a unique piece of art, the Three-Intersecting Tetrahedron has what you are looking for in spades.
Steps
Part 1
Part 1 of 4:Making the Arms of Each Tetrahedron
Part 1
-
1Cut each paper into equal thirds. Start with one strip.
-
2Fold in half length-wise. Open fold. Then fold each side in toward the “half” crease length-wise again.
-
3Choose an end to start with. Very gently fold the right side in like in the previous step, but only crease about an inch down the length of the paper. Unfold to show that crease.
-
4Fold the corner of the left side in until the point touches the crease made in the step above.
-
5Unfold the left side for about an inch from the top while pinching below the point where all the creases come together, to hold it in place.
-
6Pull the top left corner in along all the angular creases to create an equilateral triangle perpendicular to the rest of the piece of paper.
-
7Fold the triangle in half, upwards (using the already made creases) to recreate the point on the left half of the paper.
-
8Fold the right corner in half-way. Then fold again, making sure to line up the top point in the center of the paper.
- Be sure this step is produced two folds on the right side.
-
9Repeat this process for the other end of the strip.
-
10Fold the paper length-wise down the middle with the back-side up.
- Be sure that the left sides of both ends have been made into a small grove.
-
11Repeat for all of the remaining 17 cut pieces of paper.


Part 2
Part 2 of 4:Creating the First Tetrahedron
Part 2
-
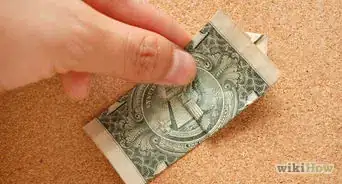
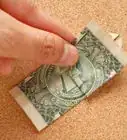
1Attach two strips together at one end. To do this, slide the folded over right edge of one strip, into the hollow opening (made by folding the equilateral triangle previously) in the left end of a separate strip.
- Do not attach both edges of one side together (as demonstrated in the third picture above). If you'd like, glue the edges together for lasting stability.
-
2Repeat with a third strip for that end.
-
3Secure the third strip to the first one to create a point with three “legs”, like a tripod.
-
4Use the same technique (right edge to left edge) to attach another strip to each leg of the tripod to create the base.


Part 3
Part 3 of 4:Interlocking the Second Tetrahedron
Part 3
-
1Start the second tetrahedron by repeating the process for the first one. However, only fully attach one strip to begin the base.
-
2Secure a strip to one leg. Before securing the strip to the next leg of the second tetrahedron, weave the strip through the center of the first tetrahedron and attach.
-
3Attach the last strip, again, through the first tetrahedron.
- At this point, if one of the tetrahedron is help upside down, the model will resemble an hourglass.


Part 4
Part 4 of 4:Interlocking the Final Tetrahedron
Part 4
-
1Place the model with the first tetrahedron base down and pointing up. The second tetrahedron should be “on its side” in the center of the first.
-
2Weave the first arm of the final tetrahedron through the middle of the second tetrahedron, but not through the first one.
-
3Repeat with a second arm so it mirrors the weaving on the opposite side of the first tetrahedron. Note that the top point of the final tetrahedron is starting to form here.
-
4Attach the third arm to the other two. This arm will not intersect any of the other tetrahedron.
-
5With the point previously facing you, weave the third arm to create the tripod. This time, weave it straight down through the first tetrahedron only.
-
6Weave the remaining two arms through both of the tetrahedrons, and attach.


Community Q&A
-
QuestionIs this for origami beginners?
 Community AnswerIt is not advised to be! Try out simpler origami before going on to this, so you can hone your skills more.
Things You'll Need
- 6 square pieces of paper (2 sheets per color)
- Ruler
- Scissors
- Glue (optional)