wikiHow is a “wiki,” similar to Wikipedia, which means that many of our articles are co-written by multiple authors. To create this article, volunteer authors worked to edit and improve it over time.
This article has been viewed 3,950 times.
Learn more...
The Maker Movement is said to have begun around 2006, with the establishment of Maker Media, and the first Maker Faire.[1] Makerspaces can be found in schools, libraries, and community centers, with tools ranging from knitting needles to laser cutters.[2] But the Maker Culture didn’t begin in the 21st century. Throughout history, people have been making items for their daily use. In colonial times, families needed a number of skills to be able to create what they needed for daily living. Many tools and techniques from the 1700s can be replicated today, and students can have a hands-on history experience.
Steps
Method 1
Method 1 of 9:Setting Up a Makerspace
-
1Involve the community.
- Visit local elementary, middle, and high schools.
- Contact teachers about the schools' history curriculum.
- Create interactive presentations appropriate to the grade level you're targeting.
- Meet with service organizations such as Kiwanis, Rotary, and Lions Clubs.
- Host events in the community or local businesses.
- Contact recreation centers like bowling alleys or miniature golf courses in your area.
- Publicize your event through local media.
- Visit local elementary, middle, and high schools.
-
2Obtain your resources. People in colonial times made use of whatever resources were available. The American Association of School Libraries offers suggestions on how to acquire the materials needed to set up a space:[3]
- Make a list of items you need.
- Ask local businesses and community organizations to provide space for collection boxes.
- Look for vintage items in thrift stores.
Advertisement -
3Find sources of funding.
- Contact local businesses for donations.
- Publicize your sponsors' donations.
- Apply for a grant.
- Search for grants online. A list of available grants can be found at https://www.grants.gov/web/grants
- Write a cover letter outlining your project.
- Fill out all the necessary paperwork.
- Contact local businesses for donations.
-
4Start making things. The project possibilities are endless, but a few ideas for basic 18th-century projects can get you started.Advertisement


Method 2
Method 2 of 9:Creating a Hands-On Experience With a Makerspace
-
1Teach the technology of the era. Life in Colonial America presented many challenges. Introduce your students to the tools and skills the colonists needed to survive and create communities.
- Have the students plan a project around the materials and tools used in the 18th Century. Consider what problems colonists faced, such as how to create shelters for harsh winters and what kind of food and clothing they would need.
-
2Plan projects teaching what life was like for other cultures in the colonies.Advertisement
Method 3
Method 3 of 9:Making Quilt Squares
-
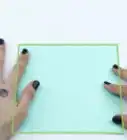
1Create your quilt background with felt squares.
- Select the color you want for your background.
- Cut the squares to the desired size.
- 12"x12" is a recommended for most projects, but you can use any size that suits your project.
- Decorate your squares using one or more of the techniques outlined below.
-
2Decorate your squares with ready-made appliques.
- Shop in dollar stores and craft stores for decorative appliques.
- Attach appliques to background felt with fabric glue, or use adhesive-backed appliques.
-
3Create designs to decorate your squares.
- Create your own designs or search for quilt square patterns. There are hundreds of free public domain patterns online.
- Print out the patterns and trace them onto fabric.
- Cut out designs and attach to the felt backing by gluing or stitching.[4]
-
4Attach scraps of fabric to the felt squares for a "crazy quilt" effect.
- Cut fabric in random geometric shapes and sizes.
- Lay fabric shapes side by side until the felt base square is covered.
- Pin or glue shapes in place.
- Stitch pinned shapes onto the base square.
-
5Display your quilt square. Frame and display individual squares, or sew or glue the squares to a backing fabric to create a quilt.Advertisement


Method 4
Method 4 of 9:Making a Branch Loom
-
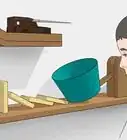
1Find a sturdy Y-shaped branch.
-
2Clean off the dead leaves and remove all bark from the branch.
-
3Tie the end of the warp (lengthwise string) to the middle of the branch’s V.
-
4Wind the warp string around the V until you reach the desired length.
-
5Thread the string for the weft (crosswise string) into a large needle.
-
6Using the needle, weave the weft string by going over and under the warp string.
- Change the yarn you are using for weaving by tying another yarn to the end and threading it through the needle.
-
7Tie off your yarn when you are done and trim any loose ends with scissors.Advertisement


Method 5
Method 5 of 9:Creating a Paper Whirligig
-
1Take a paper plate and color it with crayons, pencils, or paint.
- Using paint or ink is more consistent with 18th century art.
-
2Cut the plate in a spiral pattern.
-
3Punch a hole in the center of the plate.
-
4Tie the string in the hole so the toy can move freely.
-
5Tie the whirligig to a tree branch or drag it along like a kite.Advertisement


Method 6
Method 6 of 9:Creating a Silhouette
-
1Tape a piece of white paper on the wall.
-
2Have the subject of the picture sit so the beam of the flashlight or candle casts their shadow in profile on the paper.
-
3Trace the outline of the subject's shadow.
- Cut the profile from the white paper.
-
4Mount the profile for display.
- Glue the profile to black construction paper for a cameo effect, or glue a piece of black paper to the cut-out profile for a shadow effect.
Advertisement


Method 7
Method 7 of 9:Making a "Silver Plate" Tray
-
1Use a Styrofoam tray as the base of your silver plate tray.
- Trays can be obtained online, or you can clean and recycle meat trays.
-
2Squirt some white glue in a paper plate.
-
3Drag pieces of string through the glue.
-
4Place string on the Styrofoam tray to make designs.
-
5Cover the tray with aluminum foil.
- Smooth the foil so the designs underneath are visible.
- Fold the foil around the the back of the tray and secure it by gluing.
-
6Press (engrave) designs into the foil with a toothpick being careful not to tear the foil.Advertisement


Method 8
Method 8 of 9:Making a Pierced Tin Plate
-
1Tape a disposable aluminum pan or pie plate to your work surface.
-
2Create or download a pattern for piercing the plate.
-
3Tape the pattern to the plate.
-
4"Draw" the pattern with by piercing through the plate with a pointed instrument such as a needle or pushpin.
-
5Use indelible markers to add color to the plate, if desired.Advertisement


Method 9
Method 9 of 9:Making a Tin Candle Holder
-
1Wash and remove labels from an empty can.
- Any size will work fine. Cat food and soup cans work well.
-
2File any sharp edges to prevent cuts.
-
3Create a design template.
- Create an original design or download one from the Internet.
- Cut a strip of paper long enough to go around the can.
- Remove the paper from the can.
- Draw your design.
- Use a marker to draw the design as a series of dots.
-
4Fill the can with water and freeze to prevent the can from collapsing.
- Be sure to protect your hands when handling the frozen can.
-
5Pound your design into the can.
- Tape the design template around the can.
- Secure the can in a vise or other tool.
- Use a hammer and nail to punch holes into the can.
- Remove the can from the vise.
-
6Illuminate the lantern with a candle.Advertisement


Warnings
- Make sure children have adequate supervision when attempting any projects using sharp instruments.Thanks!
- Use proper caution when handling sharp tools and materials.Thanks!
Things You'll Need
Quilt Squares
- Felt squares (approximately 12"x12")
- White glue (recommended for children unable to use needle and thread)
- Needle and thread
- Decorative items like fabric scraps and ribbons
Whirligig
- Paper plate
- Scissors
- String or twine (approximately 12 inches)
- Coloring items, e.g. crayons, paint, and marking pens
- Hole punch
Silhouette
- 1 2'x3' foot piece of white or craft paper
- 1piece of black construction paper
- Pencil
- Tape
- 1 candle, or for those who don't want to handle fire, 1 flashlight and 1 shoe box
"Silver Plate" Tray
- Styrofoam tray
- Aluminum foil
- String
- Paper plate
- White glue
- Toothpick or other tool for engraving
Pierced Tin Plate
- Small tin or aluminum plate
- Pushpins
- Indelible markers (optional)
- Ribbons or other decorative items (optional)
Tin Candle Holder
- Empty aluminum can
- Hammer and nails
- Vise or holder for the can
- String