This article was written by Darlene Antonelli, MA. Darlene Antonelli is a Technology Writer and Editor for wikiHow. Darlene has experience teaching college courses, writing technology-related articles, and working hands-on in the technology field. She earned an MA in Writing from Rowan University in 2012 and wrote her thesis on online communities and the personalities curated in such communities.
This article has been viewed 1,816 times.
This wikiHow will teach you how to convert RAW files to JPG format to make them smaller, easier to share, and more user-friendly. You can use a web browser on your desktop or mobile phone and tablet or you can use GIMP with an extension to do this easily.
Steps
Method 1
Method 1 of 2:Using GIMP and RawTherapee
-
1Download and install GIMP from https://www.gimp.org/downloads/ (if you don't have it). It's a free image editing software that you can download on both Mac and Windows.
-
2Download and install RawTherapee from https://rawtherapee.com/downloads/. It's a free download for Mac and Windows.
- Double-click the downloaded file to run the installer wizard. If you have a Mac, this will include dragging the icon to your Applications folder in Finder.
-
3Open RawTherapee. It should open immediately after the installation, but, if not, you'll find this in the "Recently added" section of your Start menu or in your Applications folder.
-
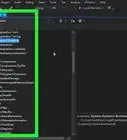
4Click the preferences icon that looks like a vertical switch board. You'll see it in the bottom left corner of the application window.
-
5Click to select "GIMP installation directory" and select your computer name from the drop-down. It's under the "External Editor" header. If you're using RawTherapee with Photoshop or some other photo editor, make sure to change the settings appropriately here.
-
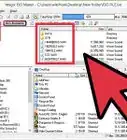
6Navigate to your GIMP directory. Your path could look like this: "Program Files > GIMP 2" if that's where your GIMP 2 is installed.
-
7Click Open and Ok. This will close the pop-up windows.
-
8Close RawTherapee. You can click the x in the top right corner of the app to close it.
-
9Open GIMP. You'll find it in your Start menu or Applications folder in Finder.
-
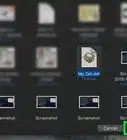
10Drag and drop your RAW file to GIMP. It should open with a greeting pop-up dialog window.
- Click OK to continue using the RAW file in RawTherapee plugin for GIMP.
-
11Close the RawTherapee window. Click the x in the top right corner of the application window. The RAW photo will open in GIMP.[1]
-
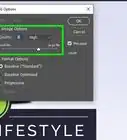
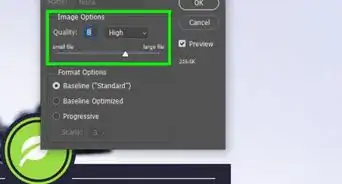
12Export the file to JPG. Click File > Export and give the file a name and save location.
- Click Select File Type (By Extension) to see a list of all the file formats you can use.
- Select JPEG image and click Export.[2]


Method 2
Method 2 of 2:Using a Web Browser
-
1Go to https://www.zamzar.com/convert/raw-to-jpg/ in a web browser. You can use any web browser on either Windows, Mac, iPhone, iPad, or Android to use Zamzar to convert RAW files to JPG.
- Zamzar is a free online converter that you don't need to sign up for an account to use. If you want upgraded perks, you can sign up for a free account or pay for even better upgrades.
-
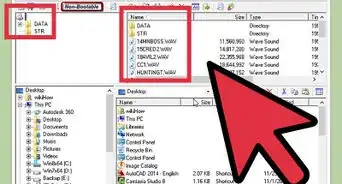
2Click or tap Add Files. Your file manager will open for you to select your RAW file. You can select multiple files, but you're limited to 50mb per session.
-
3Navigate to your RAW file and double-click it. You'll see the name of your file replace "Step 1" as the progress bar fills.
-
4Select "jpg" from the drop-down list in Step 2. If this is already selected, move on to the next step.
-
5Click or tap Convert Now. You'll see your conversion progress in the bar below "Step 3."
-
6Click or tap Download. It's a dark blue button to the right of your converted file's name.
-
7Name your file and click Save. Your file manager will appear and you can change the file name and save location before continuing.


About This Article

1. Download and install GIMP from https://www.gimp.org/downloads/ (if you don't have it).
2. Download and install RawTherapee from https://rawtherapee.com/downloads/.
3. Open RawTherapee.
4. Click the preferences icon that looks like a vertical switch board.
5. Click to select "GIMP installation directory" and select your computer name from the drop-down.
6. Navigate to your GIMP directory.
7. Click Open and OK.
8. Close RawTherapee.
9. Open GIMP.
10. Drag and drop your RAW file to GIMP.
11. Close the RawTherapee window.
12. Export the file to JPG.