This article was written by Travis Boylls. Travis Boylls is a Technology Writer and Editor for wikiHow. Travis has experience writing technology-related articles, providing software customer service, and in graphic design. He specializes in Windows, macOS, Android, iOS, and Linux platforms. He studied graphic design at Pikes Peak Community College.
The wikiHow Tech Team also followed the article's instructions and verified that they work.
This article has been viewed 15,522 times.
This wikiHow teaches you how to convert a PNG file to a DWG file using a free-trial of converter software, or using Adobe Illustrator which is a professional software that is not free. A PNG file is a type of image file whereas DWG stands for "drawing" and is a file format mostly used for AutoCAD. It is recommended that you only convert simple line drawings to the DWG format as complicated things like photographs will not convert easily. Highly detailed images with lots of colors will be difficult to convert and drain your computer's resources.
Steps
Method 1
Method 1 of 2:Using ReaConverter
-
1Go to https://www.reaconverter.com/download in a web browser. Using your preferred web browser, go the ReaConverter download page.
-
2Click Download Standard. This will begin the download of the installation file for ReaConverter. ReaConverter Standard costs $49.99, but offers a free 15-day trial before purchasing. ReaConverter Lite is free, but does not convert files to DWG format. ReaConverter does not offer a Mac version of the software.
-
3Double-click the installation file. It's the file named "ReaConverterStandard-Setup.exe". Follow the installation prompts to begin the installation.
- By default, downloads are usually located in the "Download" folder.
-
4Open ReaConverter. Once it is installed, click Finish to launch the program after installation or you can double-click the ReaConverter application icon to start the program. It's the app with an image of a toaster.
-
5Click Continue to start the 15-day trial period. It's the button on the bottom-right of the pop-up window. You will need to purchase ReaConverter Standard to continue to use the software after the trial period. During the free trial period, you will only be able to convert five files per conversion.
-
6Click + add files. It's in the upper-left corner of the window, under the "Files and folders" tab.
-
7Click Add files. It's near the top of the drop-down menu.
-
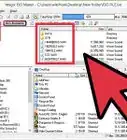
8Select the PNG file you want to convert. Go to the folder that contains the PNG file you want to convert and select the file.
-
9Click + next to "Convert to". It's the plus sign "+" next to "convert to" at the bottom of the window. This will open a page with additional file types.
-
10Select DWG. It's in the first column under "D".
-
11Click Start. It's the green button in the bottom-right of the window. This begins converting the file. Allow a few minutes for the image to convert.
-
12Click Show converted files. It's the button on the bottom of the window next to the red "Close" button. This opens the folder where the converted DWG file has been saved.


Method 2
Method 2 of 2:Using Adobe Illustrator
-
1Open Adobe Illustrator. It's the orange icon that says "Ai" on a dark background.
-
2Click File. It's in the menu at the top of the program window. This opens a drop-down menu.
-
3Click Open. It's near the top of the drop-down menu.
-
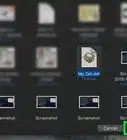
4Select your PNG image. Go to the folder that contains your PNG file and click on it.
-
5Click Open. It's in the bottom-right of the file explorer window.
-
6Click the selection tool in the tool bar. It's the black arrow at the top of the toolbar on the left.
-
7Click and drag to select the entire image. You can also select everything by pressing Ctrl+A instead.
-
8Click Window. It's in the menu at the top of the Illustrator window. This opens a drop-down menu with additional options.
-
9Click Image Trace. This opens an "Image Trace" pop-up window with additional options.
-
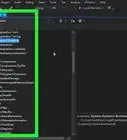
10Click the drop-down menu next to "Mode" and select a tracing mode. This will open a drop-down menu with the following options:
- Color: convert the colors in the image, each color as its own object.
- Grayscale: converts each color as a different object with a different shade of gray.
- Black and white: if you want to only convert drawn areas to black and blank areas to white.
-
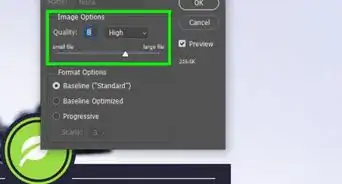
11Adjust the trace settings to your liking. You can adjust any of the sliders and options to change the image to your liking.
- You can click the checkbox for "Preview" to see how the image will look once it is converted.
-
12Click Trace. The image will now be converted into a vector format.
-
13Click File. It's in the menu at the top. This opens the main file options drop-down list.
-
14Click Export. It's in the middle of the drop-down list about halfway down. This opens a small pop-out menu with additional options.
-
15Click Export As. It's the second option in the middle of the pop-out menu.
-
16Click the "Save as type" drop-down box and select "AutoCAD Drawing". It's near the top of the drop-down list of file types.
-
17Click Export. Once you've given your file a new name and selected a location in the file explorer window, click the "Export" button in the bottom-right corner of the "Export" window. This opens a compatibility window.
-
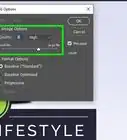
18Select an AutoCAD version and click OK. Select the version that is compatible with the version of AutoCAD you use in the drop-down box, then click "OK" when you are ready to save the file. Your PNG image is now saved to the .DWG format.


About This Article