This article was written by Nicole Levine, MFA. Nicole Levine is a Technology Writer and Editor for wikiHow. She has more than 20 years of experience creating technical documentation and leading support teams at major web hosting and software companies. Nicole also holds an MFA in Creative Writing from Portland State University and teaches composition, fiction-writing, and zine-making at various institutions.
The wikiHow Tech Team also followed the article's instructions and verified that they work.
This article has been viewed 67,446 times.
This wikiHow teaches you how to convert a Microsoft Excel file (.XLS) to the .DAT format on a Windows PC. You’ll begin by converting the .XLS file to .CSV (comma separated values) format, and then you can convert to .DAT in an app like Notepad.
Steps
Part 1
Part 1 of 2:Converting to .CSV
-
1Open Microsoft Excel. It’s in the Microsoft Office group of the All Apps section of the Windows/Start menu.
-
2Click the File menu. It’s near the top-left corner of the screen.
-
3Click Open.
-
4Click the file you want to convert. The file will open in Excel.
-
5Click the File menu.
-
6Click Save as….
-
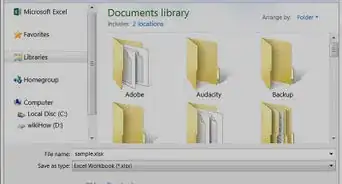
7Navigate to the folder where you want to save the file.
-
8Click the “Save as type” drop-down menu. A list of file types will appear.
-
9Select CSV (Comma delimited)(*.cvs). This will create a file that can be converted to .DAT format.
-
10Type a name for the file. It goes into the “File name” field. If you want to accept the current name you can skip this step.
-
11Click Save. A confirmation message will appear.
-
12Click OK. The .CSV file is saved and ready to be converted.


Part 2
Part 2 of 2:Converting the .CSV to .DAT
-
1Press ⊞ Win+E. This opens the file explorer.
-
2Navigate to the folder where you saved the .CSV file. Don’t click the file once you open the folder, just bring it onto the screen.
-
3Right-click the file to convert.
-
4Select Open with…. A list of apps will appear.
-
5Click Notepad. The file will open in the Notepad app.
-
6Click the File menu. It’s near the top-left corner of Notepad.
-
7Click Save As….
-
8Click the “Save as type” drop-down menu. It’s below the “File name” field. A list of file types will appear.
-
9Select All Files (*.*). Choosing this option allows you to specify your own file extension.
-
10Rename the file with .DAT at the end. For example, if the “File name” field currently says Book1.txt, change it to Book1.dat.
- It doesn’t matter whether the letters in .DAT are capital or lowercase.
-
11Click Save. The original file is now saved in the .DAT format.


About This Article