X
wikiHow is a “wiki,” similar to Wikipedia, which means that many of our articles are co-written by multiple authors. To create this article, volunteer authors worked to edit and improve it over time.
This article has been viewed 12,565 times.
Learn more...
With the increasing popularity and utility of digital image-editing software like Photoshop, manipulating photos to improve them has been so much easier. The airbrush tool allows you to achieve greater control over your design/image by using additional layers to hold the brushstrokes. You can even remove imperfections in a person’s skin by "airbrushing."[1]
Steps
Part 1
Part 1 of 5:Isolating an Area and Duplicating into Layers
Part 1
-
1Launch your Adobe Photoshop software. Locate the application your computer and double click to open.
-
2Select a photo you want to edit. Go to the "File" menu and click "Open." Find and select the photo you want to edit. It’s best to select a photo with high resolution since you’re dealing with fine details. A 10-megapixel image should suffice.Advertisement
-
3Use the Lasso tool. Select a portion of the photo with skin.
-
4Duplicate that area by pressing Ctrl + J twice. You will now have two layers.[2]
-
5Rename the top layer “High Pass.” Also rename the middle layer “Low Pass.”Advertisement


Part 2
Part 2 of 5:Working on the Low Pass Layer
Part 2
-
1Hide the High Pass layer. Do this by selecting the "High Pass" layer and clicking on the eye icon to the left of the layer.
-
2Select the "Low Pass" layer. Select "Filter" then "Blur" from the menu.
-
3Set the radius and threshold. First, choose "Surface Blur." Then adjust in a way that the image becomes blurry but still recognizable.[3]
-
4Adjust the threshold to where the edges become sharp. When you’re done, adjust the radius so the skin becomes smooth.Advertisement


Part 3
Part 3 of 5:Working on the High Pass Layer
Part 3
-
1Select the "High Pass" layer. Click on the eye icon in the left to reveal this layer.
-
2Change the layer blending mode to Linear Light. Do this by clicking the drop-down menu above your layer list and choosing the option.
-
3Add a layer mask.[4] For a natural look, you will need to reduce the visibility of bumps on the darker skin-toned sides of the skin. To simulate this effect, add a layer mask by going to Layer > Layer Mask > Reveal All.
-
4Use the "Apply Image" tool. Apply a copy of the image on the mask.
-
5Click the thumbnail of the High Pass layer.Advertisement


Part 4
Part 4 of 5:Applying Filters
Part 4
-
1Zoom in to 100% somewhere close to the skin. Select "High Pass" filter. [5] You can find this option by expanding the "Filter" menu then "Other."
-
2Adjust the Radius until the skin looks natural. It’s best to adjust in tiny increments.
-
3Click the thumbnail on the layer mask. This is located in the layers palette.
-
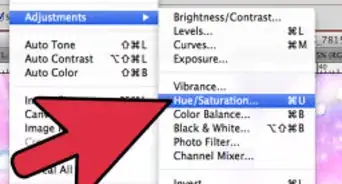
4Adjusts the contrast and brightness. Head to Image > Adjustments > Brightness/Contrast. Increase the contrast and adjust the brightness to the bumps on the skin.
- The bumps are less visible on darker areas and more visible in bright areas.
Advertisement


Part 5
Part 5 of 5:Creating a Layer Mask for Areas Not on the Skin
Part 5
-
1Select the top two layers. Press Ctrl + G.
-
2Hide the layers. Go to Layers > Layer Mask > Hide All.
-
3Add a new layer. Add it above the "High Pass" layer.
-
4Fill this with the color red. Change the opacity of the layer to 50%.
-
5Select the "Group Layer Mask." Do this by clicking the black thumbnail in the layers palette.
-
6Use the the brush tool and paint over the skin.[6] This will make the smooth skin effect visible over areas you paint.
-
7Select a large-diameter brush. Just right-click anywhere on the canvas and select a large-diameter brush with 50 hardness.
-
8Start painting the skin. Fill the tiny spots with a smaller brush. Precision isn’t too required here, as small flaws aren’t noticeable
-
9Delete the red fill layer when you finish. Done!Advertisement


References
- ↑ https://www.splento.com/blog/press-releases/what-is-photo-retouching-and-why-you-need-it/
- ↑ https://www.photoshopessentials.com/basics/understanding-photoshop-layers/
- ↑ https://helpx.adobe.com/il_en/photoshop-elements/using/blur-filters.html
- ↑ https://www.youtube.com/watch?v=PsR8BVgd7P0
- ↑ https://www.creativebloq.com/features/the-ultimate-guide-to-photoshop-filters
- ↑ https://www.youtube.com/watch?v=068PxT2Xt-s
About This Article
Advertisement