wikiHow is a “wiki,” similar to Wikipedia, which means that many of our articles are co-written by multiple authors. To create this article, volunteer authors worked to edit and improve it over time.
The wikiHow Tech Team also followed the article's instructions and verified that they work.
This article has been viewed 108,363 times.
Learn more...
Adobe InDesign was a software publishing application released in 2002. It is useful in creating magazines, posters, newspapers, fliers and books. As well as creating high-resolution images and logos, InDesign also has many text formatting options. The software can be used in 24 languages, and it can handle characters, accents, numbers and bullets with ease. Bullets are an important function for use in flyers, brochures, books and other documents in order to organize text. This article will tell you how to add bullets in InDesign.
Steps
-
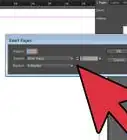
1Open Adobe InDesign and open your document.
-
2Switch to the "Type" tool and click on the text box to activate the text. Select the text where you want the bullets to begin.
- You will most likely want an introduction paragraph to a bulleted list, so be sure not to select that text.
-
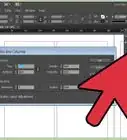
3Go to the control panel that runs horizontally above your document. Click on the icon on the far right. This will bring up an advanced menu of formatting options and special characters that are currently not on the control panel.
-
4Scroll down to the words "Bullets and Numbering" and release your click to open this formatting option.
-
5Make sure the preview option is turned on in InDesign, then wait for the "Bullets and Numbering" dialogue box to pop up.
-
6Click on "List Type" at the top of the dialogue box. It should be currently set to "None." Click on "Bullets."
-
7Choose the best bullet image to use for your project from the bullet icons. The first option is a round bullet, which is commonly used for bullets in text.
-
8Go to the "Left Indent" box and select how far you want your text to be away from the bullet. You may want to choose a low number of picas.
-
9Go to the "Right Indent" or "First Line Indent" box and use the same number you used for "Left Indent" but make the number negative. This will move your text close to the bullet and align it in your column or page.
-
10Click "OK." InDesign will automatically add bullets to any of the other paragraphs you highlighted.
- If you press "Enter" after any of the bulleted paragraphs, InDesign will automatically place a bullet at the front of the text.