Peanut Mill
About this device
| Keywords | 3D printing, food processor, kitchen appliance, grinder |
|---|---|
| Uses | industry, cooking |
| Authors | Hannah Stoll |
| Status | prototype |
| Made? | Yes |
| Replicated? | No |
| Designed in | United States |
| Materials | Plastic |
| SDGs |
SDG03 Good health and well-being SDG08 Decent work and economic growth |
| Instructions data | |
| Manufacturing files | https://www.youmagine.com/designs/peanut-mill |
| Documentation data | |
| Language | English |
| Manifest data | |
| Language | English |
| Updated | 2020-06-04 |
| Author | Kathy Nativi |
| Author affiliation | Appropedia |
| Author email | info@appropedia.org |
Peanut Mill
Project developed by Hannah Stoll
| This Open Source Appropriate Technology has been designed but not yet tested — use at your own risk. |
| This Open Source Appropriate Technology has been prototyped. |
Abstract
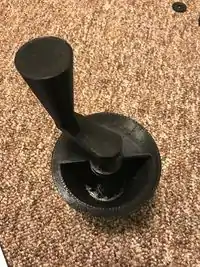
- This hand powered machine is a food processing tool that will grind peanuts down so they can be made into peanut butter. There aren't many 3D printable milling devices out there. This entire mill is 3D printed and was designed with all open source technology. Food processing mills and machines are expensive to buy, so this printable one allows people in need to have tools that work.
Bill of Materials
- Fully 3D printable (I used 1.75mm PLA filament)
- Link to Openscad and STL Files
- Bearing Bottom, 4 min, 2 g
- Bearing Top, 7 min, 4 g
- Center Rod, 18 min, 11 g
- Connector Arm, 15 min, 8 g
- Funnel, 3 hr 19 min, 111 g
- Bracket, 5 min, 2 g
- Handle, 34 min, 18 g
- Inner Grinder, 34 min, 21 g
- Outer Grinder, 1 hr 27 min, 49 g
- TOTAL: 6 hr 39 min, 226 g
Tools needed for fabrication of the OSAT
- MOST Delta RepRap or similar RepRap 3-D printer
Skills and Knowledge Necessary to Make the OSAT
Technical Specifications and Assembly Instructions
Directions for Assembly:
- Fit center rod into internal grinder
- Place it in the outer grinder
- Put bearing top on the center rod
- Slide funnel on and snap pegs to outside of outer grinder
- Line up bearing top and bottom on funnel with center rod running through them
- Plastic join the bearing top and bottom
- Plastic join the internal grinder with the bracket
- Snap on connector arm to center rod
- Snap on handle to connector arm
- Print time estimate: 6 hours 39 minutes
- Assembly time estimate: 15 minutes
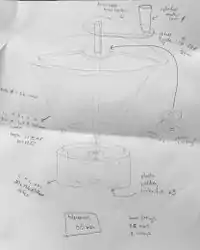
- Drawing of Assembly:
Common Problems and Solutions
- Plastic welding: The point of doing this in two places was to eliminate the need for screws and washers to make this completely printable. It is difficult, but placing the nozzle in the holes given and extruding +40 gives a good weld.
- The pegs on the funnel just snap around the outer grinder. I had an issue with the original part, but this was the quick fix.
Cost savings
- This machine can save people over $100 depending on the type of mill wanted.
- Commercial equivalent: Country Living Mill Peanut Butter Accessory
- I saved about $160 compared to the competition above. That's roughly a 97% savings.
Benefited Internet Communities
*Requests for OS 3D Printable Objects
*Food Processing Suppliers Association
*OSAT
*World Food Programme
*Action Against Hunger
References
- ↑ web page: Department of Energy (DOE) Landscaping and Energy Efficiency, DOE/GO-10095 (1995) Available: http://www.eren.doe.gov/erec/factsheets/landscape.html
- ↑ web page: Grain Mill Reviews: Basic Overview of the Different Grain Mills (Video 1 in a Series) Available: https://www.youtube.com/watch?v=2biIDfbWRIkl
- ↑ web page: Troubleshooting Guide Available:http://www.countrylivinggrainmills.com/support/grinder/
- ↑ web page: Hand Crank Mill for pregrinding nuts for Nut Butter Grinder Available:https://www.youtube.com/watch?v=G0khTvo5Ag4
[[Category:Food Processing]] [[Category:Grinder]] [[Category:Mill]]
This article is issued from Appropedia. The text is licensed under Creative Commons - Attribution - Sharealike. Additional terms may apply for the media files.