Athena Mobile Tool Effector
Files
Download the OpenSCAD library from https://github.com/phidiasllc/tool_effector. Please read the instructions on that page!
There is also a folder containing stl models of common tools at that location.
Materials and Tools
|
| ||||||||||||||
Assembly
There are two styles of tool effector, a small and a large tool effector. The small tool effector holds the print, sprung mount and small cylindrical tool mount. The large tool effector holds the microscope tool.
- Print the desired tool effector. These instructions show assembly of the small tool effector. Assembly of the large tool effector is identical.
- Clean up the print with a small flat screw driver and precision mount. DO NOT over dress the magnet pockets - magnets should fit snugly, if they are loose, reprint the part.
- Test fit the magnets in each of their pockets - they should fit snugly and all should fit flatly against the bottom of their pockets. Use the stack of magnets to insert and remove the end magnet during testing fitting. Do not let the magnets slam together!
- After ensuring the magnets fit properly in their pockets, remove them all from the pockets, keeping polarity in mind. Mix enough two part plastic epoxy to coat all the pockets in both end effector and carriages.
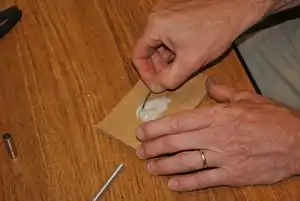 Mixing plastic epoxy.
 - Coat the interiors of all the magnet pockets with a thin layer of epoxy.
- Press the magnets into their pockets keeping in mind that the large diameter opening in the magnet points outward and the nearest neighbor magnets should attract each other in the end effector.
- Press the magnets all the way into the pockets using a non-magnetic tool or fingers (the aluminum handle of the precision knife works nicely).
- With a paper towel, wipe excess epoxy from the magnets' faces and holes ensuring that they are completely clean. After curing, excess epoxy that remains on the face of the magnets can be removed with a sharp knife, but cleaning uncured epoxy is easier.
| Athena Upgrades |
| The mobile tool effector permits easy change-out of tools on the end effector. The following require the mobile tool effector. |
| Cylindrical tool mount holds small cylindrical tools and is the simplest of the tool holders, having limited uses. |
| Sprung tool mount holds cylindrical tools in a sprung mount for pen plotting and vinyl cutting, for example. |
| Microscope holder holds USB microscopes, turning Athena into a quite good 3-axis microscope stage. |
| The fixed tool mount permits mounting and swapping of heavy, fixed tools that then work the moving workpiece. The following require the fixed tool mount. |
| Micro mill spindle mount permits attaching a micro mill spindle for small milling projects like PCB prototyping, milling small wood and plastic parts. |
| Syringe pump mount permits attachment of a 3-D printed syringe pump for printing and plotting viscous fluids. |
This article is issued from Appropedia. The text is licensed under Creative Commons - Attribution - Sharealike. Additional terms may apply for the media files.